Documentation
Motosync - Garage Management System
Thank you for Using Motosync
- Version: 1.0
- Developed By: AmwajNWD
- Created: 18 Sep, 2024
- Update: 18 Sep, 2024
If you have any questions that are beyond the scope of this help file, Please feel free to email via Item Support Page.
Get Started
Here are few necessary things you must set up in Motosync before using it.
1- Create Branches.
2- Create Warehouse.
5- Create Payment Method.
6- Create Company Category.
Branches
To Get started with Motosync you have to create the branch, you can create multiple branches as well. The branches you create will be use in whole system, when you are performing any action inside the system you can select related branch. The Branches option also allows you to track the finance related to each branch.
Create Branch
To create new branch follow the below steps:
1- Click on "Users" from sidebar.
2- Select "Branches List" from "Users" Dropdown menu in sidebar.Then Click on "+ Add Branch" Button on top right side of the "Branches List" screen.
Home / Branches List / Add Branch
Warehouses
To Get started with Motosync you have to create the warehouse after adding the branch, you can create warehouse and assign to any branch created. The warehouse you create will be use in whole system, when you are performing any action inside the system you can select related place/ warehouse.
Create Store
To create new warehouse follow the below steps:
1- Click on "Inventory" from sidebar.
2- Select "Warehouses" from sidebar.
3- Click on "+ Add Store" Button on top right side of the "Warehouses" screen
Home / Warehouses / Add Store
Update Store
To Update warehouse follow the below steps:
1- Click on "Inventory" from sidebar.
2- Select "Warehouses" from sidebar.
3- Click on Settings icon Under the warehouse table Column name "Manage", select Edit option from
"Setting icon" dropdown list.
4- Update information and click on submit button.
Home / Warehouses / Edit Store
Delete Store
To Delete warehouse follow the below steps:
1- Click on "Inventory" from sidebar.
2- Select "Warehouses" from sidebar.
3- Click on Settings icon Under the warehouse table column name "Manage", select Delete option
from "Setting icon" dropdown list.
4- Delete information and click on "Trash bin" button icon.
Payment Method
To Get started with Motosync you have to create the Payment Method, you can create Payment Method. The Payment Method you create will be use in various section, when you are performing any action inside the system.
Create Payment Method
To create new Payment Method follow the below steps:
1- Click on "Accounting Settings" from sidebar.
2- Select "Add Payment Method" from the menubar of "accounting settings" screen.
3- Popup form will appear, add Payment Method information and click on "submit" button.
Home / Accounting Settings
Update Payment Method
To Update Payment Method follow the below steps:
1- Click on "Accounting Settings" from sidebar.
2- Click on Settings icon Under the Payment Method table column name "Manage", select edit option
from "Setting icon" dropdown list.
4- popup form will appear, Update the information in form and click on "submit" button.
Home / Accounting Settings
Delete Payment Method
To Delete Payment Method follow the below steps:
1- Click on "Accounting Settings" from sidebar.
2- Click on Settings icon Under the Payment Method table column name "Manage", select delete
option from "Setting icon" dropdown list.
Home / Accounting Settings
Company Category
To Get started with Motosync you have to create the Company Category, you can create Company Category. The Company Category you create will be use in various section, when you are performing any action inside the system.
Create Company Category
To create new Company Category follow the below steps:
1- Click on "Accounting Settings" from sidebar.
2- Select "Company Category" from the menubar of "accounting settings" screen.
3- Popup form will appear, add Company Category information and click on "submit" button.
Home / Accounting Settings
Update Company Category
To Update Company Category follow the below steps:
1- Click on "Accounting Settings" from sidebar.
2- Click on Settings icon Under the Company Category table column name "Manage", select edit
option from "Setting icon" dropdown list.
3- popup form will appear, Update the information in form and click on "submit" button.
Home / Accounting Settings
Delete Company Category
To Delete Payment Method follow the below steps:
1- Click on "Accounting Settings" from sidebar.
2- Click on Settings icon Under the Company Category table column name "Manage", select delete
option from "Setting icon" dropdown list.
Home / Accounting Settings
Dashboard
Dashboard is the first Screen of this System after Login. On Dashboard you can see the Financial Overview of the system depending on the permissions you have.
1- Click on "Dashboard" from sidebar.
Garage Management System / Dashboard
- Below are the Following Functionalities in Dashboard Screen:
- Filters - Contains filters options, You can see the Statistics of Garage Management System by selecting available Filters (Monthly , Yearly, Date Ranges, Branches). By Default it is showing Current Year statistics.
- Inspection, Estimation, Job Card, Billing Job card Graph - Graph contains information of Inspections, Estimations, Job Cards and Billing Job cards monthly of 1 year. You can place cursor on graph bars to see the figures.
Accounts
This is the main Part of the system where whole accounting of the system is managed. You can manage bank accounts, chart of accounts, transfers, cheque cycle, invoices.
1- Click on "Accounts" from sidebar.
Garage Management System / Chart Of Bank Accounts
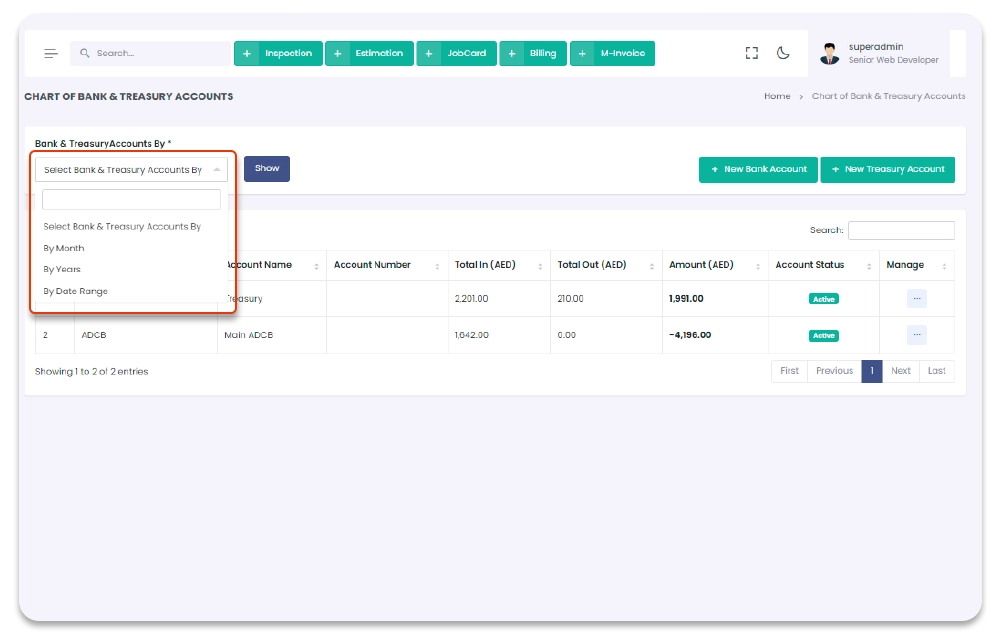
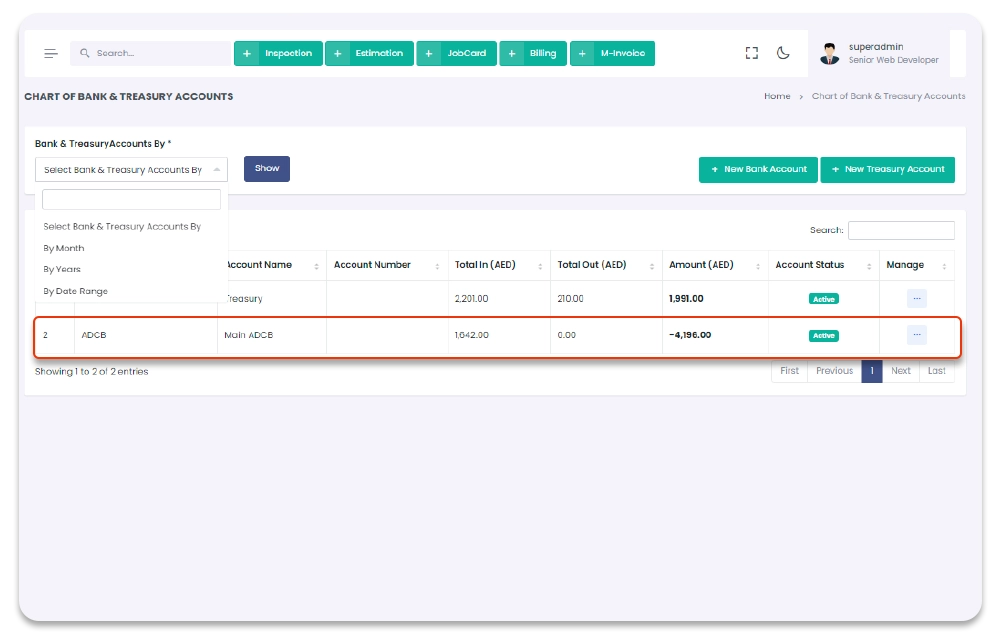
Bank & Treasury Accounts
Main bank accounts are manageable in this section. You can access this section from sidebar. When Click on Accounts from sidebar by and then "Bank & Treasury Accounts" page will open, only if you have privilege to access this page.
1- Click on "Accounts" from sidebar.
2- Click on "Bank & Treasury Accounts" from sidebar.
Garage Management System / Accounts / Chart of Bank & Treasury Accounts
Bank/Treasury Account Create
New Bank/Treasury Account - You can add new Bank/Treasury account from this page. When you click on "+ New
Bank/Treasury Account" new screen "Add Bank/Treasury Account"will open, you have to enter the
information and click on "Submit" button to add new Bank/Treasury account.
1- Click on "Accounts" from Garage Management System sidebar.
2- Then Click on "Bank/Treasury Account" then it will open (if you have privilege to access the page).
3- Click on "+ Add Bank/Treasury Account" button on the top right corner of the "Bank/Treasury Account" page.
4- After click "+ Add Bank/Treasury Account" button you will redirect to the "Add New Bank/Treasury" Pages.
5- Fill the information and click on "Submit" button to add Bank/Treasury Account.
Garage Management System / Accounts /Chart of Bank & Treasury Accounts/ Add Bank/Treasury Account
Bank/Treasury Account Update
You can update Bank/Treasury Account. To Navigate to this page and
Update Bank/Treasury Account follow the given steps:
1- Click on "Accounts" from Garage Management System sidebar.
2- Then Click on "Bank/Treasury Account" then it will open (if you have privilege to access the page).
3- Click on the icon under table column name "Manage" of the desired Bank/Treasury Account.
4- From the dropdown menu select "Edit".
5- After click "Edit" button you will redirect to the "Edit Bank/Treasury Account" Page.
6- Edit the information and click on "Submit" button to add color.
Garage Management System / Accounts /Chart of Bank & Treasury Accounts/ Edit Bank/Treasury Account
Bank/Treasury Account Delete
You can delete Bank/Treasury Accounts. To Navigate to this page and
Delete Bank/Treasury Account follow the given steps:
1- Click on "Accounts" from Garage Management System sidebar.
2- Then Click on "Bank/Treasury Account" then it will open (if you have privilege to access the page).
3- Click on the icon under table column name "Manage" of the desired Bank/Treasury Account.
4- From the dropdown menu select "Delete".
5- After click "Delete" button you will be asked for a "Confirmation".
6- When you confirm the Bank/Treasury Account will be deleted.
Garage Management System / Accounts /Chart of Bank & Treasury Accounts
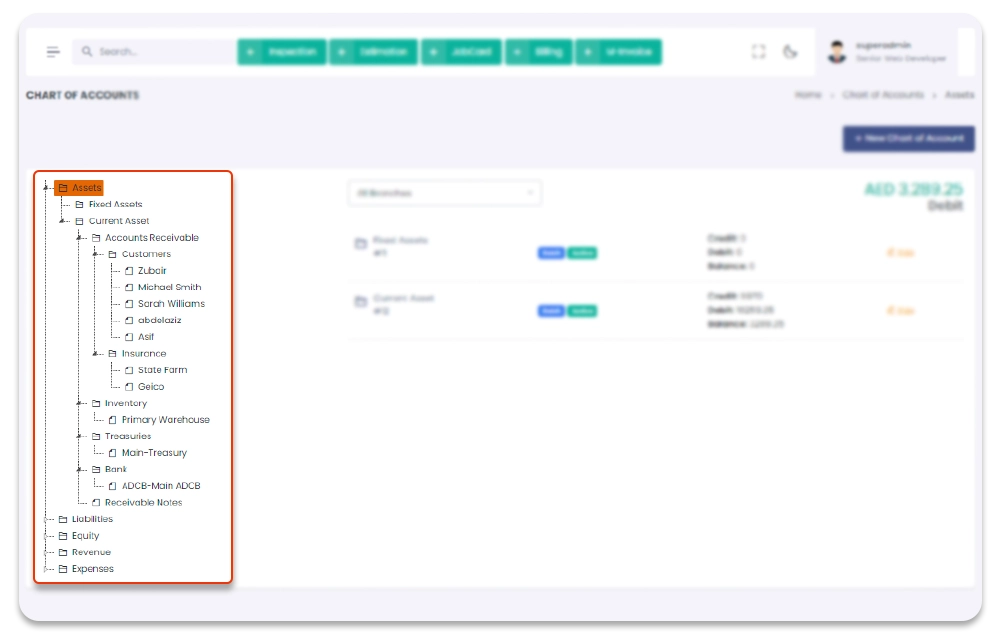
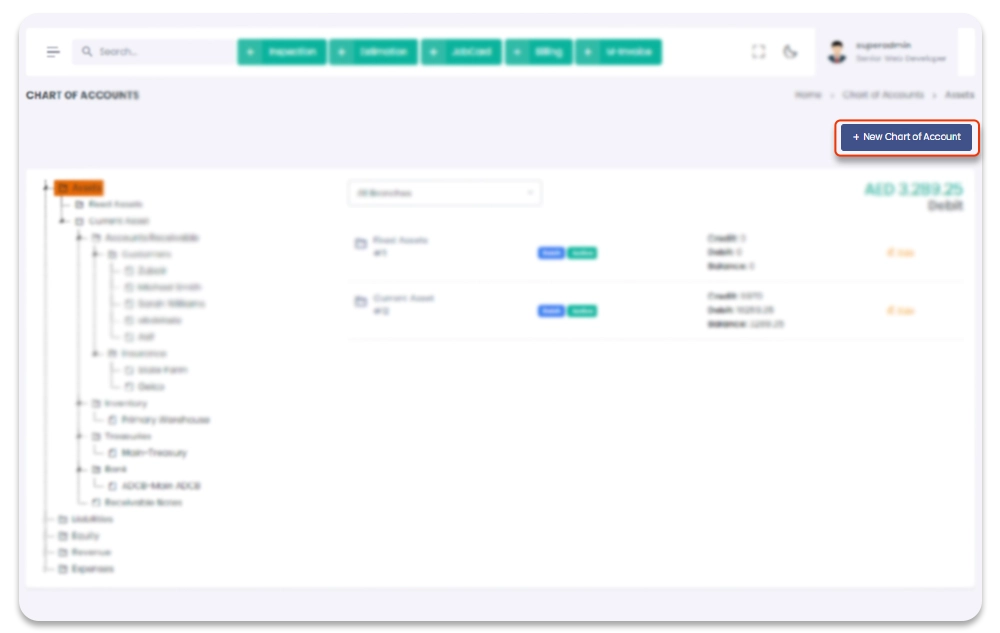
Chart Of Accounts
Chart of Account is detailed screen of accounts. Here you can see the hierarchy of all account avabilable in system and it also show the complete flow of amount in the system. You can create as well as manage chart of accounts according to your work behaviour. To see the detail of account, click on related account from chart of Accounts.
1- Click on "Accounts" from Garage Management System sidebar.
2- Click on "Chart of Accounts" from sidebar.
Garage Management System / Chart of Accounts
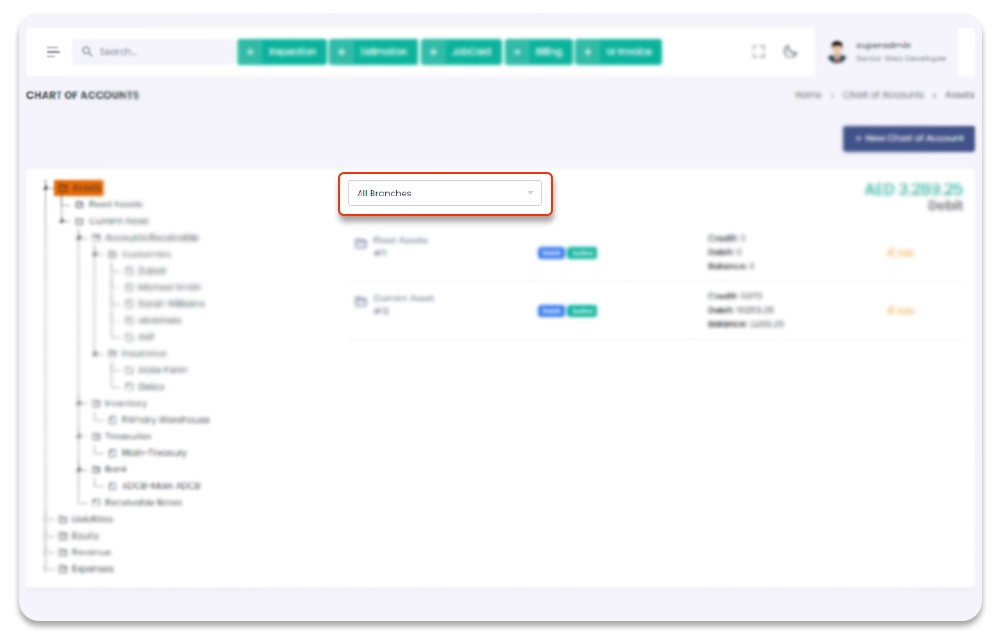
You can also filter COA details by branch wise. Select Branch from dropdown to see the related COA details.
Create COA
New Chart of Accounts - You can add new COA from this page. When you click on "+ New Chart of Account" popup will open, you have to enter the information and click on "Submit" button to add new chart of account.1- Click on "+ New Chart of Account" from right corner of screen.
Update COA
Update Chart of Accounts - To Update COA, click on related coa and on the right side of the screen you will see the details of selected COA, from the COA row click on "Edit" option to update the COA.1- Click on related account from chart of accounts.
2- Click on edit option displayed on right side of the screen.
Journal Entries
All the journal entries are manageable though journal entries Section. You can add, update, view and delete, journal entries. All the added journal entry details will show in journal entry page table. To navigate and to record journal entries, follow the steps below.
1- Click on "Accounts" from Garage Management System sidebar.
2- Click on "Journal Entries" from Garage Management System sidebar.
2- You will redirect to the Journal Entries Page.
Garage Management System / Accounts /Journal Entries
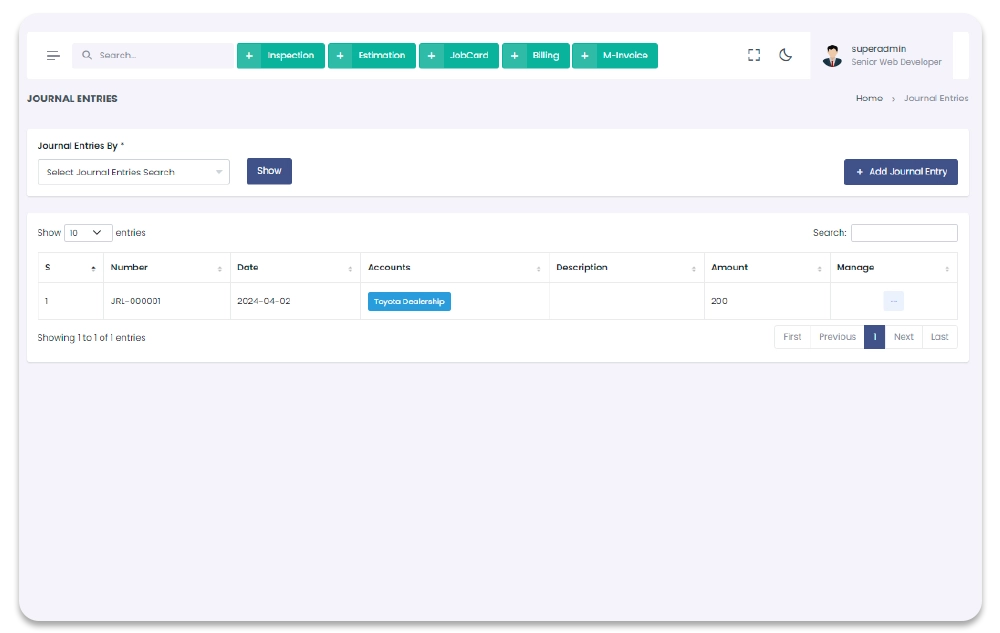
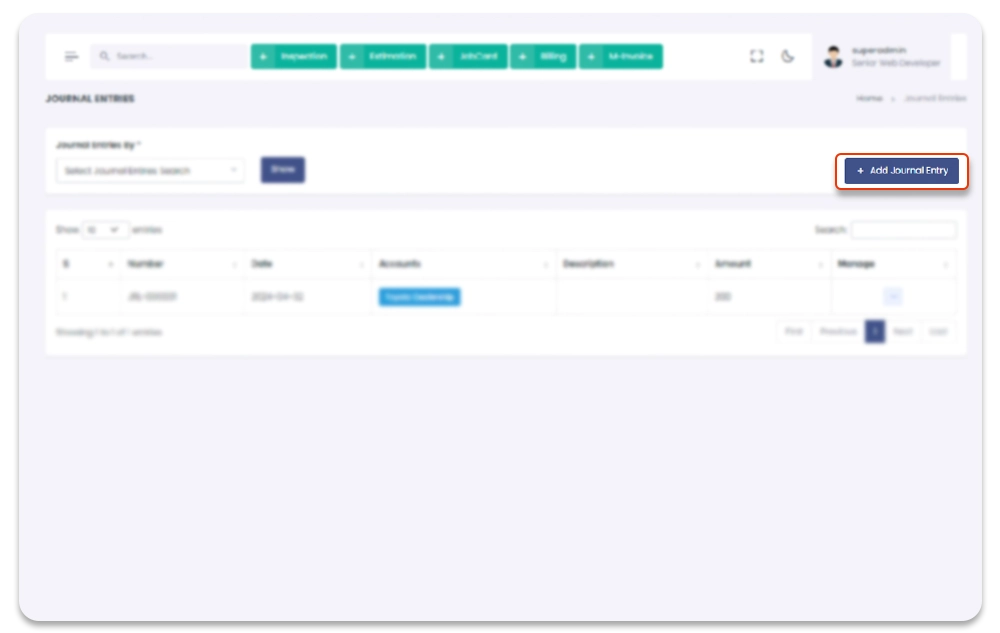
Add Journal Entry
You can add journal entry through Add Journal Entry Page. To navigate to Add Entry Page, and to Add Journal entry, follow the steps below:
1- Click on "Accounts" from Garage Management System sidebar.
2- Click on "Journal Entry" from Garage Management System sidebar.
3- Click on + Add Entry option from the top right corner of the screen.
4- After click on + Add Entry, you will redirect to the Add journal entry page.
5- On Add journal entry page you have to enter journal details (journal file, journal number,
journal date, journal account, Debit , Credit).
6- After Adding the journal detail in the form and click on "Submit" to save Journal.
Garage Management System / Accounts /Journal Entries / Add Journal Entry
Update Journal Entry
You can update Journal Entry once entry is created. To Navigate to Update Journal Entry Page, and to update follow the steps below:
1- Click on "Accounts" from Garage Management System sidebar.
2- Click on "Journal Entries" from Garage Management System sidebar.
3- Click on Edit option from the Journal Entry table column name Manage
dropdown.
4- After click on Edit, you will redirect to the Update Journal Entry page.
5- On Update Journal Entries page you have to update the journal entry information.
6- After updating the journal entry information in the form and click on "Submit" to save new
changes.
Garage Management System / Accounts /Journal Entries / Update Journal Entries
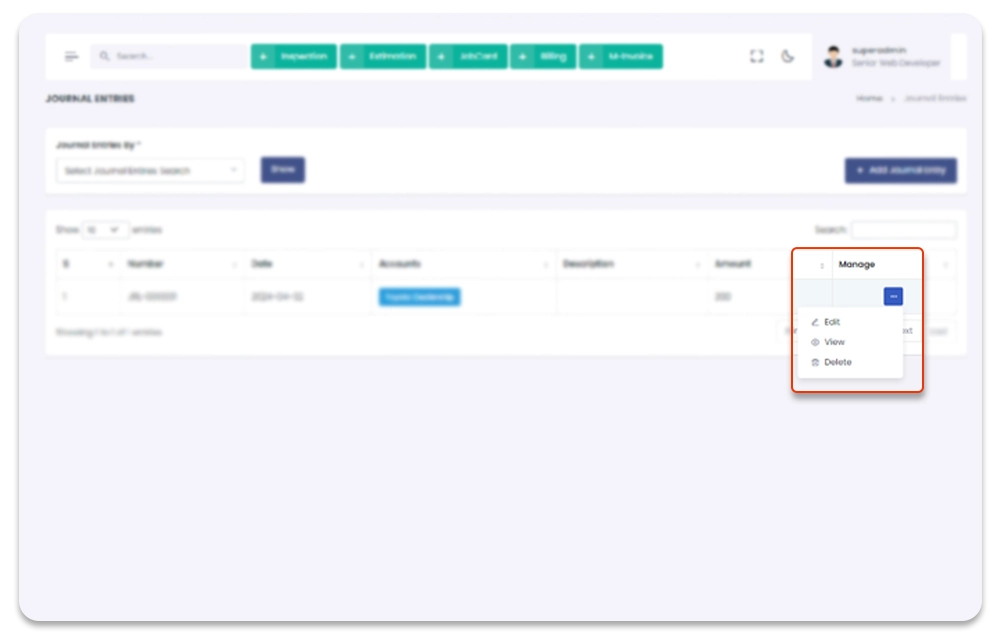
View Journal Detail
You can View Journal Details once entry is created. To Navigate to View Journal Entry Detail Page, follow the steps below:
1- Click on "Accounts" from Garage Management System sidebar.
2- Click on "Journal Entries" from Garage Management System sidebar.
3- Click on View option from the Journal Entry table column name Manage
dropdown.
4- After click on View, you will redirect to the View Journal Entry page.
5- On View page you have get the complete detail of journal entry and Journal
Log.
Garage Management System / Accounts /Journal Entries / Update Journal Entries
Delete Journal Entry
You can Delete Journal Details once entry is created. To Navigate to Delete Journal Entry Page, follow the steps below:
1- Click on "Accounts" from Garage Management System sidebar.
2- Click on "Journal Entries" from Garage Management System sidebar.
3- Click on Delete option from the Journal Entry table column name Manage
dropdown.
4- After click on Delete, journal entry will be deleted with notification.
Garage Management System / Accounts /Journal Entries
Manage Invoices
This section contain all the "Paid Receipts","Paid Pamyents" & "Manual Invoices" details. You can see more detail about the transaction by clicking the related section navigation. To Navigate to "Manage Invoices" Page follow the steps below:
1- Click on "Accounts" from Garage Management System sidebar.
2- Click on "Manage Invoices" from top of the Menubar.
3- Click on related section.
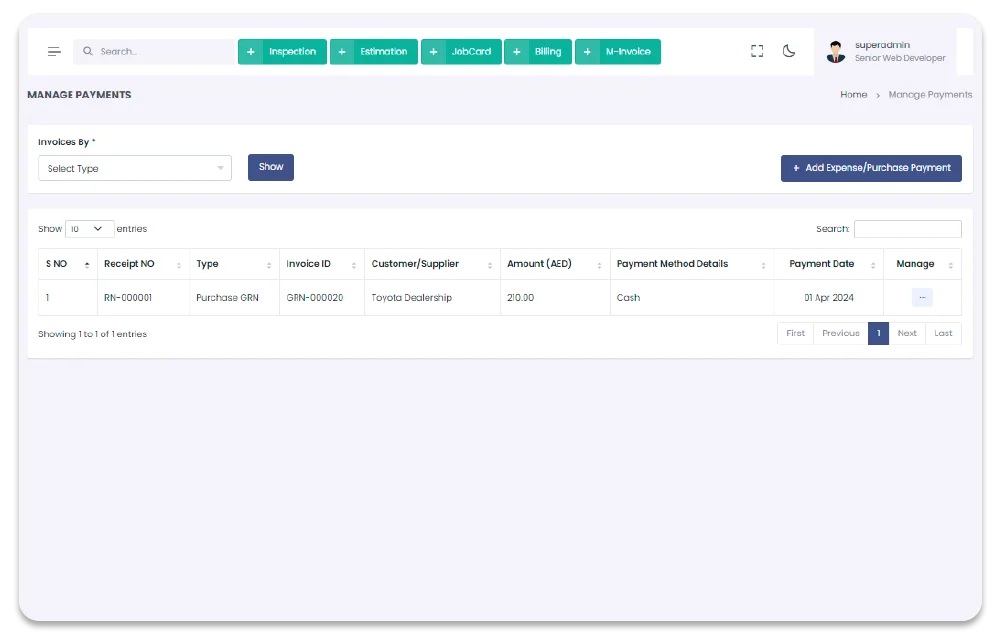
Manage Payments
All the paid invoice from customer or receivable paid invoices will show here (Example:
Sales, Sale Services). From this section you add "customer invoice payment". To Navigate to this page
follow the given steps:
1- Click on "Accounts" from Garage Management System sidebar.
2- Click on "Manage Payments" from top of the sidebar.
3- Click on " Manage Payments", from top of the sidebar.
Garage Management System / Accounts /Manage Invoices/ Manage Payments
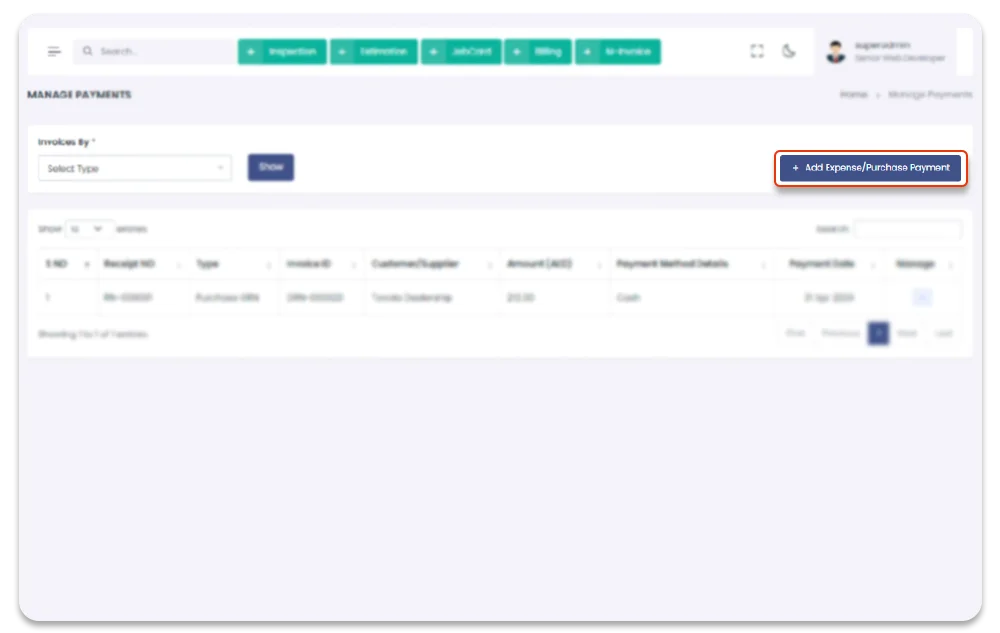
Expense/Purchase Payment Create
You add invoice payment by click on " + Add Expense/Purchase Payment" button on top
right corner of the "Manage Payments" screen. To create the Manage follow the steps below:
1- Click on "Accounts" from Garage Management System sidebar.
2- Click on "Manage Payments" from top of the sidebar.
3- Click on "+ Add Expense/Purchase Payment", on the top right corner of the "Manage Payments"
Page.
4- After click on "+ Add Expense/Purchase Payment", you will redirect to the "Add Expense/Purchase Payment" page.
5- Fill the information in the form and click on "Submit" button to add Expense/Purchase Payment.
Garage Management System / Accounts /Manage Payments / Add Expense/Purchase Payment
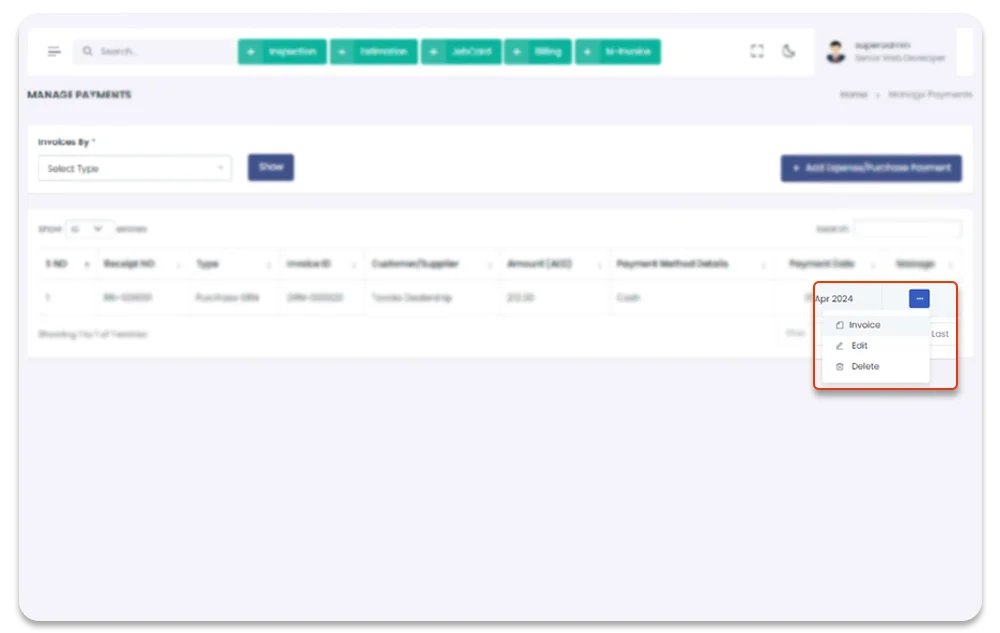
Update Expense/Purchase Payment
You can also update the Expense/Purchase Payment. To Update the Customer Expense/Purchase Payment
follow the steps below:
1- Click on "Accounts" from Garage Management System sidebar.
2- Click on "Manage Payment" from top of the sidebar.
3- You can also update the Payment by selecting Edit Expense/Purchase Payment option from the table setting
icons button.
4- When Click on "Edit" option, you will redirect to the "Edit customer Payment" page.
5- Update the information in the form and click on "Submit" button to update.
Garage Management System / Accounts /Manage Payments / Edit Expense/Purchase Payment
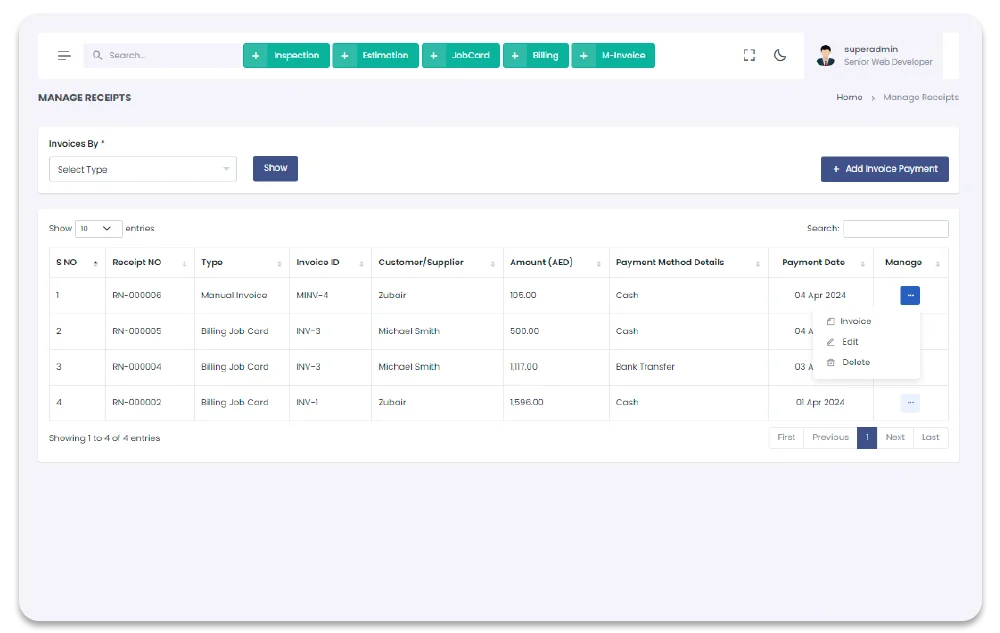
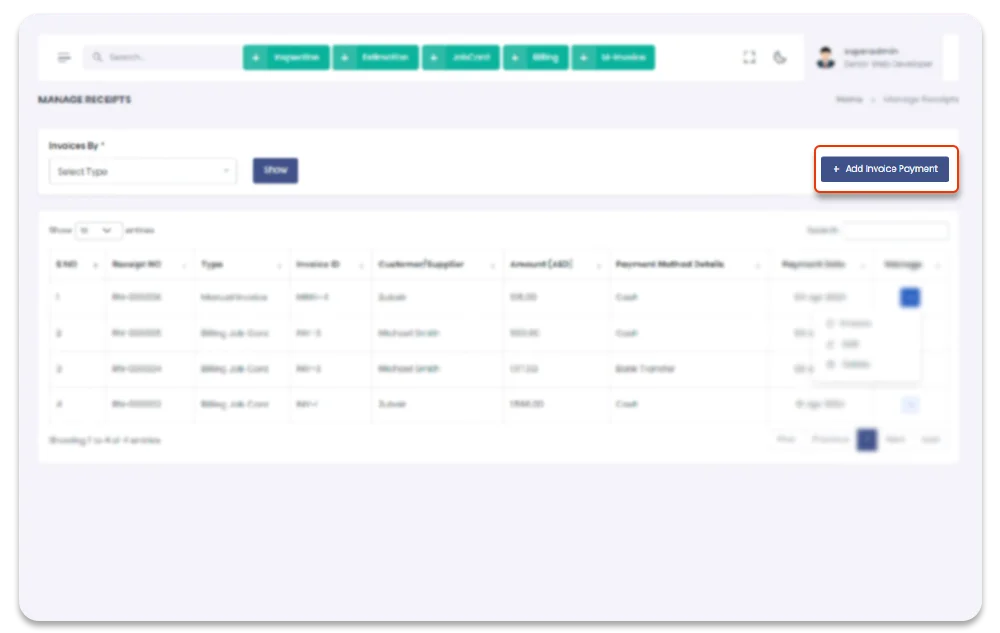
Manage Receipts
This section contain all the payable payments, it also includes the partial payments. One invoice in this section can be appear to have multiple payments. You can see more detail about the transaction by clicking the related invoice row. To edit or view the pdf of payment, click on settings icons under the column name "files". To Navigate to "Manage Receipts" Page follow the steps below:
1- Click on "Accounts" from Garage Management System sidebar.
2- Click on "Manage Invoices" from top of the sidebar.
3- Click on "Manage Receipts" from top of the sidebar.
4- Invoice receipts detail PDF file can be seen from the dropdown under the column name "Files".
5- You can also see the receipt details by click on related receipt payment row from "Manage Receipt"
table.
Garage Management System / Accounts /Manage Invoices
Create Receipts
You add payment receipt by click on"+ Add Receipt Payment" button on top right
corner of the "payment receipt" screen. To create the Manage follow the steps below
1- Click on "Accounts" from Garage Management System sidebar.
2- Click on "Manage Receipts" from top of the sidebar.
3- Click on "+ Add Receipts Payment", on the top right corner of the "Manage Receipt"
Page.
4- After click on "+ Add Receipts Payment", you will redirect to the "Add Receipt
Payment" page.
5- Fill the information in the form and click on "Submit" button to add receipt payment.
6- If payment is partially paid or fully Unpaid, click on receipt row and it will redirect to the
add payment page, with remaining payment auto selected.
Garage Management System / Accounts /Manage Receipts / Add Receipt Payment
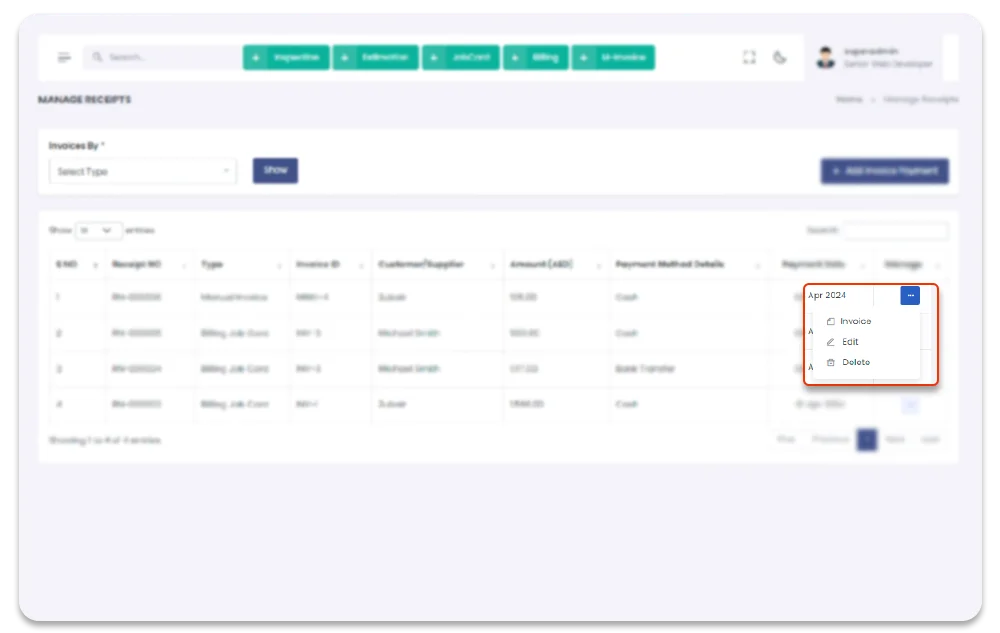
Update Receipts
You can also update the Receipts Payment. To Update the Receipts Payment follow the
steps below
1- Click on "Accounts" from Garage Management System sidebar.
2- Click on "Manage Receipts" from top of the sidebar.
3- You can also update the invoice by selecting Receipts option from the table setting icons
button.
4- When Click on "Edit" option, you will redirect to the "Edit Receipt Payment" page.
5- Update the information in the form and click on "Submit" button to update.
Garage Management System / Accounts /Manage Receipts / Edit Receipt Payment
Manual Invoices
This section contain all the manual invoices. You can create and manage manual invoices here. If payment is partially paid or fully Unpaid, click on receipt row and it will redirect to the add payment page, with remaining payment auto selected. To Navigate to "Manual Invoices" Page follow the steps below:
1- Click on "Accounts" from Garage Management System sidebar.
2- Click on "Manage Invoices" from top of the sidebar.
3- Click on "Manual Invoices" from top of the sidebar.
Garage Management System / Manage Invoices / Manual Invoices
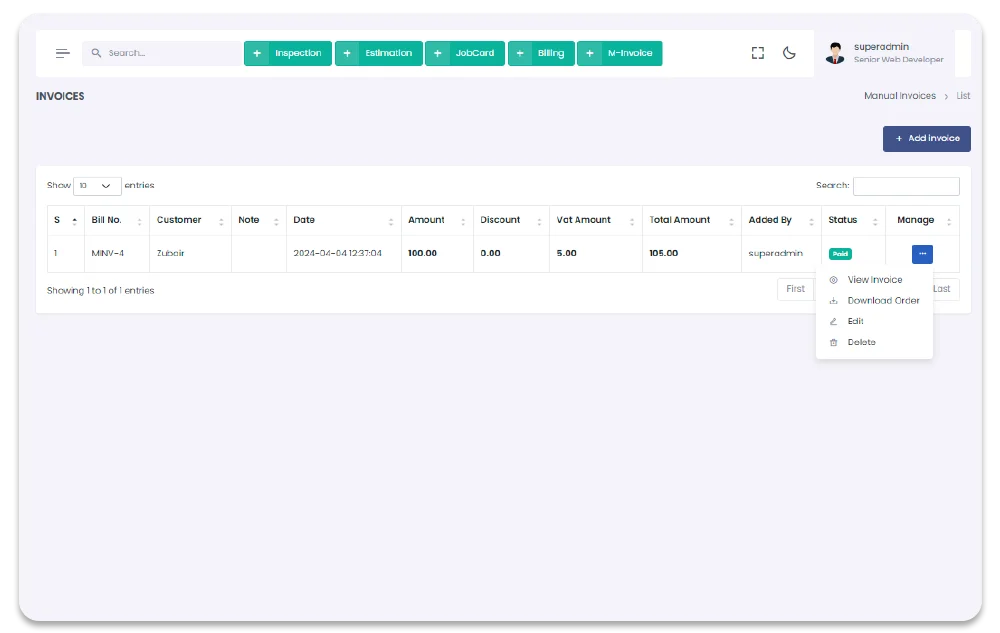
Create Manual Invoice
You add payment receipt by click on"+ Add invoice" button on top right
corner of the "Manual Invoice" screen. To create the Manage follow the steps below
1- Click on "Accounts" from Garage Management System sidebar.
2- Click on "Manual Invoice" from top of the sidebar.
3- Click on "+ Add Invoice", on the top right corner of the "Manage Receipt"
Page.
4- After click on "+ Add Invoice", you will redirect to the "Add Invoice" page.
5- Fill the information in the form and click on "Submit" button to add invoice.
Garage Management System / Manage Invoices / Manual Invoice / Add invoice

Update Manual Invoice
You can also update the Manual Invoice Payment. To Update the Manual Invoice Payment follow the
steps below
1- Click on "Accounts" from Garage Management System sidebar.
2- Click on "Manual Invoice" from top of the sidebar.
3- You can also update the invoice by selecting Manual Invoice option from the table setting icons
button.
4- When Click on "Edit" option, you will redirect to the "Edit invoice" page.
5- Update the information in the form and click on "Submit" button to update.
Garage Management System / Manage Invoices / Manual Invoice / Edit invoice
Purchasing
All the Purchase Orders, GRNs, Purchases, can be done from Purchasing section. To Navigate to the Purchsing section, follow the steps below:
1- Go to "Accounts" section from Garage Management System sidebar.
2- Click on "Purchases" from Garage Management System sidebar.
Garage Management System / Purchases
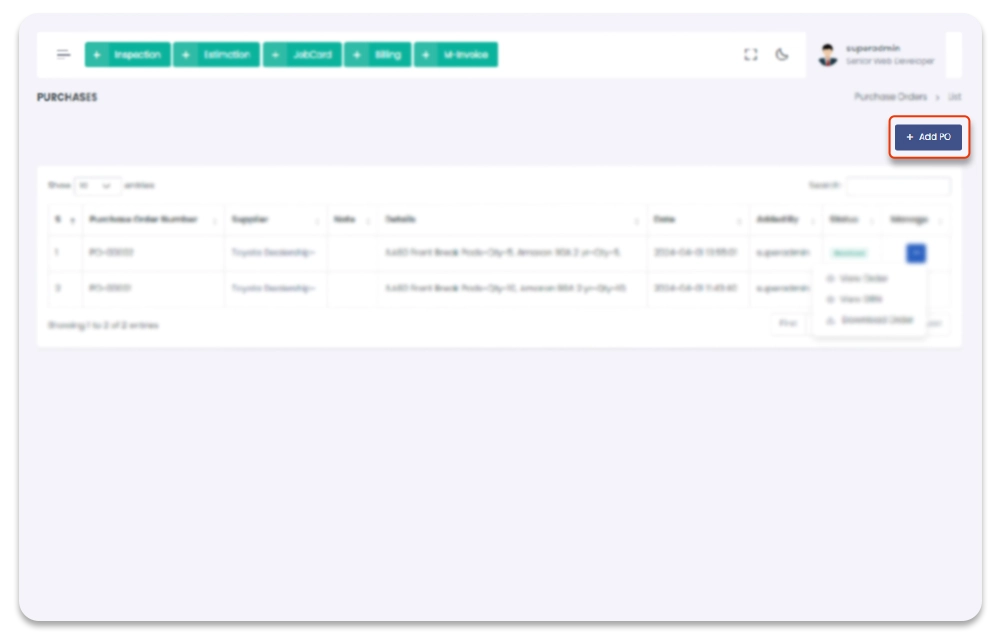
Purchase Orders
To Purchase anything first thing you have to do is creating purchase order. All Purchase Orders will show in this section with detail. You can also create GRN through the Create GRN button appear in PO table after creating PO. Status of the Purchase Order in Purchase Order column will change to Received, when GRN is created for this PO. To navigate to this page, follow the steps below:
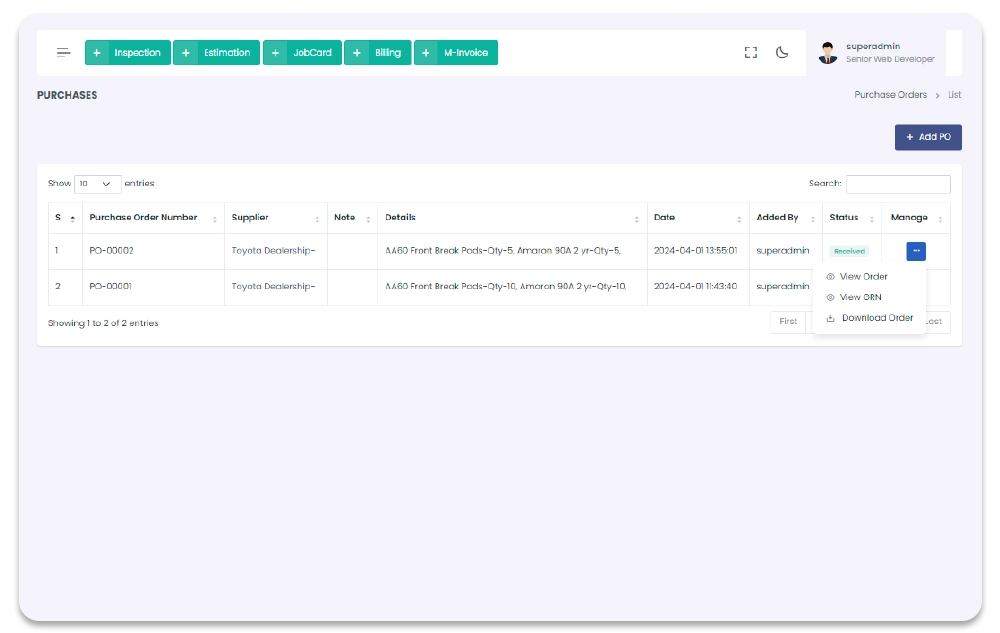
1- Go to "Accounts" section from Garage Management System sidebar.
2- Click on "Purchases" from Garage Management System sidebar.
3- Click on "Purchase Order" from Garage Management System sidebar.
(Page will open after click on
Purchase Order from sidebar, only if you have privilege).
Garage Management System / Purchase Order
New Purchase Order
To Purchase anything first thing you have to do is creating purchase order. To Add new purchase order follow the steps below:
1- Click on "Purchasing" from Garage Management System sidebar.
2- Click on Add New Purchase Order from the Menubar.
3- After click on + Add New Purchase Order button on the top right side of the screen, you
will redirect to the Add Purchase Order page.
4- Fill all the Purchase order details in the form. (All the Added Branches, Warehouses, Item
Categories, Item names) will appear in this section, you have to select the details of POs
accordingly as you want.
5- Click on "Submit" button to save the changes.
Garage Management System / Purchasing / Add New Purchase Order
Update Purchase Order
You can Update Purchase Order only when the GRN for the PO is not created. Once GRN for Purchase Order is created you can not update the PO. To Update PO, follow the steps below:
1- Click on "Purchasing" from Garage Management System sidebar.
2- Click on "Manage POs" from the Menubar.
3- click on settings icon under table column name "Manage".
4- from the dropdown menu select "Edit".
5- After click on Edit button, you will redirect to the Update Purchase Order screen.
Garage Management System / Purchasing / Update Purchase Order
Delete Purchase Order
You can Delete Purchase Order only when the Status of the GRN for the Purchase Order is not created, after creating the GRN of the Purchase Order you can not Delete the Purchase Order. To delete PO, follow the steps below:
1- Click on "Purchasing" from Garage Management System sidebar.
2- Click on "Manage POs" from the Menubar.
3- click on settings icon under table column name "Manage".
4- from the dropdown menu select "Delete".
5- After click on Delete button, PO will be delete with notification.
Garage Management System / Purchase Order
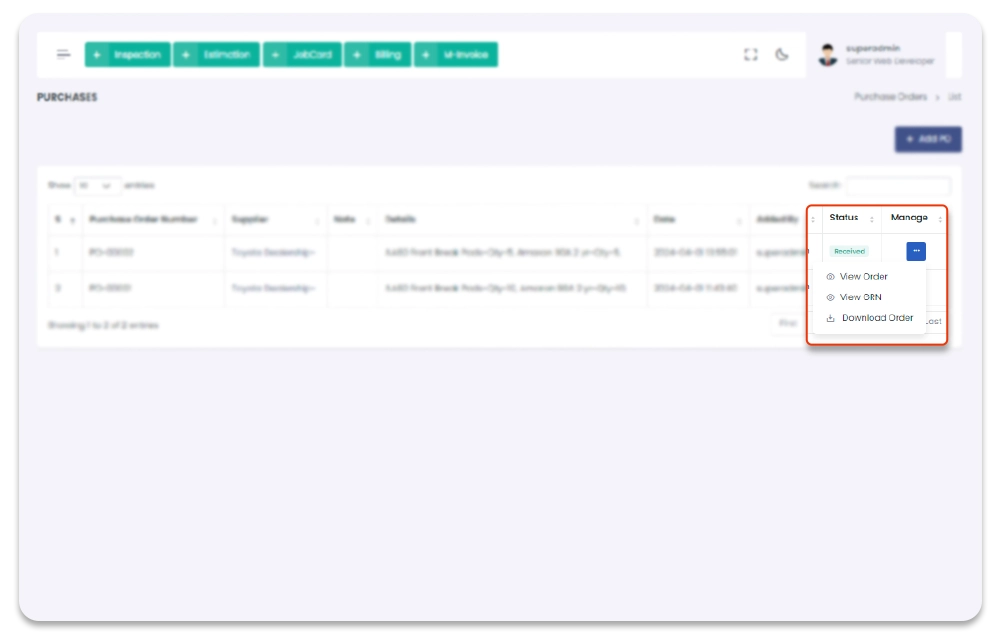
View / Download PO
You can View the purchase order after it is created. To View PO PDF, follow the steps below:
1- Click on "Purchasing" from Garage Management System sidebar.
2- Click on "Manage POs" from the Menubar.
3- click on settings icon under table column name "Manage".
4- from the dropdown menu select "View Order".
5- After click on View Order button, Purchase Order PDF file will open with PO details.
6- You can also download Purchase Order, to download select Download Order from the dropdown
list of settings icon.
Garage Management System / Purchase Order
Manage GRN
All the added GRN will show in this section with deatils. You can manage GRN thourgh this section (create, Update, Delete, View/ download GRN). To navigate this section, follow the steps below:
1- Click on "Purchasing" from Garage Management System sidebar.
2- Click on "Manage GRNs" from Menubar.
Garage Management System / Manage GRNs
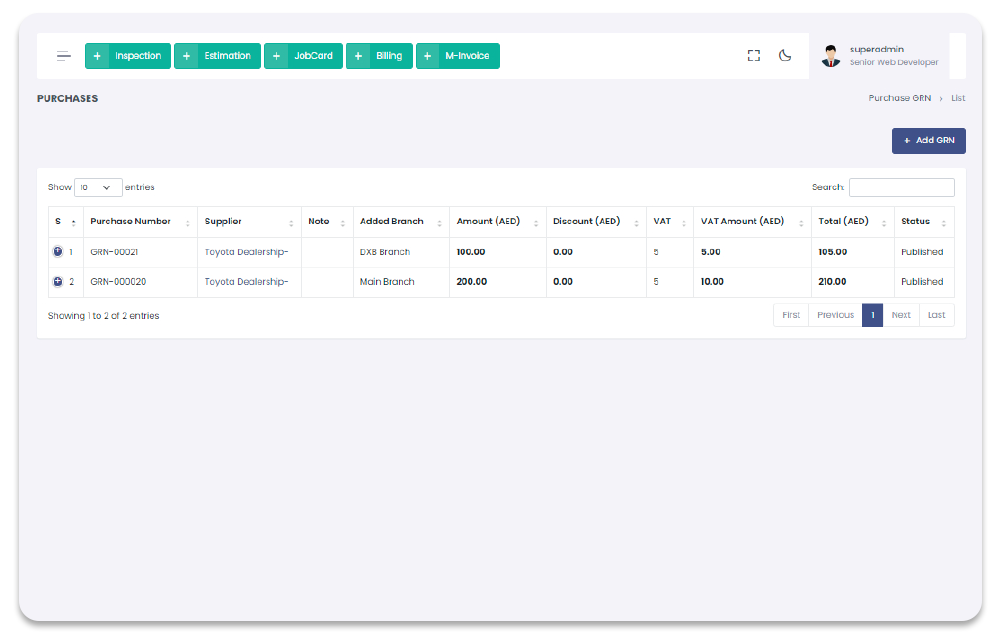
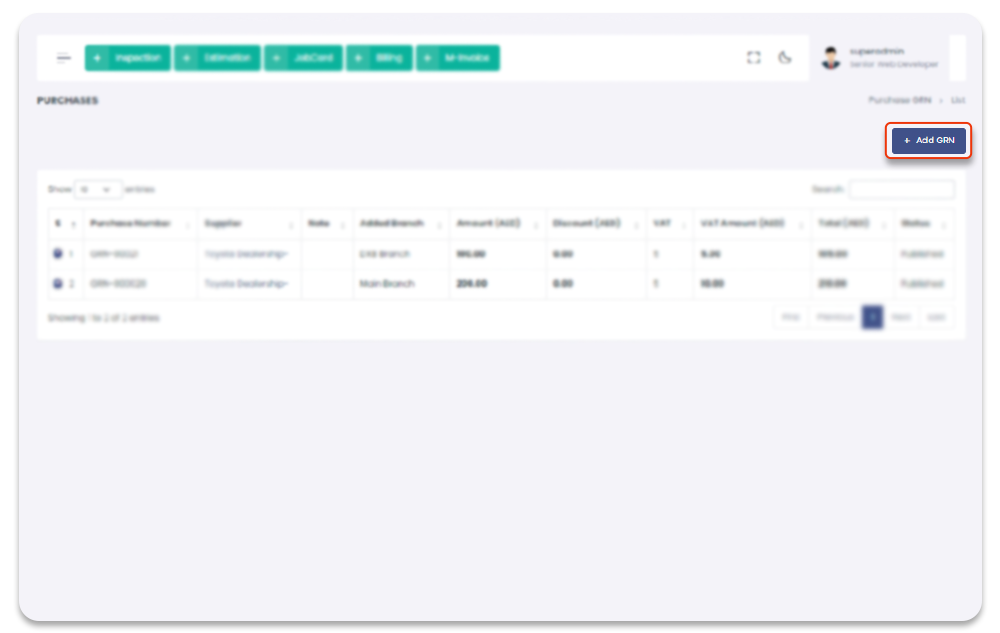
Create GRN
When GRN is created, it is by default the Created GRN is not published, you have to change the Status of GRN from Draft to Publish by selecting publish option from the dropdown. When GRN is created by default "Payment Status" is Unpaid, you have to add the payment through the Manage Payment section.
1- Click on "Purchasing" from Garage Management System sidebar.
2- Click on Manage GRNs from the Menubar.
3- Click on + Add GRN button available on top right corner of "Manage GRN" screen.
4- After click on + Add GRN you will redirect to the + Add GRN page.
5- On Add GRN page, fill the GRN details (product batch, warehouse, branches) information.
Garage Management System / Manage GRNs / Add New GRNs
Update GRN
GRN can be update only if its Status is not Published and payment status is Unpaid. To Update the GRN, follow the steps below
1- Click on "Purchasing" from Garage Management System sidebar.
2- Click on Manage GRN from the Menubar.
3- Click on setting icon under the column name Manage.
4- Select the Edit option from the dropdown list.
5- After Click on Edit you will redirect to the Update GRN Page.
6- Add the Updated GRN information and click on Submit button to save the changes.
Garage Management System / Manage GRN / Update GRN
Delete GRN
You can Delete Delete GRN only when GRN Status is not Published and payment status is Unpaid. To Delete the GRN, follow the steps below
1- Click on "Purchasing" from Garage Management System sidebar.
2- Click on "Manage GRN" from the Menubar.
3- Click on setting icon under the column name Manage.
4- Select the Delete option from the dropdown list.
5- After click on Delete button, GRN will be delete with notification.
Garage Management System / Manage GRN
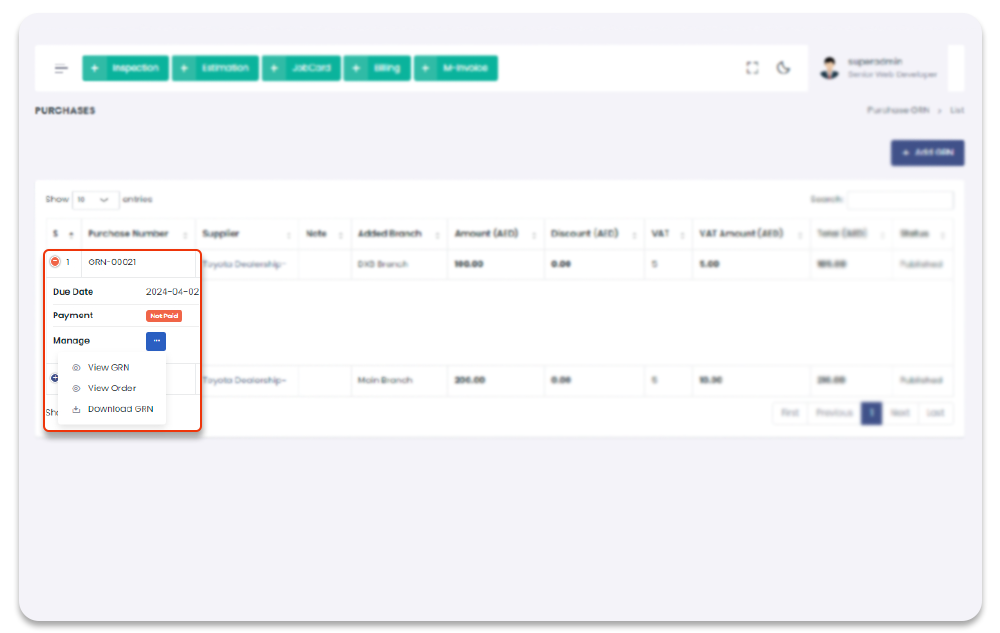
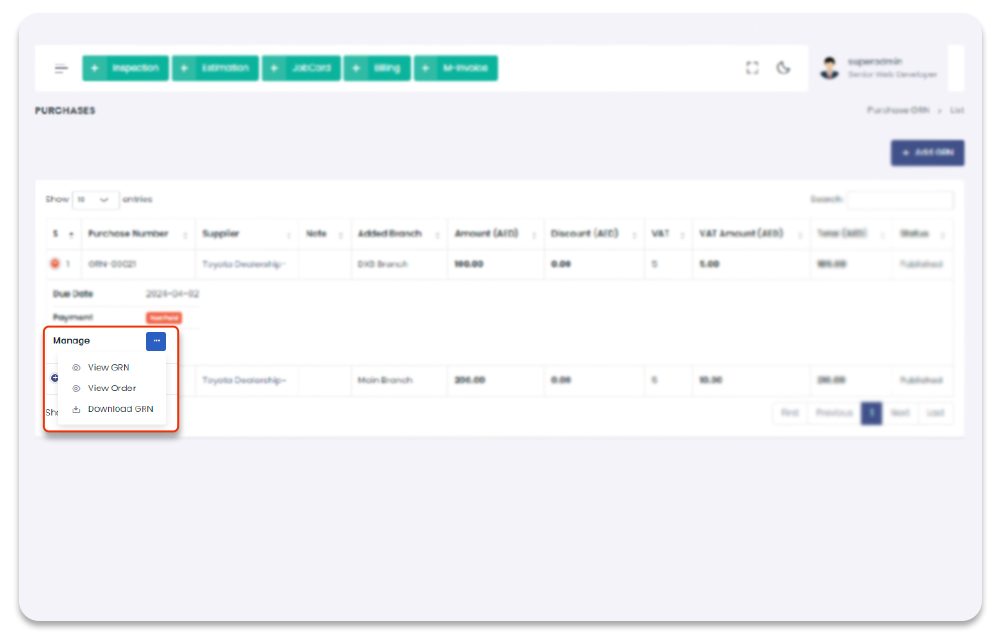
View / Download GRN
You can View and download the GRN order after it is created. To View GRN PDF, follow the steps below:
1- Click on "Purchasing" from Garage Management System sidebar.
2- Click on "Manage GRN" from the Menubar.
3- Click on settings icon under table column name "Manage".
4- From the dropdown menu select "View GRN", "Items", "Download GRN".
5- After click on View GRN button, Purchase Order PDF file will open with GRN details.
6- You can also download GRN, to download select Download GRN from the dropdown list of
settings icon.
Garage Management System / Manage GRN
Purchases
All the General Purchasings can be done from the Purchases Section. When Purchase is created by default it isUnpaid, to purchases payment can be done from the Manage Purchases section. To navigate to the Purchases Page, follow the steps below:
1- Click on "Purchasing" from Garage Management System sidebar.
2- Click on "Manage Purchases" from the Menubar.
Garage Management System / Purchases

Add Purchase
You can Add General Purchases through this section. To Navigate to Add Purchase Page, follow the steps below:
1- Click on "Purchasing" from Garage Management System sidebar.
2- Click on "Manage Purchases" from the Menubar.
3- Click on + Add New Purchase button from the top right corner of the Purchases screen.
4- After click on + Add New Purchase, you will redirect to the Add Purchases page.
5- Fill the Purchase information in the form and click on "Submit" to record new Purchase.
Garage Management System / Purchases / Add New Purchases

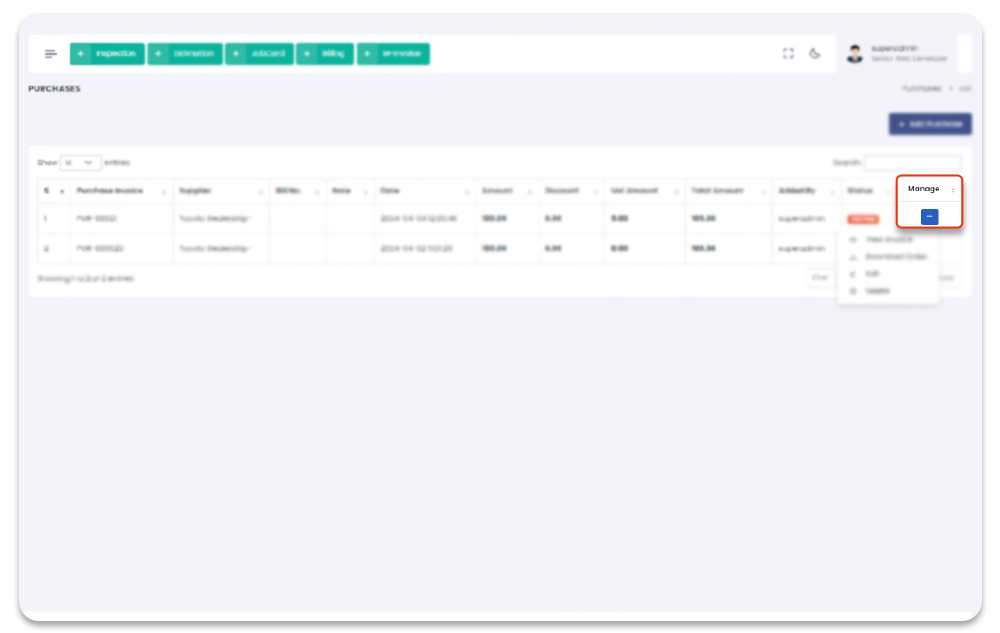
Update Purchase
You can only update the purchase when Purchase Status is Unpaid. To update the Purchases follow the steps below:
1- Click on "Purchasing" from Garage Management System sidebar.
2- Click on "Manage Purchases" from the Menubar.
3- click on settings icon under table column name "Manage".
4- from the dropdown menu select "Edit".
5- After click on edit button, you will navigate to the Update Purchase Page.
6- Update the Purchases information and click on "Submit" button to save the changes.
Garage Management System / Purchases / Update Purchase
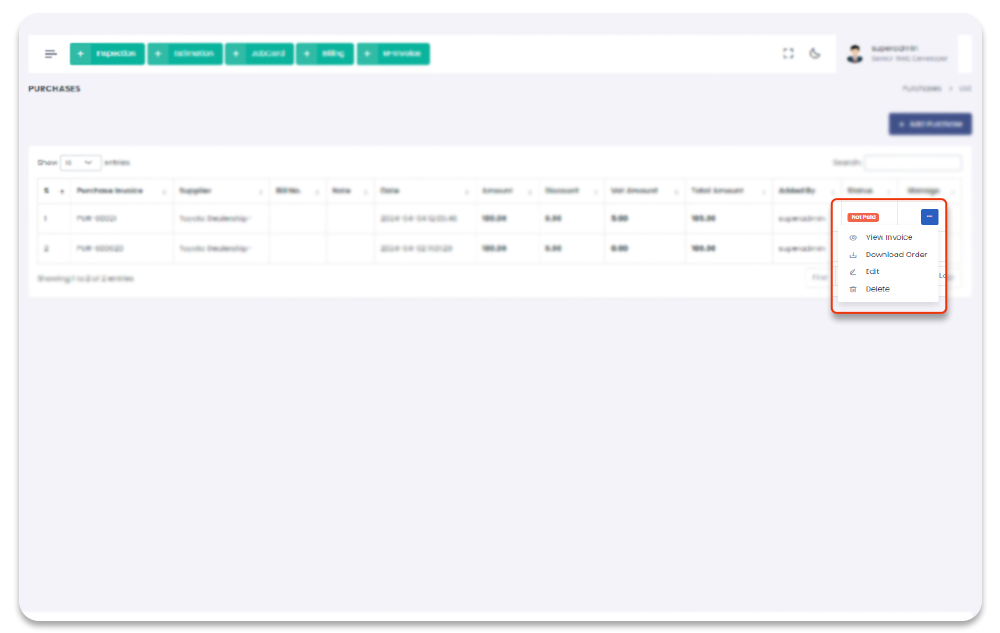
Delete Purchase
You can Purchase only delete the purchase when Purchase Status is Unpaid. To update the Purchases follow the steps below:
1- Click on "Purchasing" from Garage Management System sidebar.
2- Click on "Manage Purchases" from the Menubar.
3- click on settings icon under table column name "Manage".
4- from the dropdown menu select "Delete".
5- After click on Delete button, Purchase will be delete with notification.
Garage Management System / Purchases
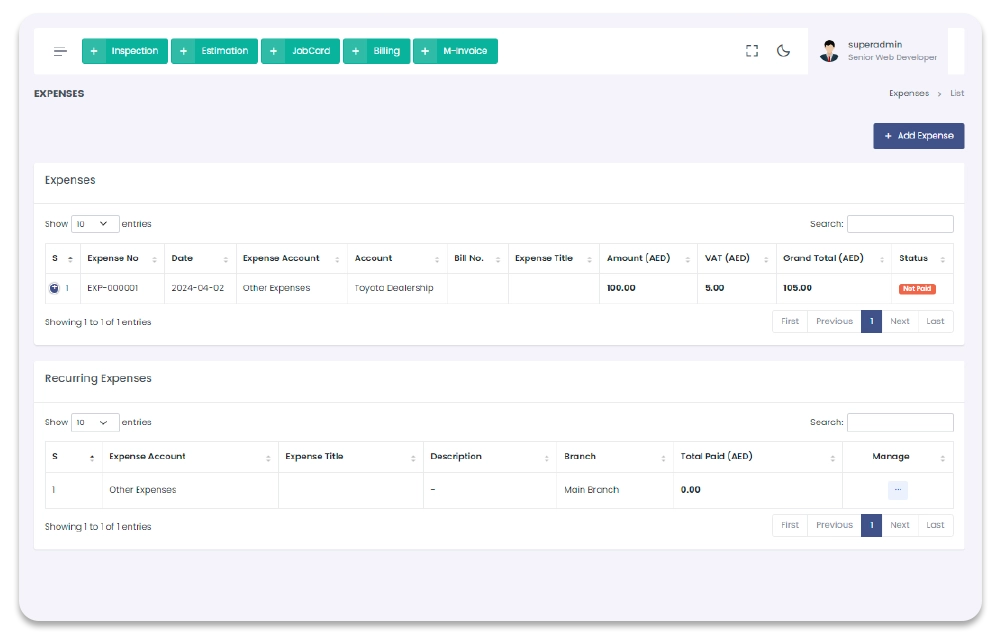
Expenses
All the expense are manageable (View, Create, Update, Delete) through Expenses section. All the Expenses will show in this section with complete details. You can create expense by selecting supplier or without without selecting supplier. Expense Filter option available, you can sort the expense details by using Filter above the Manage Expense table. Top navigate to Expense section, follow the steps below:
1- Click on "Expenses" from Garage Management System sidebar.
2- Click on "Manage Expenses".
3- You will redirect to the Manage Expense Page.
Garage Management System / Manage Expenses
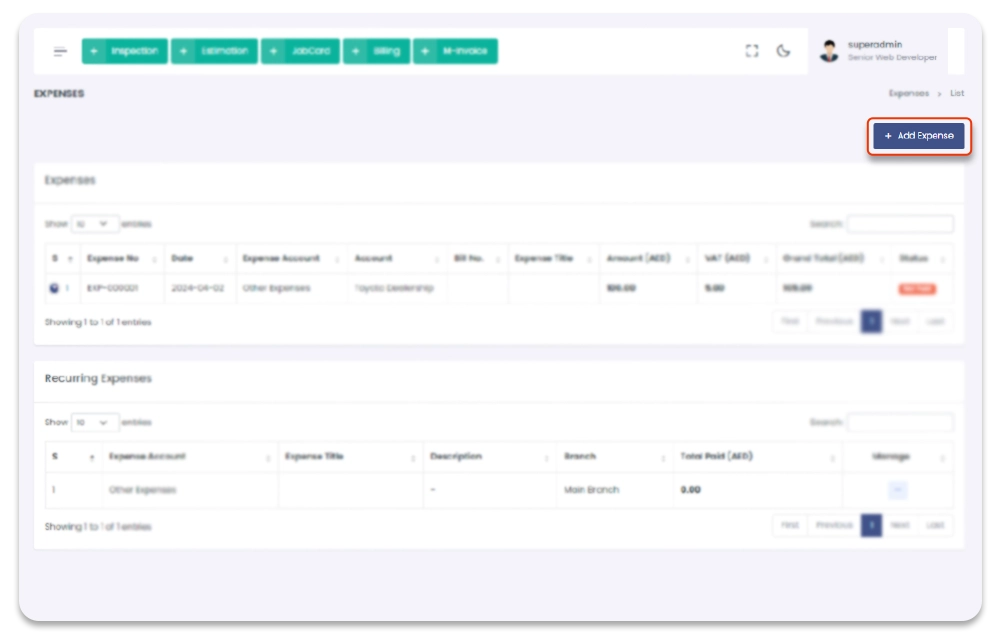
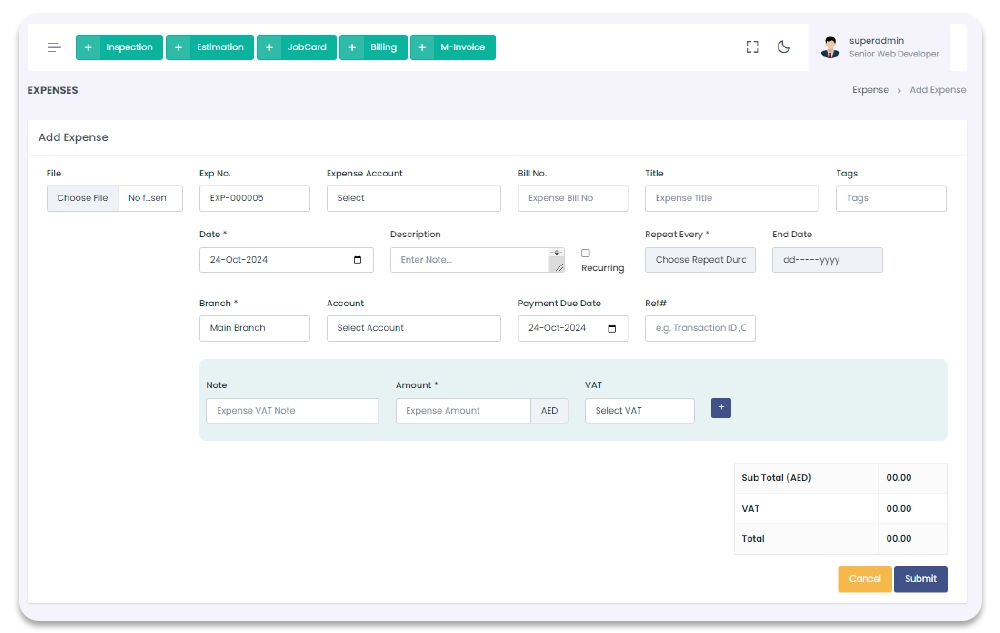
Add Expense
You can create new Expense through Add Expense section. You can create two type of expenses you can create (regular expense, recursive expense). When you will Add Recursive Expense it will show in Recurring Expenses table in Manage Expense Page, and normal expenses will show in Expenses table. To Navigate to Add Expense Page, and to Add Expense follow the steps below:
1- Click on "Expense" from Garage Management System sidebar.
2- Click on + Add Expenses option from the top right corner of the screen.
3- After click on + Add Expenses, you will redirect to the Add Expense page.
4- On Add Expense page you have to can enter provide Expense details (Expense account,
Expense amount, Expense type etc. In case of recursive expense, select the end date, it is the
date till which date this expense will be keep added).
5- After Adding the Expense information in the form and click on "Submit" to save Expense.
Adding Expense Flow
1- If Cash account is selected the expense amount will direct deduct from the selected account
with Confirmed status.
2- If Supplier Account is selected or no any account is selected then payment status is
Not Paid and need to add payment in Finance/ Add Payment section. (To Add
payment click on Not Paid payment status it will redirect to the Add payment section.)
Garage Management System / Manage Expenses / Add Expense
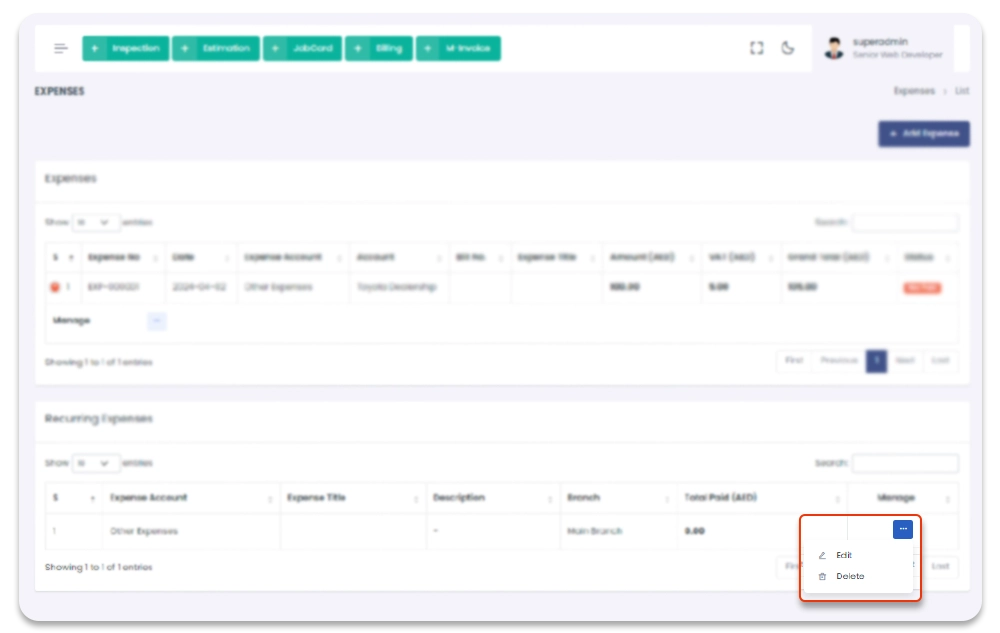
Update Expenses
You can update Expenses once expense is created. You can not Update the expense with payment status Confirmed. To Navigate to Update Expense Page, and to update follow the steps below:
1- Click on "Expenses" from Garage Management System sidebar.
2- Click on Edit option from the Manage Expense table column name Manage
dropdown.
3- After click on Edit, you will redirect to the Update Sale Service page.
4- On Update Expense page you have to update the Sale Services information.
5- After updating the Sale Services information in the form and click on "Submit" to save new
changes.
Garage Management System / Manage Expenses / Update Expense
Reports
All the Reports are accessible through Report Section. To navigate to Reports section, follow the steps below.
1- Go to "Dashboard" / "Financial" section from Garage Management System sidebar.
2- click on Reports from top menubar.
3- After click on Reportsselect any related report section from dropdown.
Garage Management System / Repots
Expense Report
Expense Report contains detailed reports related to expenses. Fitler options also available above the expense report table to sort the expense report data. To navigate to Expense report section, follow the steps below.
1- Go to "Dashboard" / "Financial" section from Garage Management System
sidebar.
2- Click on Reports from top menubar.
3- After click on Reports select Expense report from dropdown.
Garage Management System / All Expenses / Year / 2022
Purchase Report
Purchase Report contains detailed reports related to purchases. Fitler options also available above the Purchase Report table to sort the Purchase Report data. You can View Invoice, Download Invoice of each Purchase details from the Purchase Report table by select Options from Manage dropdown. To navigate to Purchase Report section, follow the steps below.
1- Go to "Dashboard" / "Financial" section from Garage Management System sidebar.
Or select Sales from Reports menubar.
2- Click on Reports from top menubar.
3- After click on Reports select Purchases from dropdown.
Garage Management System / All Purchases / Year / 2022
GRN Reports
GRN Reports contains detailed reports related to GRN. Fitler options also available above the GRN Report table to sort the GRN Report data. You can View Invoice, Download Invoice of each GRN details from the GRN Report table by select Options from Manage dropdown. To navigate to GRN Report section, follow the steps below.
1- Go to "Dashboard" / "Financial" section from Garage Management System
sidebar. Or select GRN Reports from Reports menubar.
2- Click on Reports from top menubar.
3- After click on Reports select Purchases from dropdown.
Garage Management System / All GRNs / Year / 2022
GRN Products Reports
GRN Products Reports contains detailed reports related to GRN Products. Fitler options also available above the GRN Products Report table to sort the GRN Product Report data. You can View Invoice, Download Invoice of each GRN details from the GRN Products Report table by select Options from Manage dropdown. To navigate to GRN Products Report section, follow the steps below.
1- Go to "Dashboard" / "Financial" section from Garage Management System
sidebar. Or select GRN Products Reports from Reports menubar.
2- Click on Reports from top menubar.
3- After click on Reports select Purchases from dropdown.
Garage Management System / All Purchased GRNs Products / Year / 2022
Purchase Order Reports
PO Reports contains detailed reports related to PO Products. Fitler options also available above the POs Report table to sort the PO Report data. You can View Order, Download Order of each PO details from the POReport table by select Options from Manage dropdown. To navigate to PO Report section, follow the steps below.
1- Go to "Dashboard" / "Financial" section from Garage Management System
sidebar. Or select Purchases Order Reports from Reports menubar.
2- Click on Reports from top menubar.
3- After click on Reports select Purchase Order Reports from dropdown.
Garage Management System / All POs / Year / 2022
PO Product Reports
PO Product Reports contains detailed reports related to PO order. Fitler options also available above the PO product Report table to sort the PO Product Report data. You can View Invoice, Download Invoice of each PO product details from the PO Products Detail Report table by select Options from Manage dropdown. To navigate to PO product report section, follow the steps below.
1- Go to "Dashboard" / "Financial" section from Garage Management System
sidebar. Or select PO Product Reports from Reports menubar.
2- Click on Reports from top menubar.
3- After click on Reports select Purchases from dropdown.
Garage Management System / All POs Products / Year / 2022
Financial Reports
Financial Reports contains detailed reports related to finance. Fianance Report contains ( Bank Transfers, Trial Balance, VATs, Ledger Summary, Profit or loss, Balance sheet). To navigate to Financial Report section, follow the steps below.
1- Go to "Dashboard" / "Financial" section from Garage Management System sidebar.
Or select Financial Reports from Reports menubar.
2- After click on Financial Report you will navigate to the financial report page.
3- On this page you will find options of all financial reports.
Garage Management System / All POs Products / Year / 2022
Bank Transfer Report
Bank Transfer contains detailed reports related to bank transfers. Filter option available to sort the report data. To navigate to Bank Transfer section, follow the steps below.
1- Go to "Dashboard" / "Financial" section from Garage Management System
sidebar. Or select Financial Reports from Reports menubar.
2- After click on Financial Report you will navigate to the financial report
page.
3- On this page choose Bank Transfer option.
Garage Management System / All Bank Transfers / Year / 2022
Trial Balance Report
Trial Balance contains detailed reports related to Trial Balance. Fitler options available above the trial balance table to sort the report data. Print button is also available to print the trail balance report. You can click on "+" button to expand the trial balance detail. To navigate to Trial Balance section, follow the steps below.
1- Go to "Dashboard" / "Financial" section from Garage Management System
sidebar. Or select Financial Reports from Reports menubar.
2- After click on Financial Report you will navigate to the financial report
page.
3- On this page choose Trial Balance option.
Garage Management System / All Trial Balance / Year / 2022
VAT Reports
VAT Reports contains detailed reports related to VAT. Fitler options available above the VAT Reports table to sort the report data. To navigate to VAT Reports section, follow the below steps.
1- Go to "Dashboard" / "Financial" section from Garage Management System
sidebar. Or select Financial Reports from Reports menubar.
2- After click on Financial Report you will navigate to the financial report
page.
3- On this page choose VATs option.
Garage Management System / All VATs / Year / 2022
Ledger Summary
Ledger Summary contains detailed reports related to Ledger Summary. Fitler options available above the Ledger Summary Reports table to sort the report data. you can export & Print Ledger summary report, by clicking "print", "export" button above the Table. To navigate to Ledger Summary section, follow the below steps.
1- Go to "Dashboard" / "Financial" section from Garage Management System
sidebar. Or select Financial Reports from Reports menubar.
2- After click on Financial Report you will navigate to the financial report
page.
3- On this page choose Ledger Summary option.
Garage Management System / Ledger Summary / Year / 2022
Profit & Loss Report
Profit & Loss Report contains detailed reports related to Profit & Loss. Fitler options available above the Profit & Loss Report table to sort the report data. Print button is also available to print the Profit & Loss report. You can click on "+" button to expand the Profit & Loss Report detail. To navigate to Profit & Loss Report section, follow the steps below.
1- Go to "Dashboard" / "Financial" section from Garage Management System
sidebar. Or select Financial Reports from Reports menubar.
2- After click on Financial Report you will navigate to the financial report
page.
3- On this page choose Profit & Loss option.
Garage Management System / Profit/Loss / Year / 2022
Balance Sheet Report
Balance Sheet Report contains detailed reports related to Balance Sheet. Fitler options available above the Balance Sheet Report table to sort the report data. Print button is also available to print the Balance Sheet report. You can click on "+" button to expand the Balance Sheet Report detail. To navigate to Balance Sheet Report section, follow the steps below.
1- Go to "Dashboard" / "Financial" section from Garage Management System
sidebar. Or select Financial Reports from Reports menubar.
2- After click on Balance Sheet you will navigate to the financial report page.
3- On this page choose Balance Sheet option.
Garage Management System / Balance Sheet Report / Year / 2022
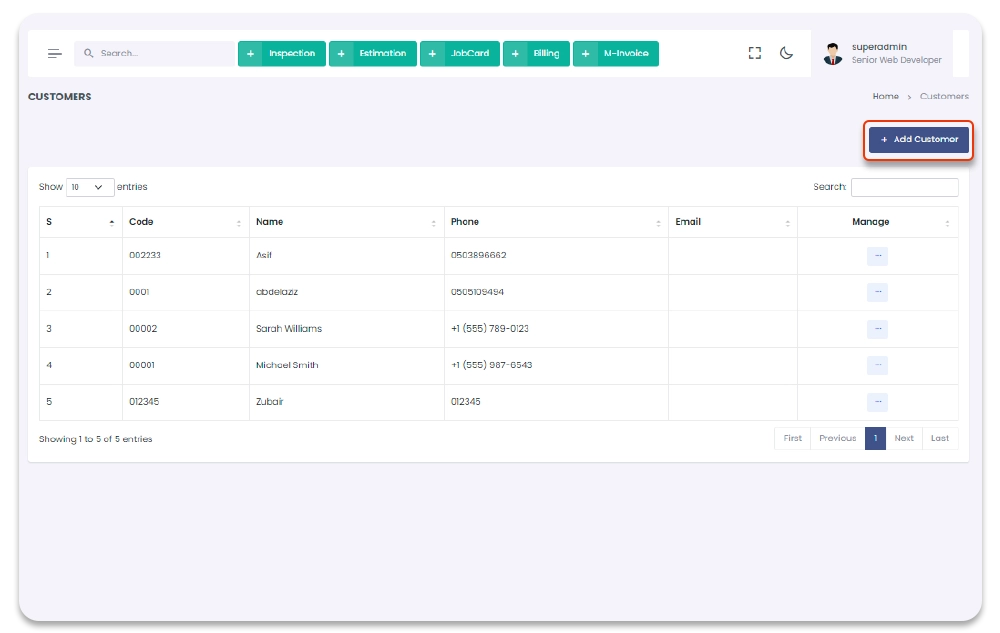
Customers
This section contains all the customers list with customer profiles. You can create new customers well as delete and update the existing customers.
After add a customer a pop up modal will appear to choose between add vehicle or add manual invoice.These will be the wizard steps we have added for user easyiness so that user can navigate the flow
1- Click on "Customers" from sidebar.
Garage Management System / Customers
- Add New Customer - You can add new customer by clicking the "New customer" button on the top left corner of the customer screen.
- You can also add the Contact list of customer through "Add Customer" form. To Add contact list you have to fill the contact information in "Contact List" section. You can add multiple contact also related to any customer, to add more contact list click on "+" icon in "contact List" Section, after filling all the details click on "Submit" button.
- Customer Profile - You can View new customer by clicking the related customer name row in the list, and you will be redirect to the customer profile page.
1- Click on "Customers" from sidebar.
2- Click on "+ New Customer" from Top right corner of the screen.
Garage Management System / Customers / New Customer
After clicking the "New customer" button you will redirect to the Add New customer Page. You have to fill details in the form and press Submit Button to add the new customer.

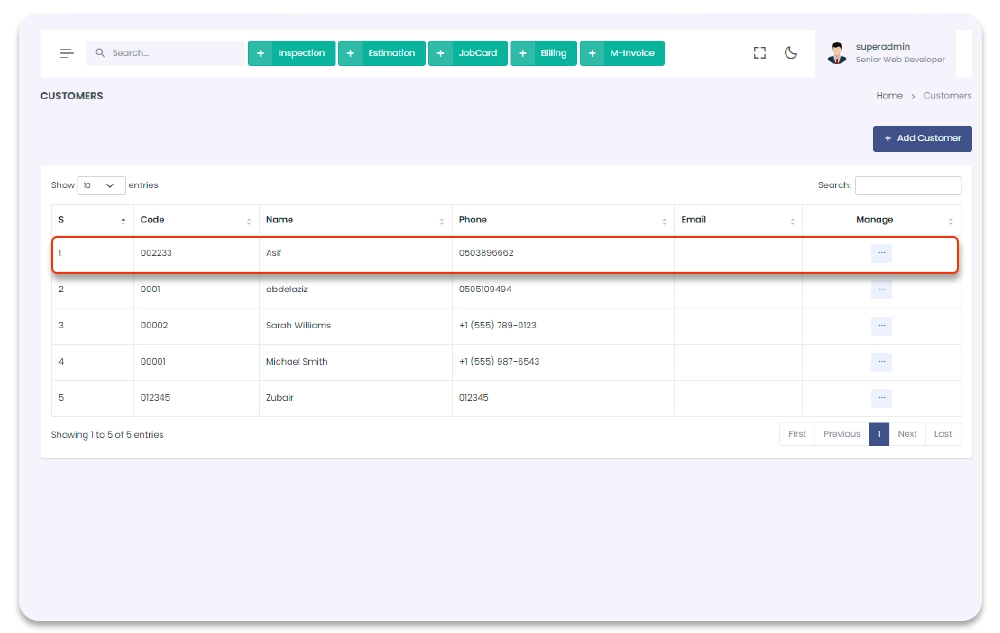
After clicking the clicking the related customer name row in the list, and you will be redirect to the "customer profile" page. On "customer Profile" page you can see all the details related to customer, as well as trasaction details related to the customer.
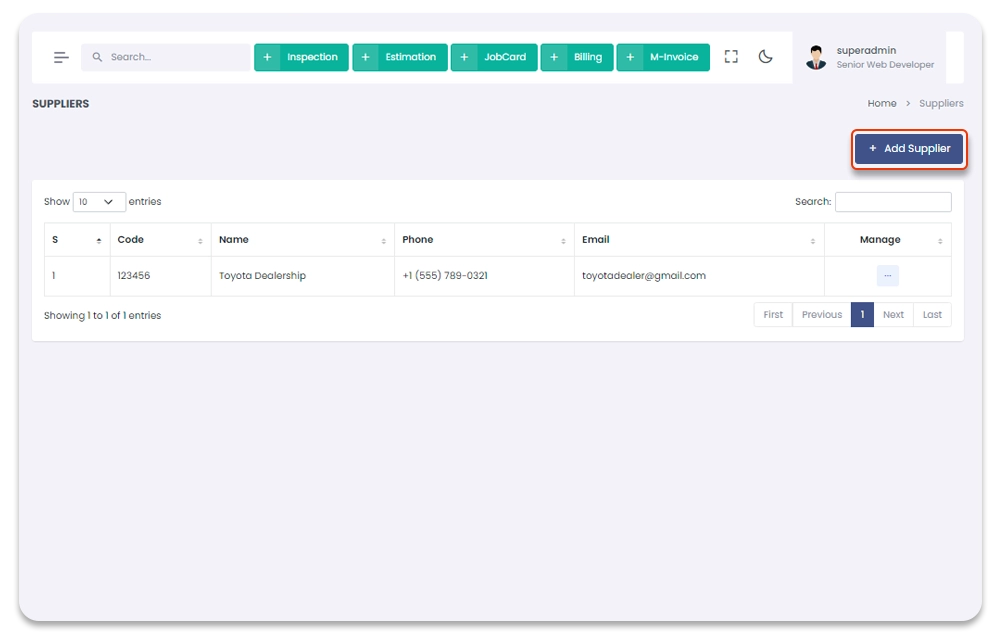
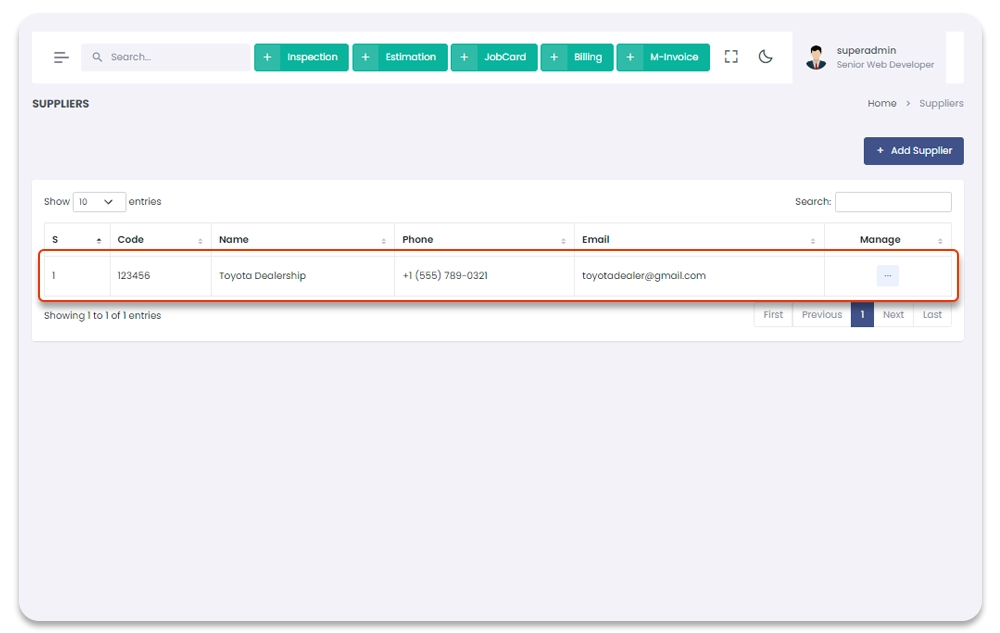
Suppliers
This section contains all the suppliers list with supplier profiles. You can create new suppliers well as delete and update the existing suppliers.
1- Click on "Customers & Suppliers" from sidebar.
2- Click on "Suppliers" from Topbar.
Garage Management System / Suppliers
- Add New Supplier - You can add new supplier by clicking the "New Supplier" button on the top right corner of the supplier screen.
- Supplier Profile - You can View new supplier by clicking the related supplier name row in the list, and you will be redirect to the supplier profile page.
1- Click on "Suppliers" from sidebar.
3- Click on "+ New Supplier" from Top right corner of the screen.
Garage Management System / Suppliers / New Supplier
4- After clicking the "New Supplier" button you will redirect to the Add New Supplier Page. You have to fill details in the form and press Submit Button to add the new supplier.
You can also add the Contact list of supplier through "Add Supplier" form. To Add contact list you have to fill the contact information in "Contact List" section. You can add multiple contact also related to any supplier, to add more contact list click on "+" icon in "contact List" Section, after filling all the details click on "Submit" button.
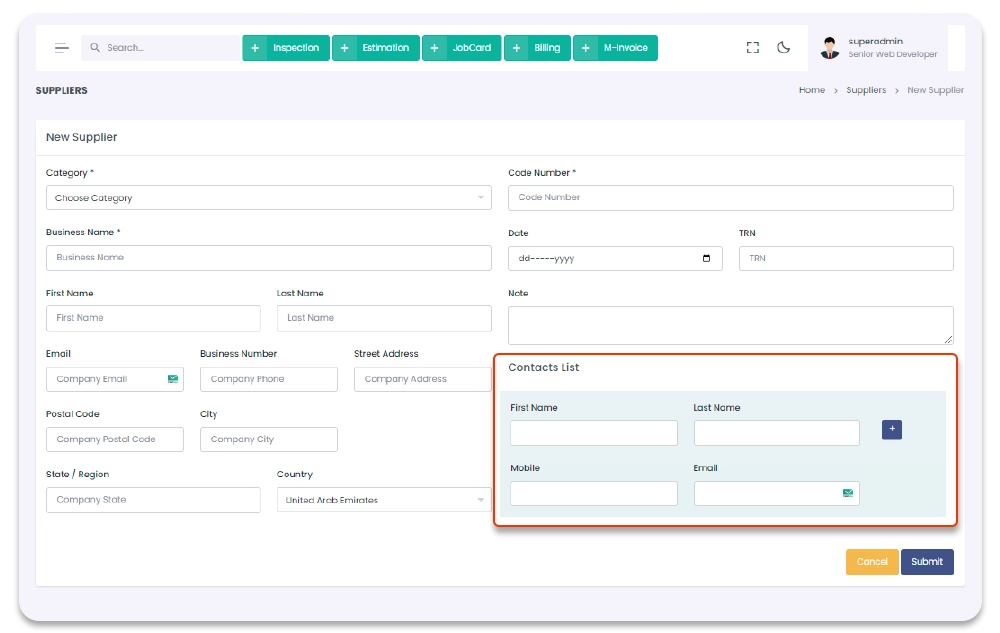
After clicking the clicking the related supplier name row in the list, and you will be redirect to the "supplier profile" page. On "Supplier Profile" page you can see all the details related to supplier, as well as trasaction details related to the supplier.
Inventory
All the Warehouses, parts, parts brands, Part's Quantity, Categories, Sub categories, Batches are managed through "Inventory" module. You can Navigate to this Section by following steps:
1- Click on "Inventory" from Garage Management System sidebar.
Garage Management System / Inventory
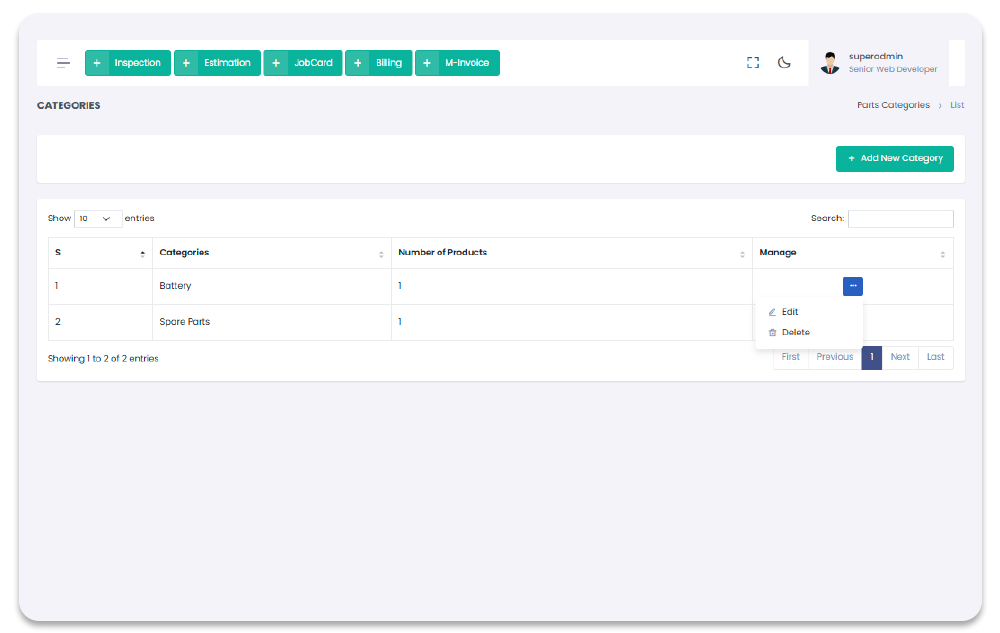
Categories
All part's categories will show in this section with detail. You can create new part category (example: caps, computers, mobile devices etc) as well as you can edit and delete these categories too. To navigate to this page follow the steps below:
1- Click on "Inventory" from Garage Management System sidebar.
2- Click on "Categories" from the Garage Management System sidebar.
Garage Management System / Categories
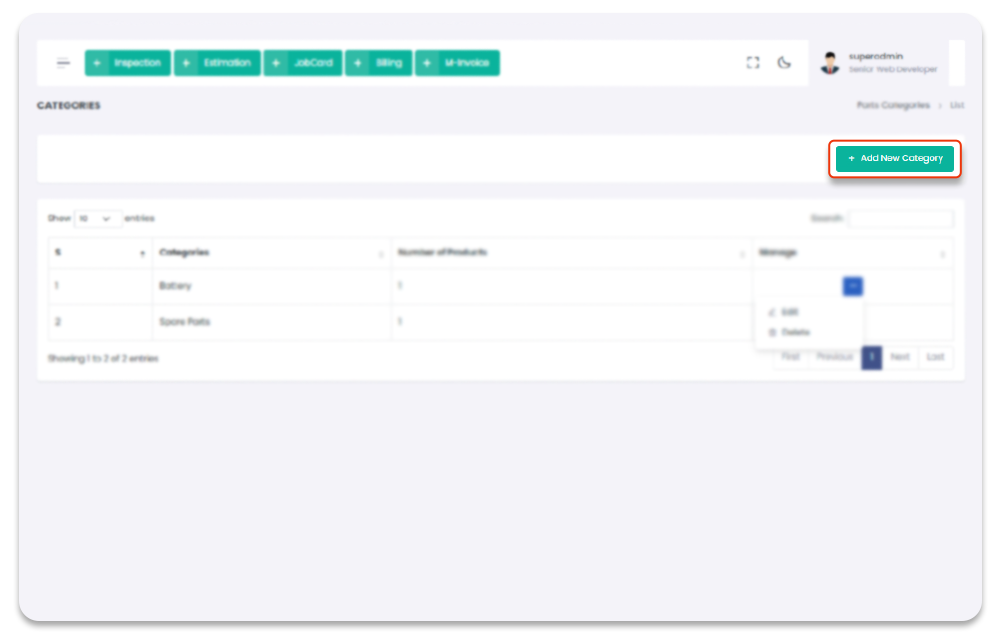
Add Category
All part's categories will show in this section with detail. You can create new part category (example: caps, computers, mobile devices etc). To navigate to this page and add part category follow the steps below:
1- Click on "Inventory" from Garage Management System sidebar.
2- Click on "Categories" from the Garage Management System sidebar.
3- Click on "+ Add New Category" button from the top right corner of the "category"
screen.
4- After click on "+ Add New Category" you will navigate to the "Add category" page.
5- Fill the category information in the form and click on "Submit" to record new category.
Garage Management System / Categories / New Categories
Update Categories
You can update part's categories once category created. To navigate to this page follow the steps below:
1- Click on "Inventory" from Garage Management System sidebar.
2- Click on "Categories" from the Garage Management System sidebar.
3- Click on settings icon under table column name "Manage".
4- From the dropdown menu select "Edit".
5- After click on edit button, you will navigate to the "Update category" page.
6- Update the category information and click on "Submit" button to save the changes.
Garage Management System / categories / Update Categories
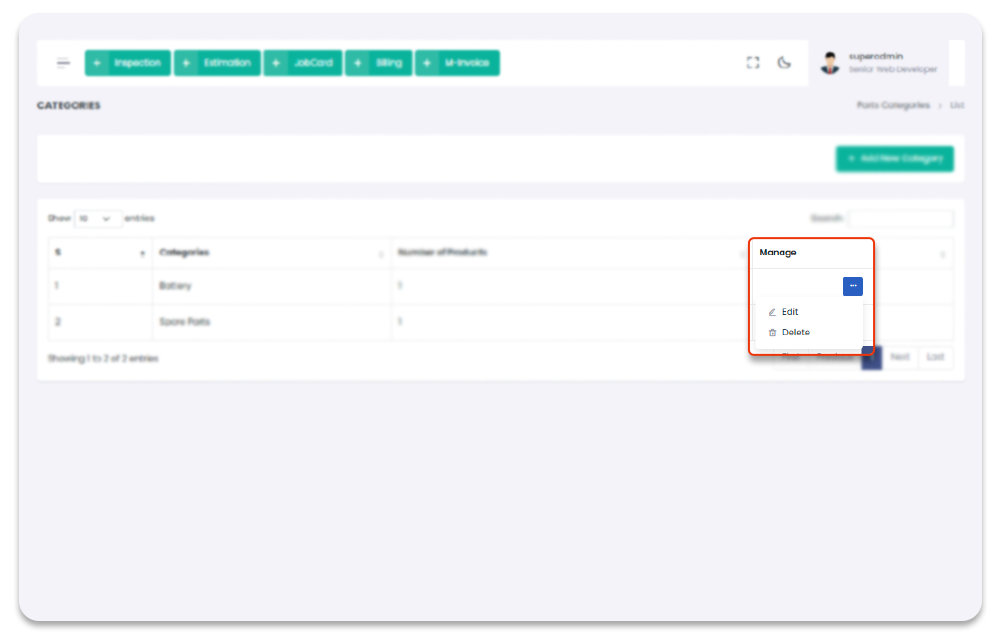
Delete Categories
You can delete part's categories once category created. To navigate to this page follow the steps below:
1- Click on "Inventory" from Garage Management System sidebar.
2- Click on "Categories" from the Garage Management System sidebar.
3- Click on settings icon under table column name "Manage".
4- From the dropdown menu select "Delete".
5- After click on Delete button, category will be delete with notification.
Garage Management System / Categories
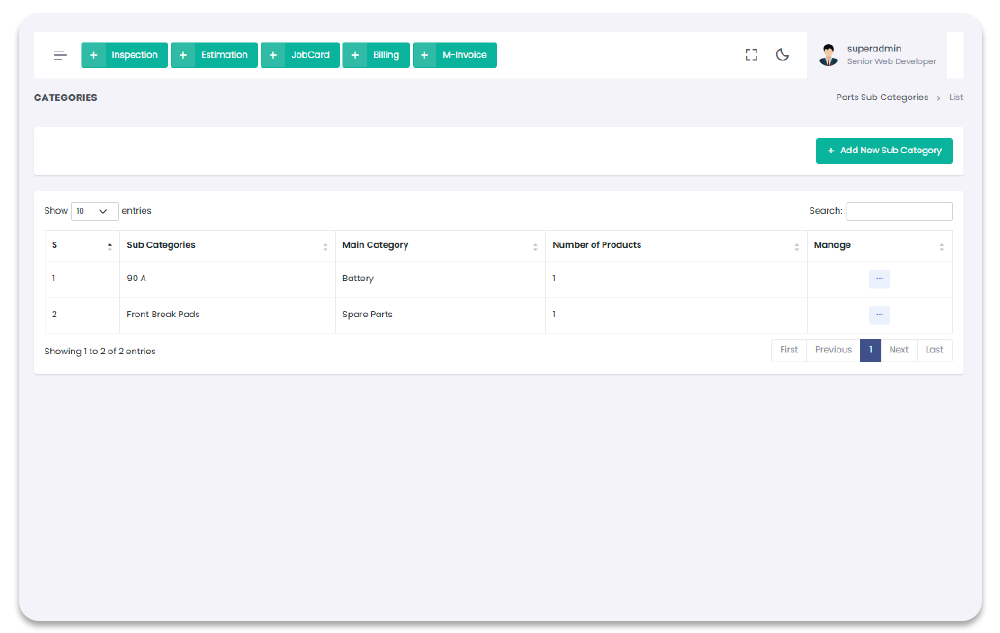
Sub Categories
All part's categories will show in this section with detail. You can create new part category (example: caps, computers, mobile devices etc) as well as you can edit and delete these categories too. To navigate to this page follow the steps below:
1- Click on "Inventory" from Garage Management System sidebar.
2- Click on "Categories" from the Garage Management System sidebar.
Garage Management System / Sub Categories
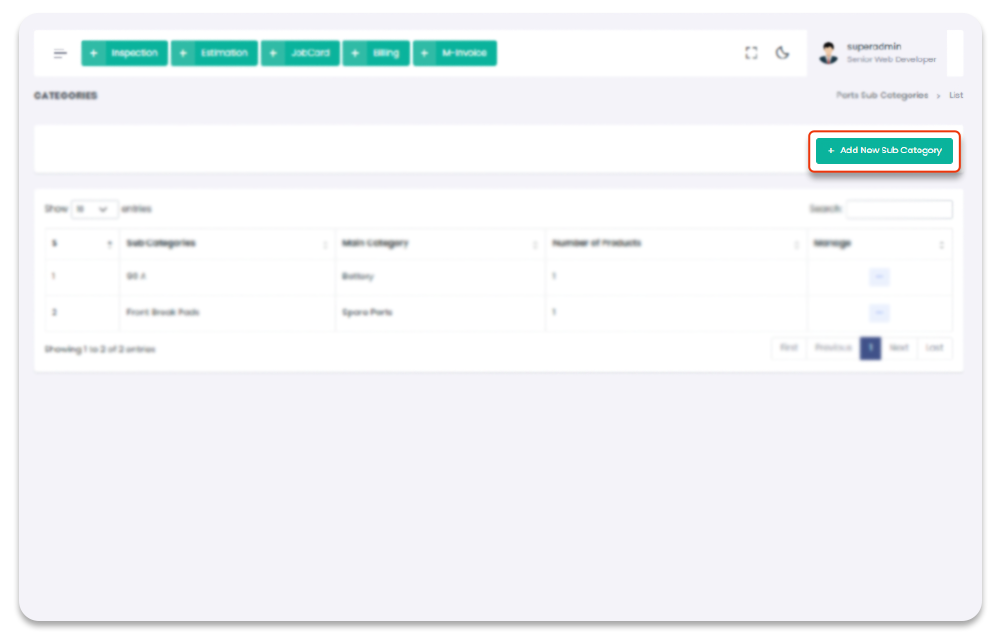
Add Sub Category
All part's categories will show in this section with detail. You can create new part category (example: caps, computers, mobile devices etc). To navigate to this page and add part category follow the steps below:
1- Click on "Inventory" from Garage Management System sidebar.
2- Click on "Sub Categories" from the Garage Management System sidebar.
3- Click on "+ Add New Sub Category" button from the top right corner of the "category"
screen.
4- After click on "+ Add New Sub Category" you will navigate to the "Add category" page.
5- Fill the category information in the form and click on "Submit" to record new category.
Garage Management System / Sub Categories / New Categories
Update Sub Categories
You can update part's categories once category created. To navigate to this page follow the steps below:
1- Click on "Inventory" from Garage Management System sidebar.
2- Click on "Sub Categories" from the Garage Management System sidebar.
3- Click on settings icon under table column name "Manage".
4- From the dropdown menu select "Edit".
5- After click on edit button, you will navigate to the "Update category" page.
6- Update the category information and click on "Submit" button to save the changes.
Garage Management System / Sub categories / Update Categories
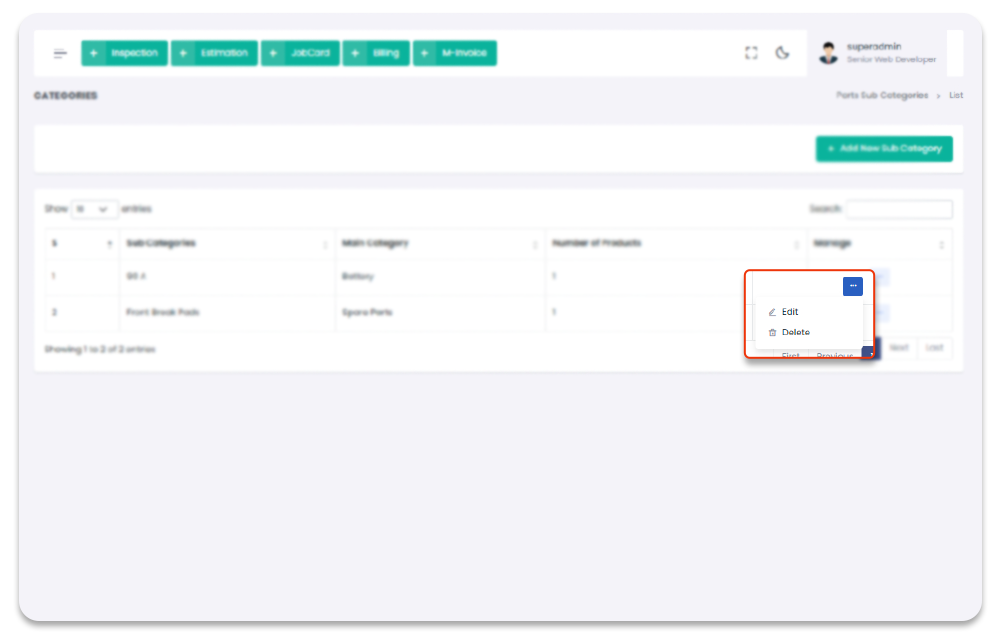
Delete Sub Categories
You can delete part's categories once category created. To navigate to this page follow the steps below:
1- Click on "Inventory" from Garage Management System sidebar.
2- Click on "Sub Categories" from the Garage Management System sidebar.
3- Click on settings icon under table column name "Manage".
4- From the dropdown menu select "Delete".
5- After click on Delete button, category will be delete with notification.
Garage Management System / Sub Categories
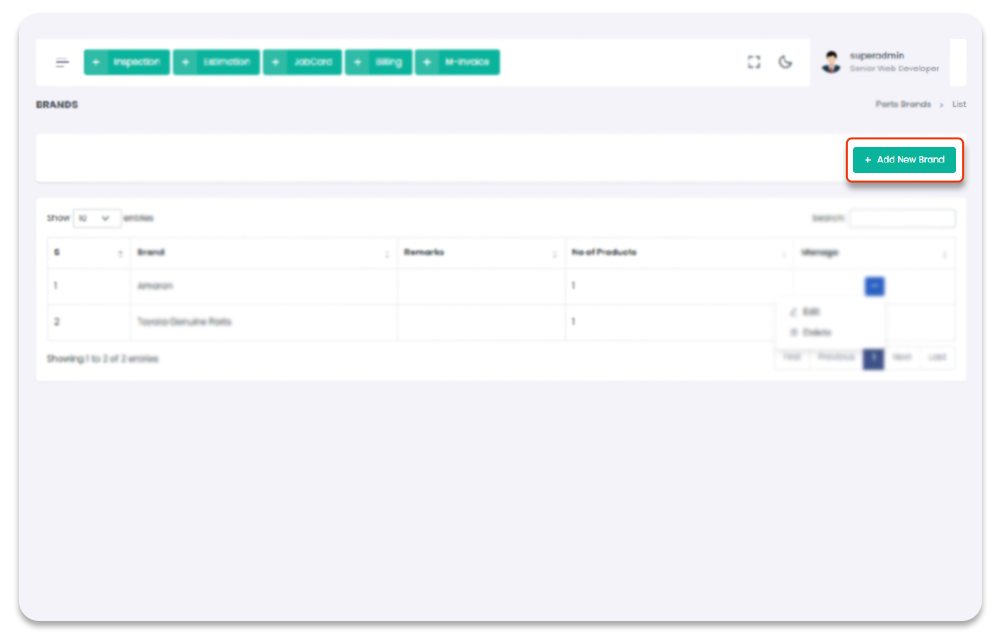
Parts Brands
All part's brands will show in this section with detail. You can create new part brands as well as you can edit and delete these brands too. To navigate to this page follow the steps below:
1- Click on "Inventory" from Garage Management System sidebar.
2- Click on "Parts Brands" from the Garage Management System sidebar.
Garage Management System / Parts Brands
Add Parts Brand
All part's brands will show in this section with detail. You can create new part brand. To navigate to this page and add part brand follow the steps below:
1- Click on "Inventory" from Garage Management System sidebar.
2- Click on "Parts Brands" from the Garage Management System sidebar.
3- Click on "+ Add New Brand" button from the top right corner of the "Parts Brands"
screen.
4- After click on "+ Add New Brand" you will navigate to the "Add Brand" page.
5- Fill the brand information in the form and click on "Submit" to record new brand.
Garage Management System / Parts Brands / Add Brand
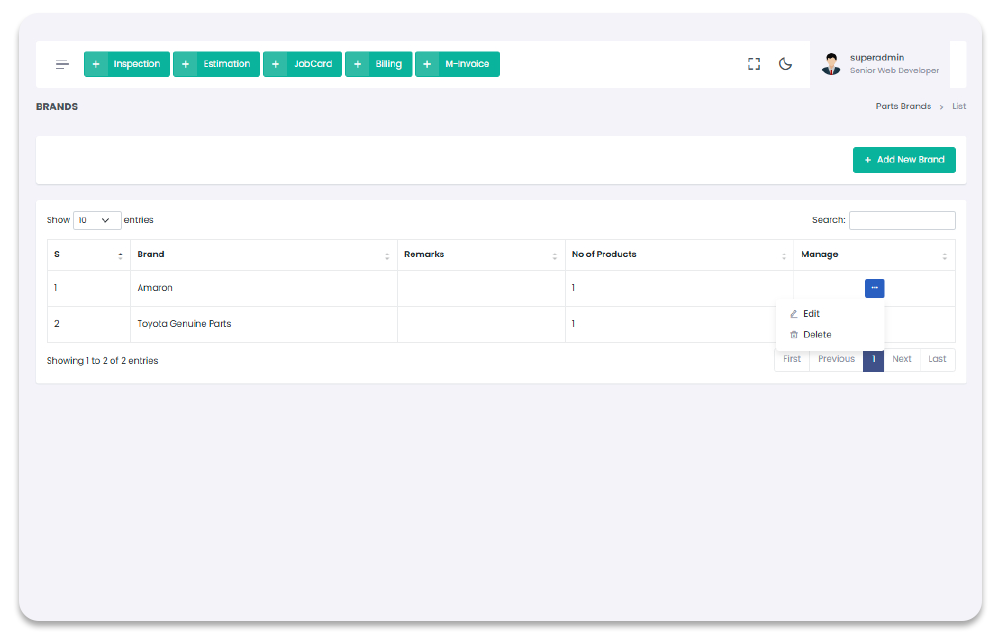
Update Parts Brand
You can update part's brands once brand created. To navigate to this page follow the steps below:
1- Click on "Inventory" from Garage Management System sidebar.
2- Click on "Parts Brand" from the Garage Management System sidebar.
3- Click on settings icon under table column name "Manage".
4- From the dropdown menu select "Edit".
5- After click on edit button, you will navigate to the "Update brand" page.
6- Update the brand information and click on "Submit" button to save the changes.
Garage Management System / Parts Brands / Update Brand
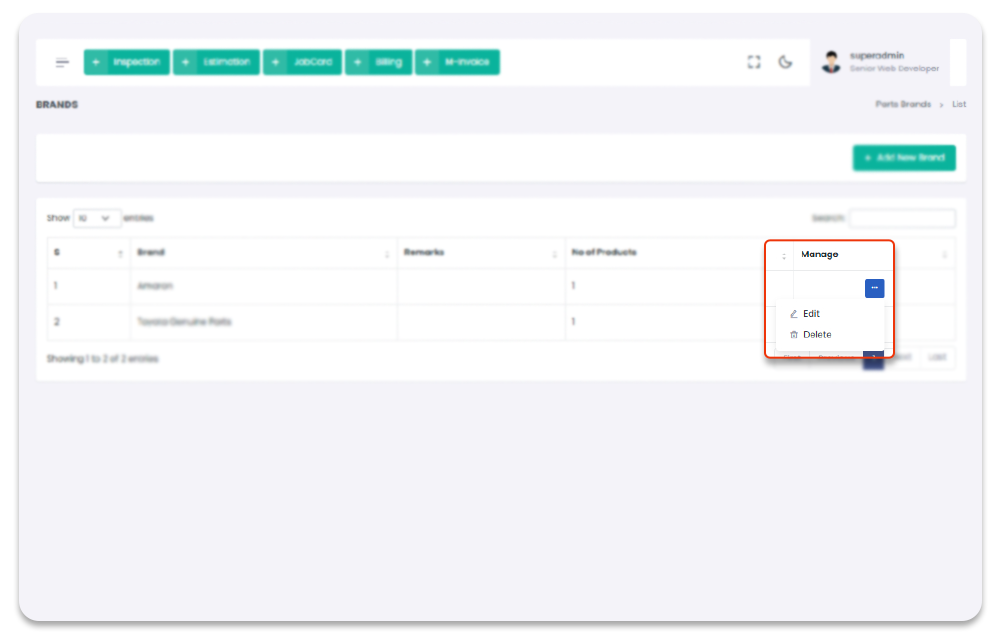
Delete Parts Brands
You can delete part's brands once brand created. To navigate to this page follow the steps below:
1- Click on "Inventory" from Garage Management System sidebar.
2- Click on "Parts Brand" from the Garage Management System sidebar.
3- Click on settings icon under table column name "Manage".
4- From the dropdown menu select "Delete".
5- After click on Delete button, brand will be delete with notification.
Garage Management System / Parts Brands
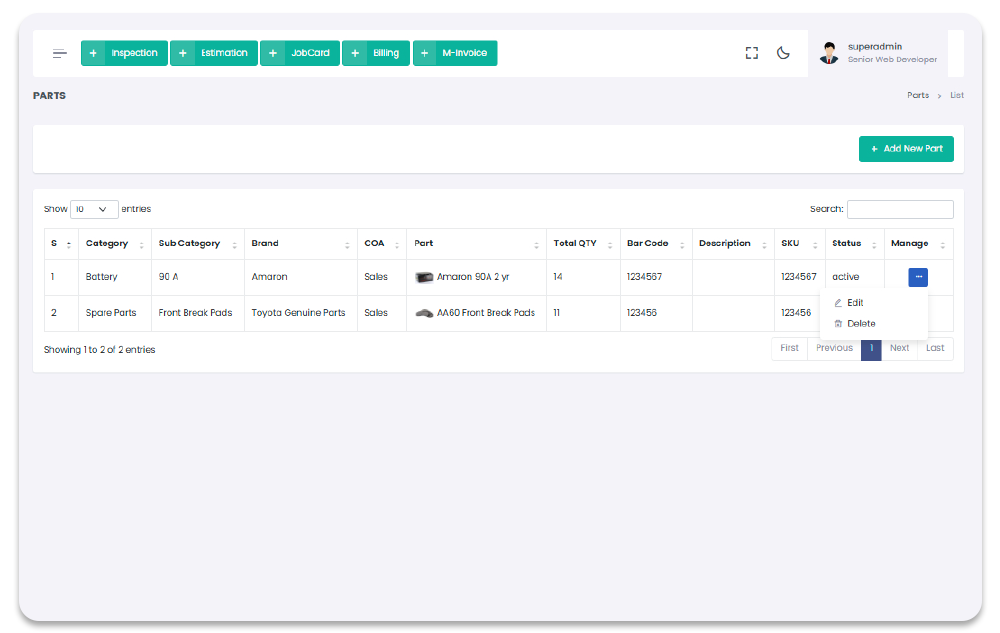
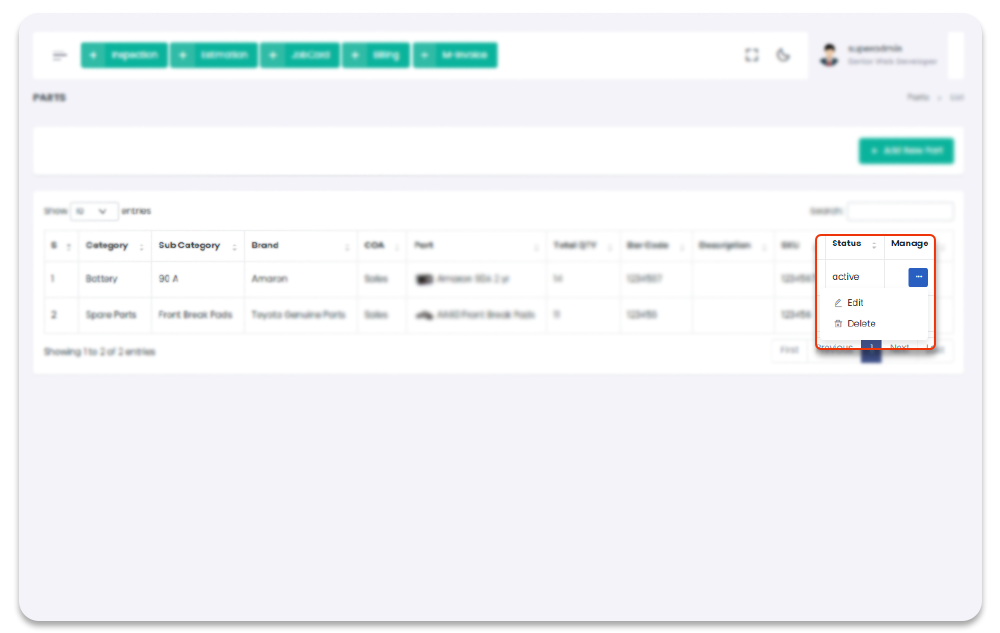
Parts
All Parts will show in this section with detail (Part quantity, Part price, Part status etc). You can create new Parts (example: caps-> white cap, computers -> Toshiba, mobile devices -> Apple etc) as well as you can edit and delete these Parts too. To navigate to this page follow the steps below:
1- Click on "Inventory" from Garage Management System sidebar.
2- Click on "Parts" from the Garage Management System sidebar.
Garage Management System / Parts
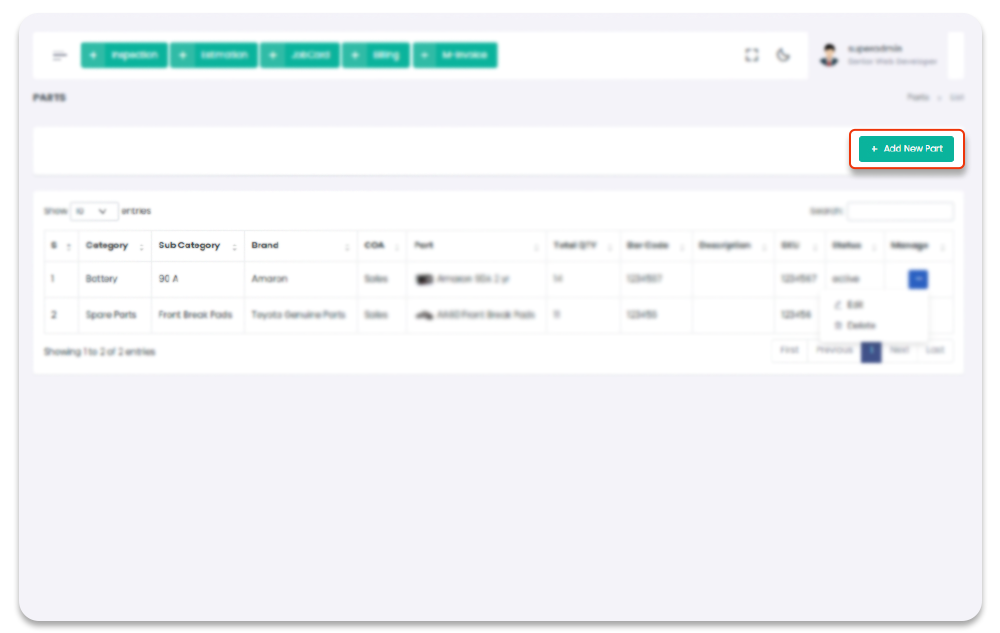
Add Part
All Parts will show in this section with detail. You can create new Parts (example: caps -> white cap, computers -> Toshiba, mobile devices -> Apple etc). To navigate to this page and add Parts follow the steps below:
1- Click on "Inventory" from Garage Management System sidebar.
2- Click on "Parts" from the Garage Management System sidebar.
3- Click on "+ Add New Part" button from the top right corner of the "Part" screen.
4- After click on "+ Add New Part" you will navigate to the "Add Part" page.
5- Fill the Part information in the form and click on "Submit" to record new Part.
Garage Management System / Parts / New Part
Update Part
You can update Parts once Part created as well as you can manage the part's batches. To navigate to this page follow the steps below:
1- Click on "Inventory" from Garage Management System sidebar.
2- Click on "Parts" from the Garage Management System sidebar.
3- Click on settings icon under table column name "Manage".
4- From the dropdown menu select "Edit".
5- After click on edit button, you will navigate to the "Update Part" page.
6- Update the Part information and click on "Submit" button to save the changes.
7- To Update part's batch click on settings icons under the column name "Manage"
and select "Manage Batches".
8- After clicking on "Manage Batches" you will redirect to the "batches" page. (Detailed information
about batches is in Batches section).
Garage Management System / Parts / Update Parts
Delete Part
You can delete Parts once Part created. To delete the part follow the steps below:
1- Click on "Inventory" from Garage Management System sidebar.
2- Click on "Parts" from the Garage Management System sidebar.
3- click on settings icon under table column name "Manage".
4- from the dropdown menu select "Delete".
5- After click on Delete button, Part will be delete with notification.
Garage Management System / Parts
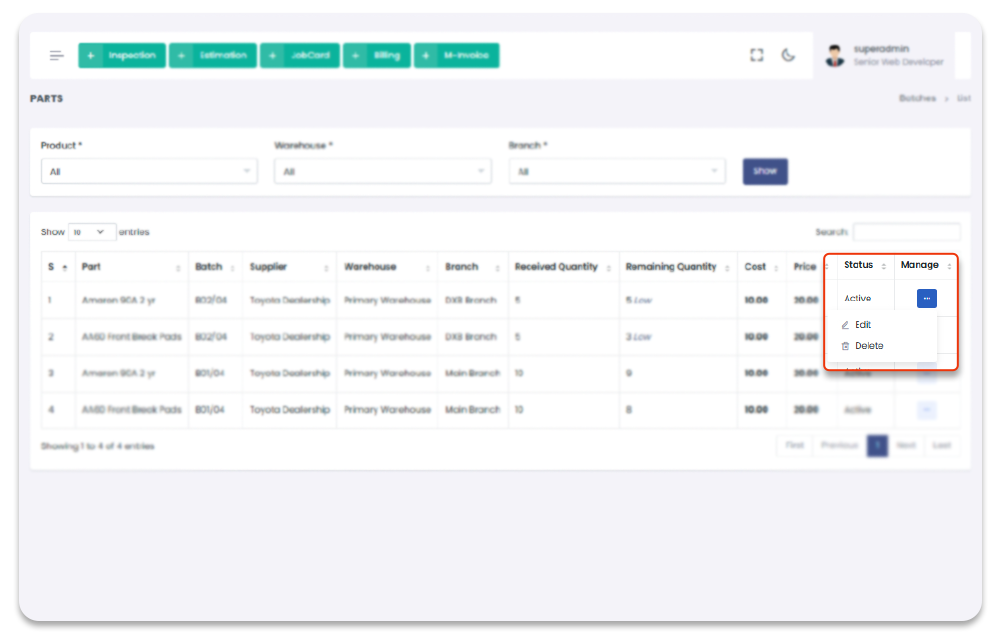
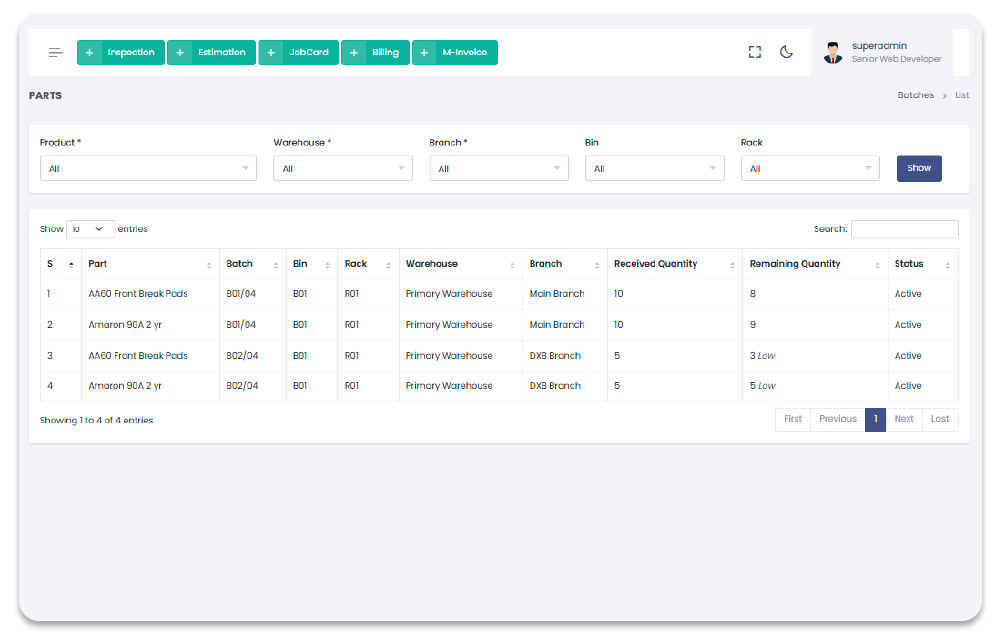
Batches
All the parts Quantity, Part store location, Parts Cost price & selling price, Part Batch status managed through this section. "Filter" option is also available in "Batches" page to sort the detailed information.
1- Click on "Inventory" from Garage Management System sidebar.
2- Click on "Batches" from the Garage Management System sidebar.
Garage Management System / Batches

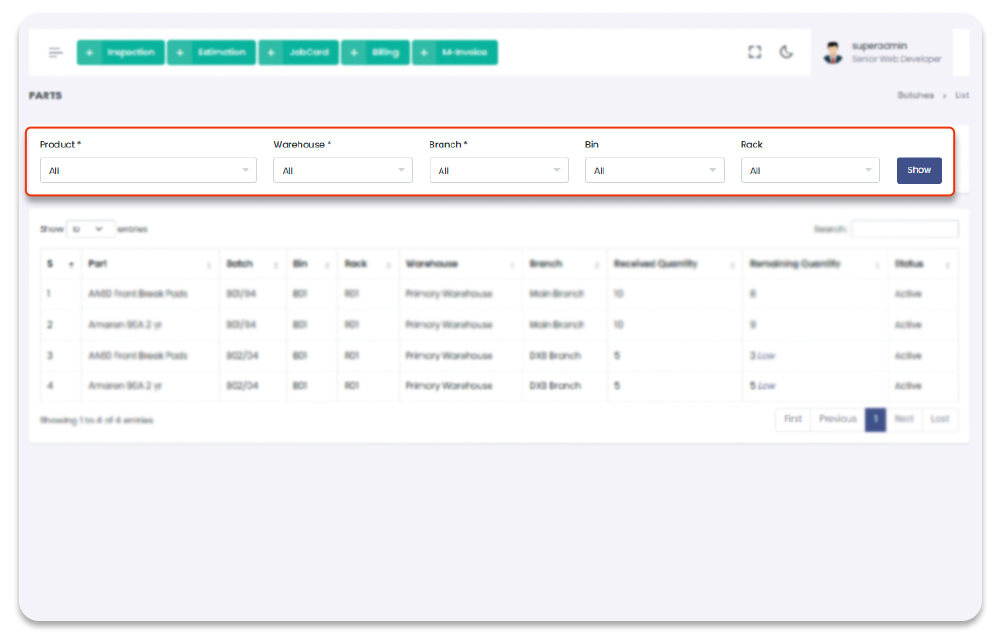
Add Batches
All Batches will show in this section with detail. You can filter the batches details using filter options available above the Batches Table. Once you apply the filter and sort any part after applying filter Add Batch option will apear on the top right side of the Batch screen.
1- Click on "Inventory" from Garage Management System sidebar.
2- Click on "Batches" from the Garage Management System sidebar.
3- Apply the filter and sort any part.
4- After applying filter Add Batch button will appear on the top right side of the
Batches Page.
5- Click on "+ New Batch" button from the top right corner of the Batches screen.
6- After click on "+ Add Batch" popup screen will appear.
7- Fill the Batch information in the form and click on "Submit" to record new Batch.
Garage Management System / Batches / New Batches

Update Batches
You can update Batch once Batch created. To update the batch follow the steps below:
1- Click on "Inventory" from Garage Management System sidebar.
2- Click on "Parts" from the Garage Management System sidebar.
3- click on settings icon under table column name "Manage".
4- from the dropdown menu select "Edit".
5- After click on edit button, popup screen will apear to update the Batch information.
6- Update the Batch information and click on "Submit" button to save the changes.
Garage Management System / Batches / Update Batches
Delete Batch
You can delete Batch once Batch created. To delete the Batch follow the steps below:
1- Click on "Inventory" from Garage Management System sidebar.
2- Click on "Batches" from the Garage Management System sidebar.
3- click on settings icon under table column name "Manage".
4- from the dropdown menu select "Delete".
5- After click on Delete button, Batches will be delete with notification.
Garage Management System / Batches
Part Locations
All the Part Locations will show in "Part Locations" section. To Navigate to this page
follow the given steps:
1- Click on "Inventory" from Garage Management System sidebar.
2- After Click by default"Part Locations" will open (if you have privilege to access the page).
Garage Management System / Part Locations
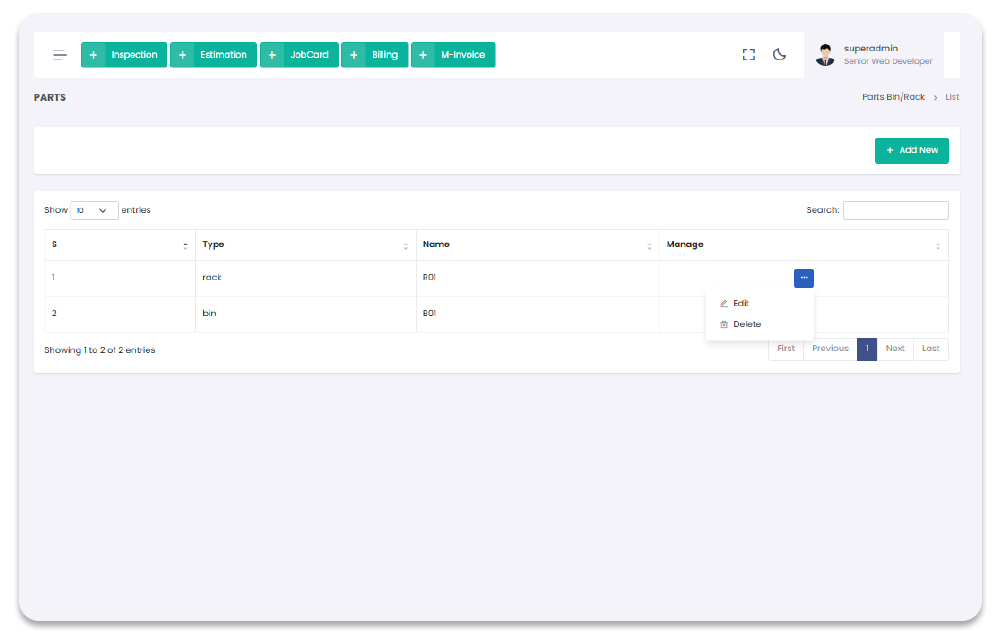
Part Bin/Rack
All the Part Bin/Rack will show in "Part Bin/Rack" section. To Navigate to this page
follow the given steps:
1- Click on "Inventory" from Garage Management System sidebar.
2- After Click by default"Part Bin/Rack" will open (if you have privilege to access the page).
Garage Management System / Part Bin/Rack
Add Part Bin/Rack
You can add Part Bin/Rack to get started with Inventory. To Navigate to this page and
Add Bin/Rack follow the given steps:
1- Click on "Inventory" from Garage Management System sidebar.
2- After Click by default"Part Bin/Rack" will open (if you have privilege to access the page).
3- Click on "+ Add Parts Location" button on the top right corner of the "Part Bin/Rack" page.
4- After click "+ Add Parts Location" button you will redirect to the "Add Parts Location" Page.
5- Fill the information and click on "Submit" button to add Parts Location.
Garage Management System / Part Bin/Rack / Add Parts Location
Update Part Bin/Rack
You can Update Part Bin/Rack/ store from "Part Bin/Rack" Page. To Navigate to this page and
Update store follow the given steps:
1- Click on "Inventory" from Garage Management System sidebar.
2- After Click by default"Part Bin/Rack" will open (if you have privilege to access the page).
3- Click on "Edit" button from the dropdown of Table column name "manage".
4- After click "+ Edit" button you will redirect to the "Edit Parts Location" Page.
5- Fill the information and click on "Submit" button to Update Bin/Rack.
Garage Management System / Part Bin/Rack / Edit Parts Location
Delete Part Bin/Rack
You can Delete Part Bin/Rack/ store from "Part Bin/Rack" Page. To Navigate to this page and
Update store follow the given steps:
1- Click on "Inventory" from Garage Management System sidebar.
2- After Click by default"Part Bin/Rack" will open (if you have privilege to access the page).
3- Click on "Delete" button from the dropdown of Table column name "manage".
4- After click on "Delete" button from the dropdown warehouse will be deleted with notification.
Garage Management System / Part Bin/Rack
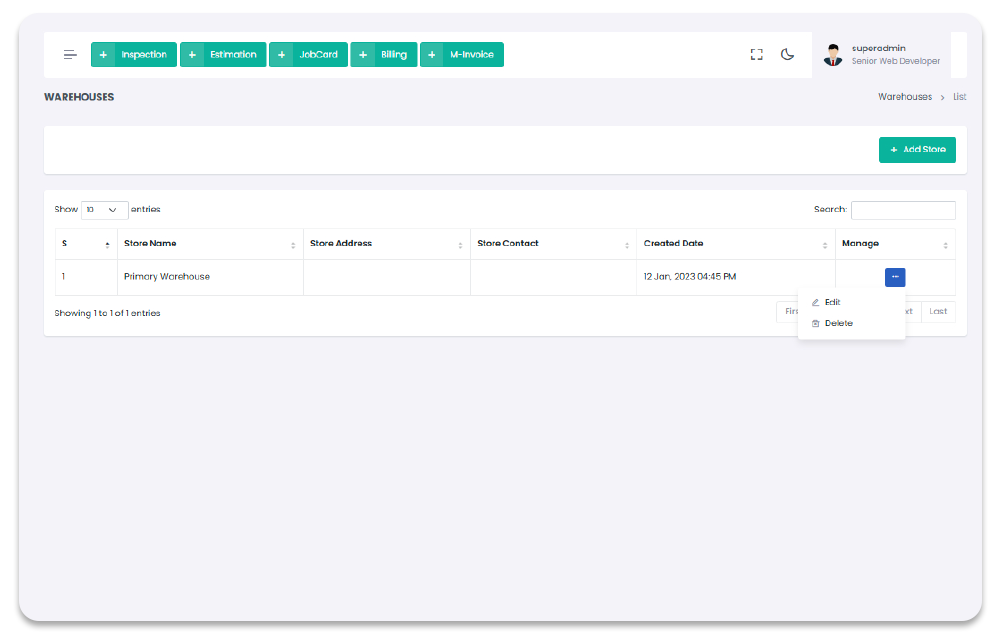
Warehouses
All the Part Bin/Rack/ stores will show in "Part Bin/Rack" section. To Navigate to this page
follow the given steps:
1- Click on "Inventory" from Garage Management System sidebar.
2- After Click by default"Warehouses" will open (if you have privilege to access the page).
Garage Management System / Part Bin/Rack
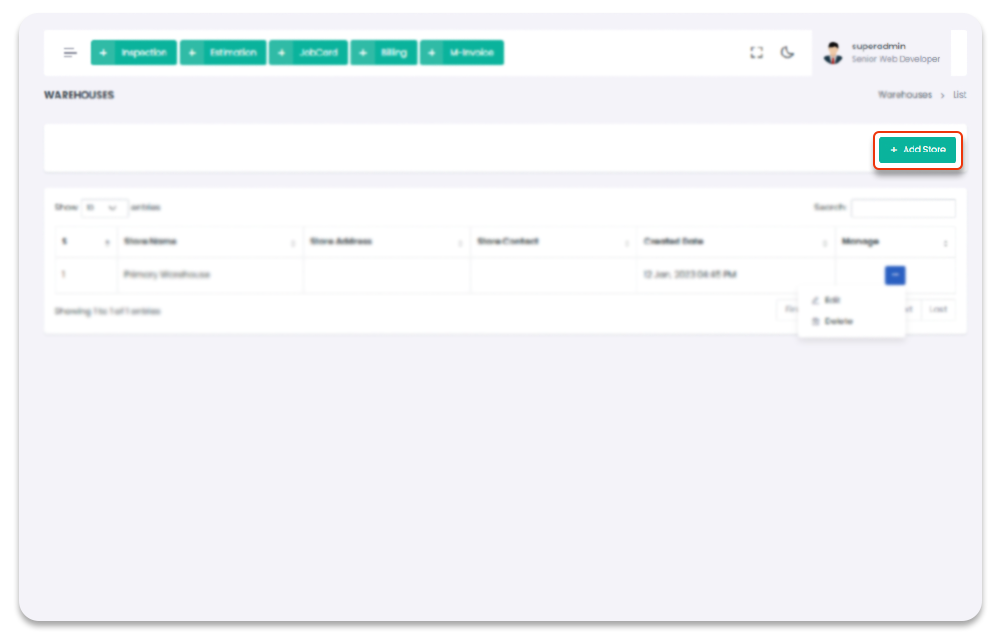
Add Warehouse
You can add warehouse/ store to get started with Inventory. To Navigate to this page and
Add store follow the given steps:
1- Click on "Inventory" from Garage Management System sidebar.
2- After Click by default"Warehouses" will open (if you have privilege to access the page).
3- Click on "+ Add Store" button on the top right corner of the "Warehouse" page.
4- After click "+ Add Store" button you will redirect to the "Add warehouse" Page.
5- Fill the information and click on "Submit" button to add store.
Garage Management System / Warehouses / Add Store
Update Warehouse
You can Update warehouse/ store from "Warehouses" Page. To Navigate to this page and
Update store follow the given steps:
1- Click on "Inventory" from Garage Management System sidebar.
2- After Click by default"Warehouses" will open (if you have privilege to access the page).
3- Click on "Edit" button from the dropdown of Table column name "manage".
4- After click "+ Edit" button you will redirect to the "Edit warehouse" Page.
5- Fill the information and click on "Submit" button to Update store.
Garage Management System / Warehouses / Edit Warehouse
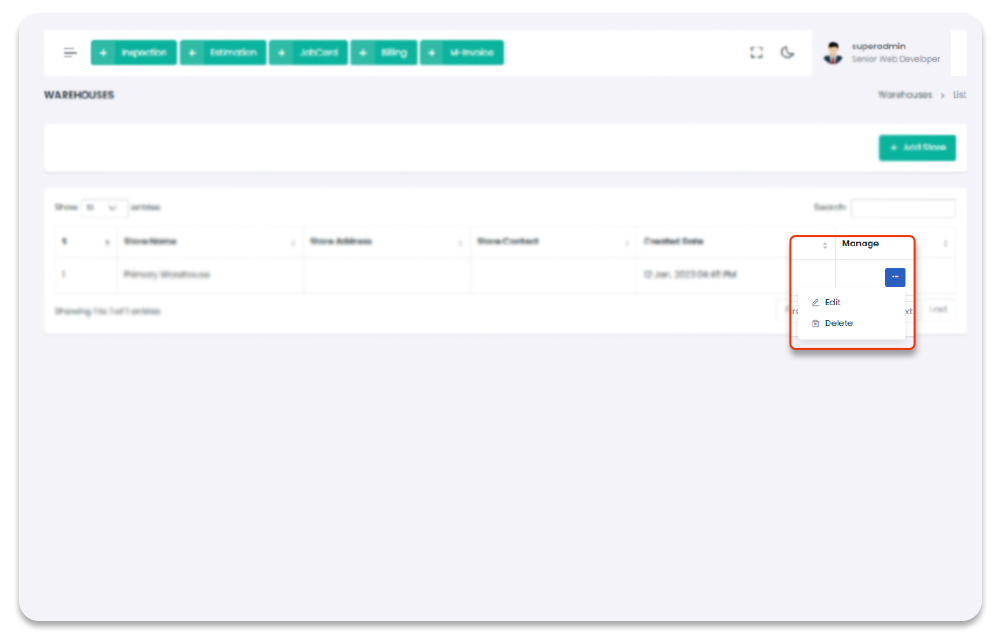
Delete Warehouse
You can Delete warehouse/ store from "Warehouses" Page. To Navigate to this page and
Update store follow the given steps:
1- Click on "Inventory" from Garage Management System sidebar.
2- After Click by default"Warehouses" will open (if you have privilege to access the page).
3- Click on "Delete" button from the dropdown of Table column name "manage".
4- After click on "Delete" button from the dropdown warehouse will be deleted with notification.
Garage Management System / Warehouse
Vehicles
All the Vehicles function can be done from the Vehicles Section. To navigate to the Vehicles Pages, follow the steps below:
1- Click on "Vehicle" from Garage Management System sidebar.
2- Click on "Desired Functionality" from the Sidebar.
Garage Management System / Vehicles
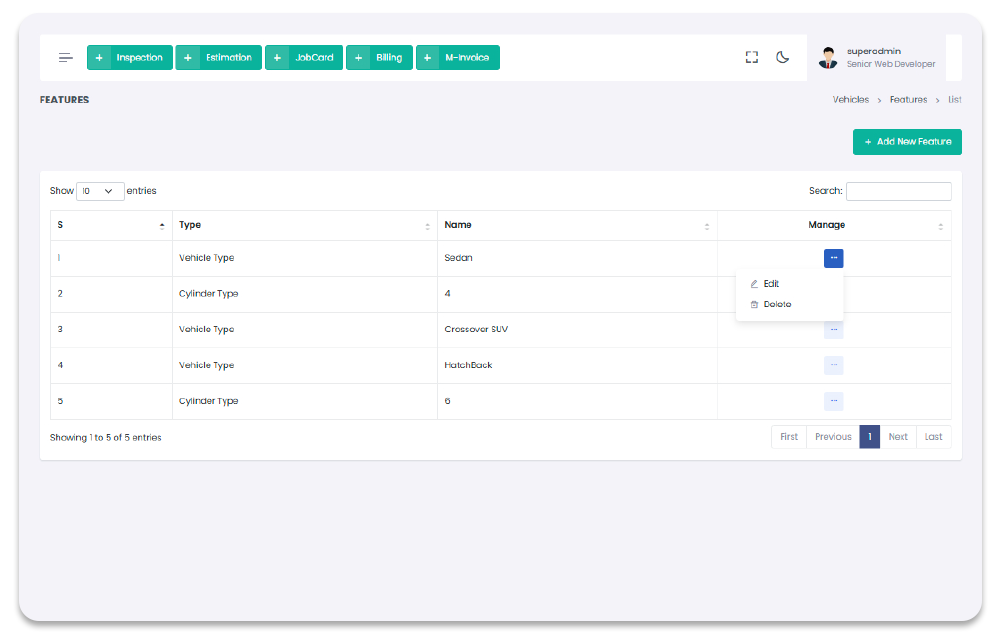
Features
All the Features can be done from the Features Section. When feature is created you can be used it in Vehicles section, To navigate to the Features Page, follow the steps below:
1- Click on "Vehicle" from Garage Management System sidebar.
2- Click on "Features" from the Sidebar.
Garage Management System / Vehicles/ Features
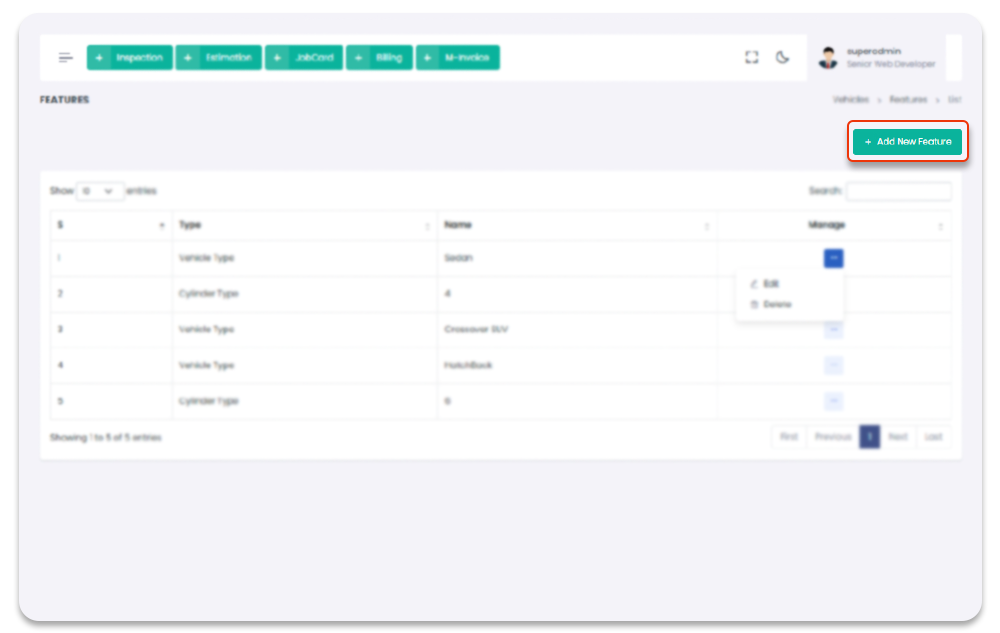
Features Create
You can add feature to get started with Vehicles. To Navigate to this page and
Add feature follow the given steps:
1- Click on "Vehicle" from Garage Management System sidebar.
2- Then Click on "Features" then it will open (if you have privilege to access the page).
3- Click on "+ Add New Feature" button on the top right corner of the "Features" page.
4- After click "+ Add New Feature" button you will redirect to the "Add New Feature" Page.
5- Fill the information and click on "Submit" button to add feature.
Garage Management System / Vehicles/ Add Vehicle Feature
Features Update
You can update features. To Navigate to this page and
Update feature follow the given steps:
1- Click on "Vehicle" from Garage Management System sidebar.
2- Then Click on "Features" then it will open (if you have privilege to access the page).
3- Click on the icon under table column name "Manage" of the desired feature.
4- From the dropdown menu select "Edit".
5- After click "Edit" button you will redirect to the "Edit Vehicle Feature" Page.
6- Edit the information and click on "Submit" button to add feature.
Garage Management System / Vehicles/ Edit Vehicle Feature

Features Delete
You can delete features. To Navigate to this page and
Delete feature follow the given steps:
1- Click on "Vehicle" from Garage Management System sidebar.
2- Then Click on "Features" then it will open (if you have privilege to access the page).
3- Click on the icon under table column name "Manage" of the desired feature.
4- From the dropdown menu select "Delete".
5- After click "Delete" button you will be asked for a "Confirmation".
6- When you confirm the feature will be deleted.
Garage Management System / Vehicles/ Features

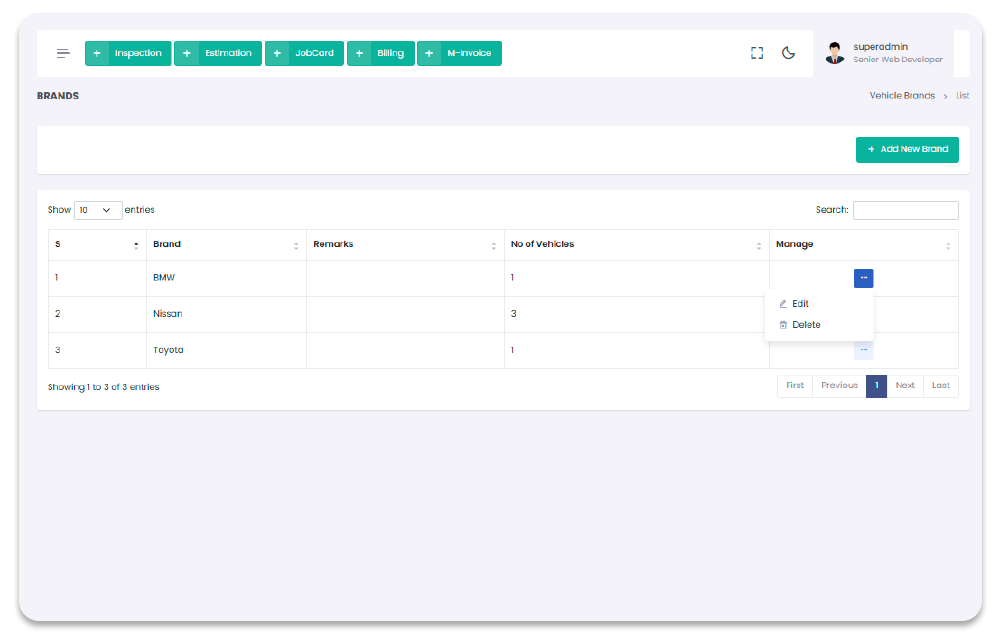
Vehicle Brands
All the brand can be done from the brand Section. When brand is created you can be used it in Vehicles section, To navigate to the brand Page, follow the steps below:
1- Click on "Vehicle" from Garage Management System sidebar.
2- Click on "Vehicle Brand" from the Sidebar.
Garage Management System / Vehicles/ Vehicle Brand
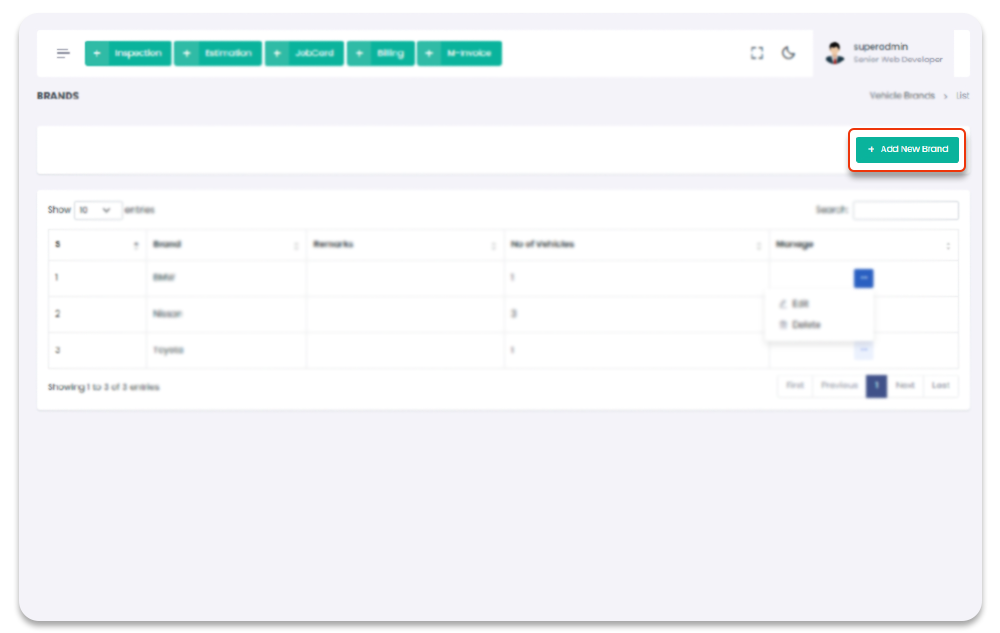
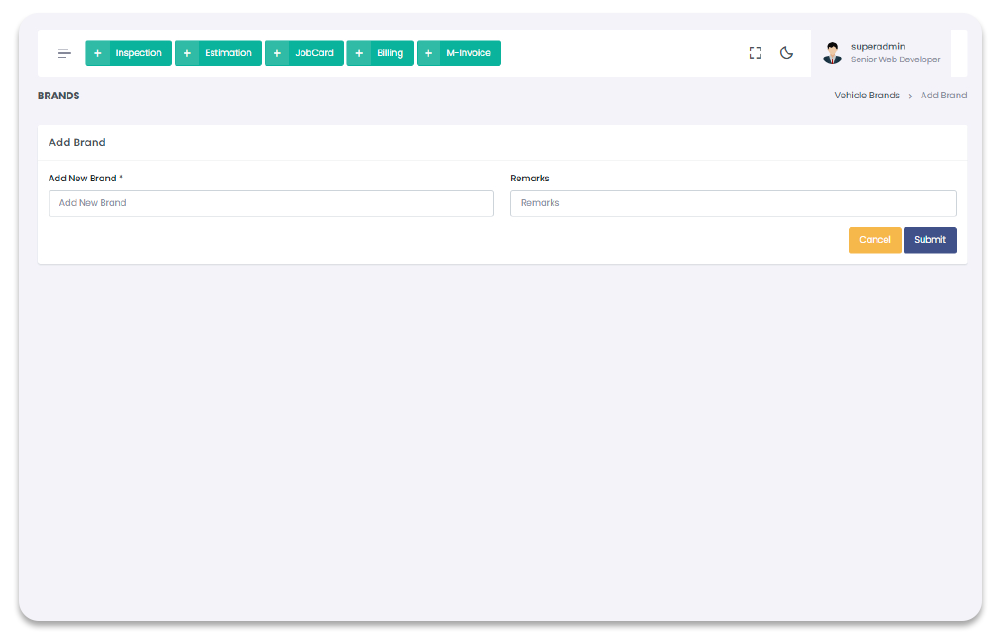
Vehicle Brand Create
You can add brand to get started with Vehicles. To Navigate to this page and
Add brand follow the given steps:
1- Click on "Vehicle" from Garage Management System sidebar.
2- Then Click on "Vehicle Brands" then it will open (if you have privilege to access the page).
3- Click on "+ Add New Vehicle Brand" button on the top right corner of the "Vehicle Brands" page.
4- After click "+ Add New Vehicle Brand" button you will redirect to the "Add New Vehicle Brand" Page.
5- Fill the information and click on "Submit" button to add brand.
Garage Management System / Vehicles/ Add Vehicle Brand
Vehicle Brands Update
You can update brands. To Navigate to this page and
Update brand follow the given steps:
1- Click on "Vehicle" from Garage Management System sidebar.
2- Then Click on "Vehicle Brands" then it will open (if you have privilege to access the page).
3- Click on the icon under table column name "Manage" of the desired brand.
4- From the dropdown menu select "Edit".
5- After click "Edit" button you will redirect to the "Edit Vehicle Brand" Page.
6- Edit the information and click on "Submit" button to add brand.
Garage Management System / Vehicles/ Edit Vehicle Brand
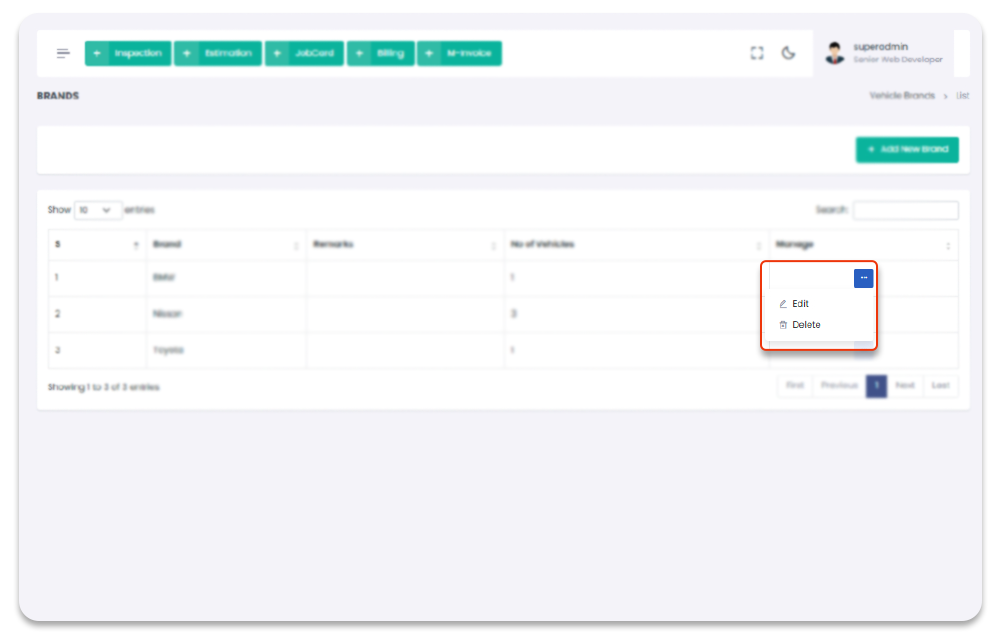
Vehicle Brands Delete
You can delete brands. To Navigate to this page and
Delete brand follow the given steps:
1- Click on "Vehicle" from Garage Management System sidebar.
2- Then Click on "Vehicle Brands" then it will open (if you have privilege to access the page).
3- Click on the icon under table column name "Manage" of the desired brand.
4- From the dropdown menu select "Delete".
5- After click "Delete" button you will be asked for a "Confirmation".
6- When you confirm the brand will be deleted.
Garage Management System / Vehicles/ Vehicle Brand
Models
All the model can be done from the model Section. When model is created you can be used it in Vehicles section, To navigate to the model Page, follow the steps below:
1- Click on "Vehicle" from Garage Management System sidebar.
2- Click on "Model" from the Sidebar.
Garage Management System / Vehicles/ Model
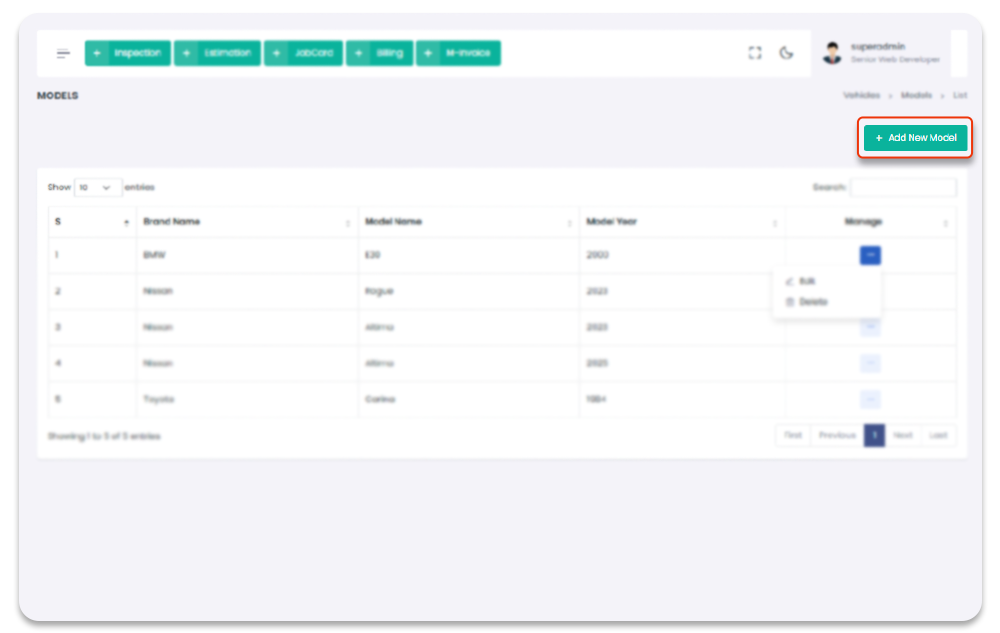
Model Create
You can add model to get started with Vehicles. To Navigate to this page and
Add model follow the given steps:
1- Click on "Vehicle" from Garage Management System sidebar.
2- Then Click on "Vehicle Model" then it will open (if you have privilege to access the page).
3- Click on "+ Add New Model" button on the top right corner of the "Vehicle Model" page.
4- After click "+ Add New Model" button you will redirect to the "Add New Model" Page.
5- Fill the information and click on "Submit" button to add model.
Garage Management System / Vehicles/ Add Vehicle Model
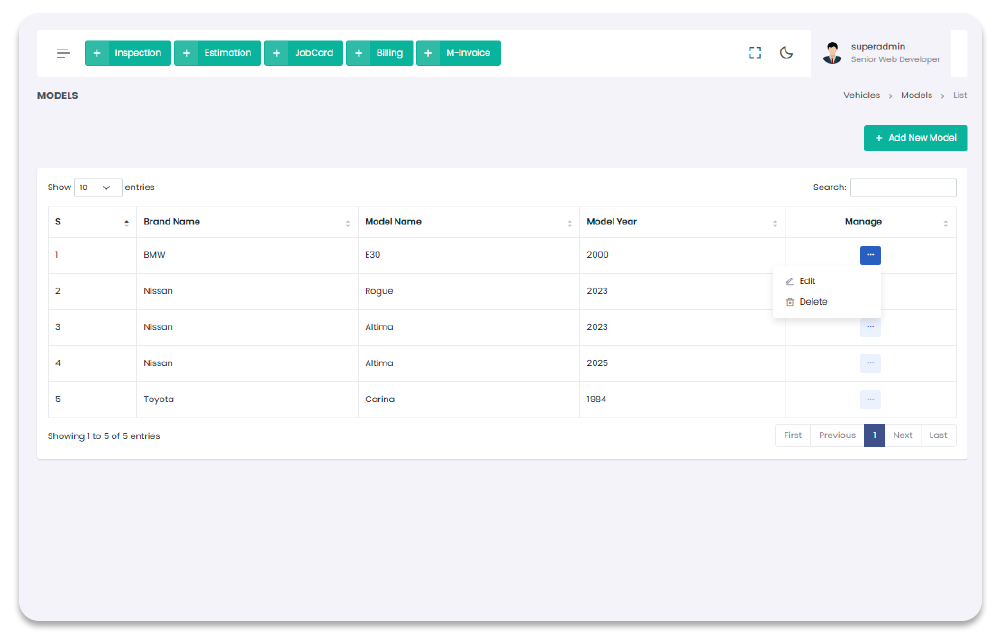
Vehicle Model Update
You can update models. To Navigate to this page and
Update model follow the given steps:
1- Click on "Vehicle" from Garage Management System sidebar.
2- Then Click on "Vehicle Model" then it will open (if you have privilege to access the page).
3- Click on the icon under table column name "Manage" of the desired model.
4- From the dropdown menu select "Edit".
5- After click "Edit" button you will redirect to the "Edit Vehicle Model" Page.
6- Edit the information and click on "Submit" button to add model.
Garage Management System / Vehicles/ Edit Vehicle Model
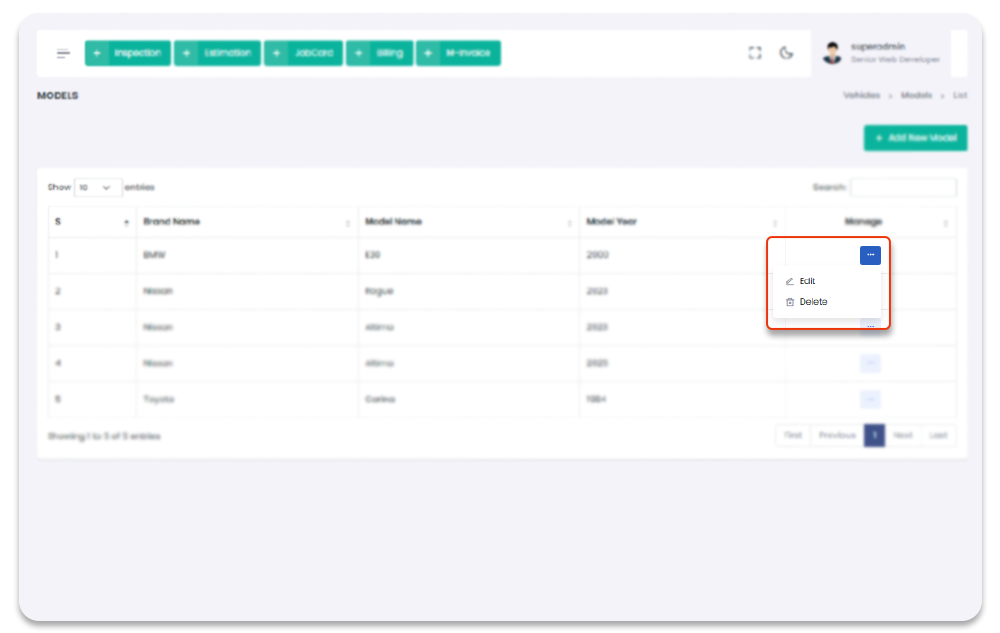
Vehicle Model Delete
You can delete models. To Navigate to this page and
Delete model follow the given steps:
1- Click on "Vehicle" from Garage Management System sidebar.
2- Then Click on "Vehicle Model" then it will open (if you have privilege to access the page).
3- Click on the icon under table column name "Manage" of the desired model.
4- From the dropdown menu select "Delete".
5- After click "Delete" button you will be asked for a "Confirmation".
6- When you confirm the model will be deleted.
Garage Management System / Vehicles/ Model

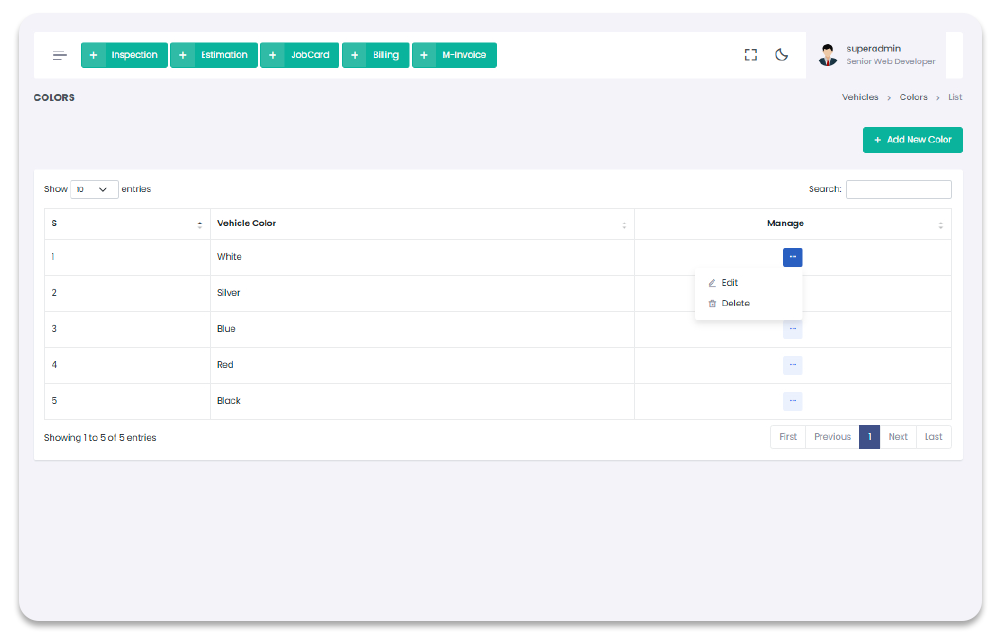
Colors
All the color can be done from the color Section. When color is created you can be used it in Vehicles section, To navigate to the color Page, follow the steps below:
1- Click on "Vehicle" from Garage Management System sidebar.
2- Click on "color" from the Sidebar.
Garage Management System / Vehicles/ Color
Color Create
You can add color to get started with Vehicles. To Navigate to this page and
Add color follow the given steps:
1- Click on "Vehicle" from Garage Management System sidebar.
2- Then Click on "Colors" then it will open (if you have privilege to access the page).
3- Click on "+ Add New Color" button on the top right corner of the "Colors" page.
4- After click "+ Add New Color" button you will redirect to the "Add New Color" Page.
5- Fill the information and click on "Submit" button to add color.
Garage Management System / Vehicles/ Add Vehicle Color

Colors Update
You can update brands. To Navigate to this page and
Update color follow the given steps:
1- Click on "Vehicle" from Garage Management System sidebar.
2- Then Click on "Colors" then it will open (if you have privilege to access the page).
3- Click on the icon under table column name "Manage" of the desired color.
4- From the dropdown menu select "Edit".
5- After click "Edit" button you will redirect to the "Edit Vehicle Color" Page.
6- Edit the information and click on "Submit" button to add color.
Garage Management System / Vehicles/ Edit Vehicle Color
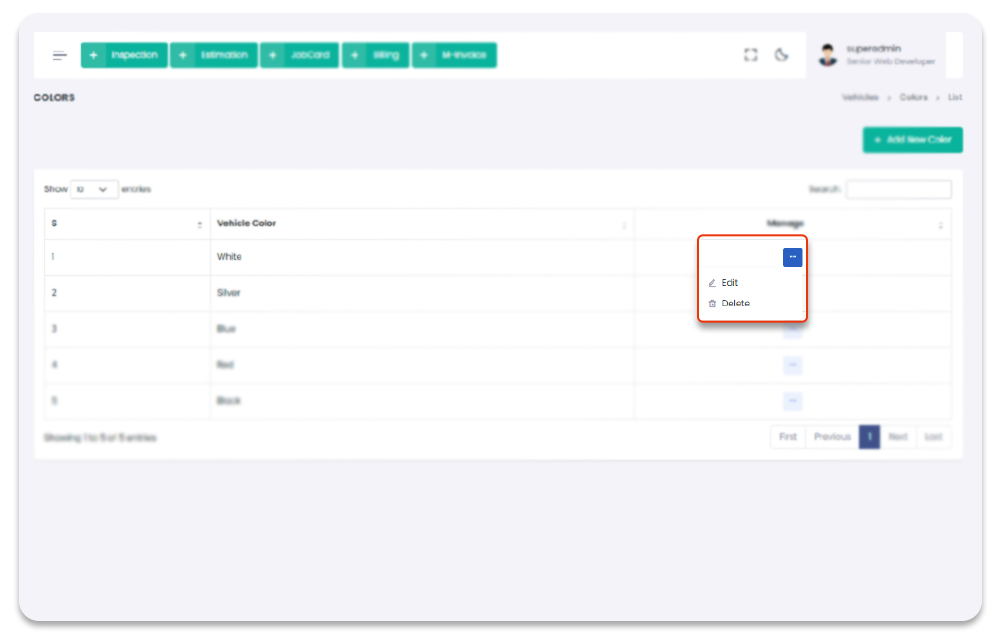
Colors Delete
You can delete colors. To Navigate to this page and
Delete color follow the given steps:
1- Click on "Vehicle" from Garage Management System sidebar.
2- Then Click on "Colors" then it will open (if you have privilege to access the page).
3- Click on the icon under table column name "Manage" of the desired color.
4- From the dropdown menu select "Delete".
5- After click "Delete" button you will be asked for a "Confirmation".
6- When you confirm the color will be deleted.
Garage Management System / Vehicles/ Color

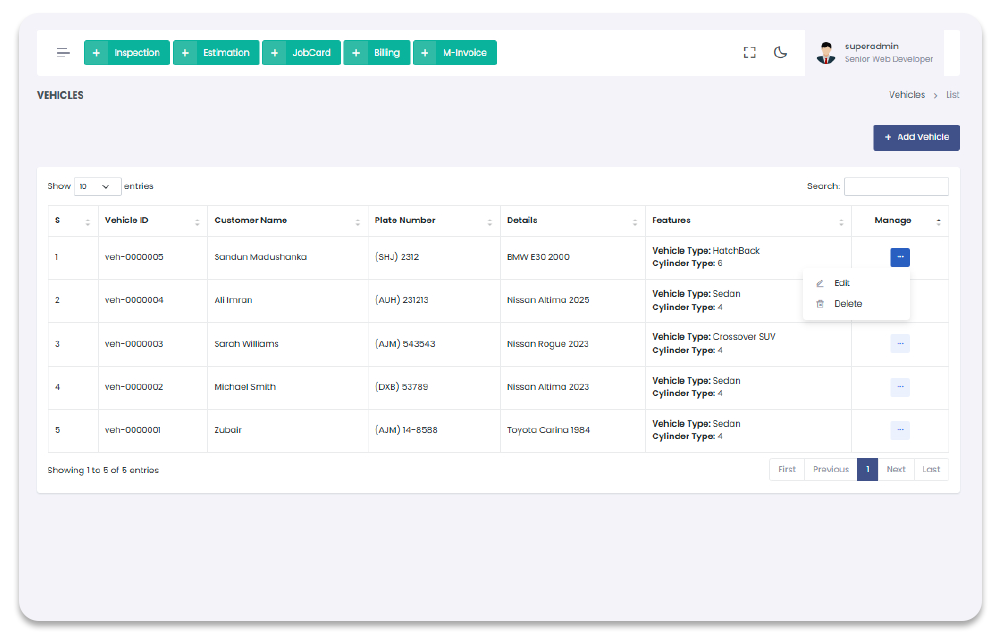
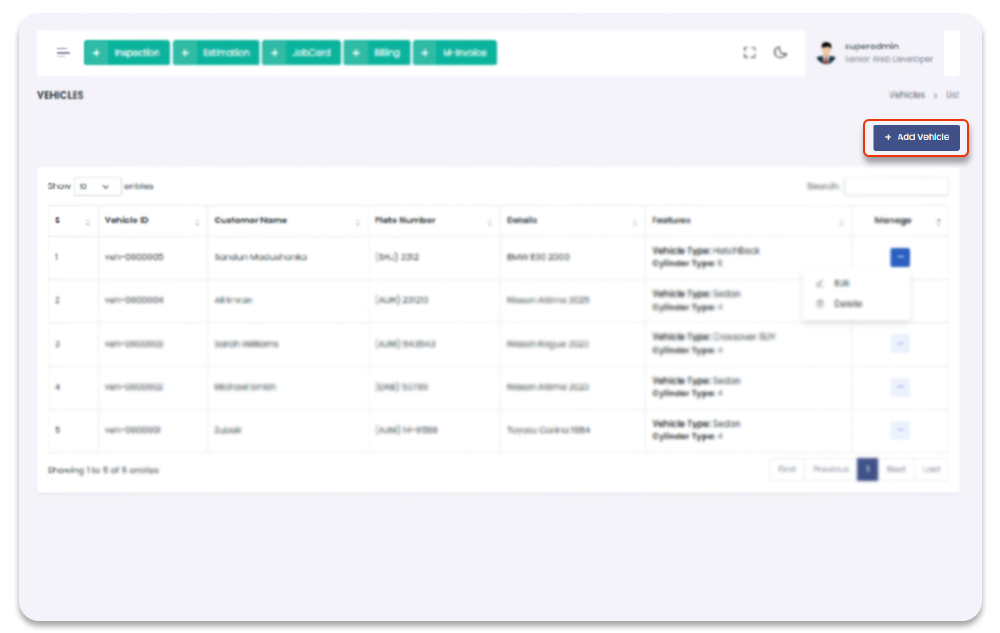
Vehicle
All the vehicle can be done from the vehicle Section. When vehicle is created you can be used it in Vehicles section, To navigate to the vehicle Page, follow the steps below:
1- Click on "Vehicle" from Garage Management System sidebar.
2- Click on "vehicle" from the Sidebar.
After add a vehicle a pop up modal will appear to choose between add inspection or add job card directly.These will be the wizard steps we have added for user easyiness so that user can navigate the flow
Garage Management System / Vehicles/ Color
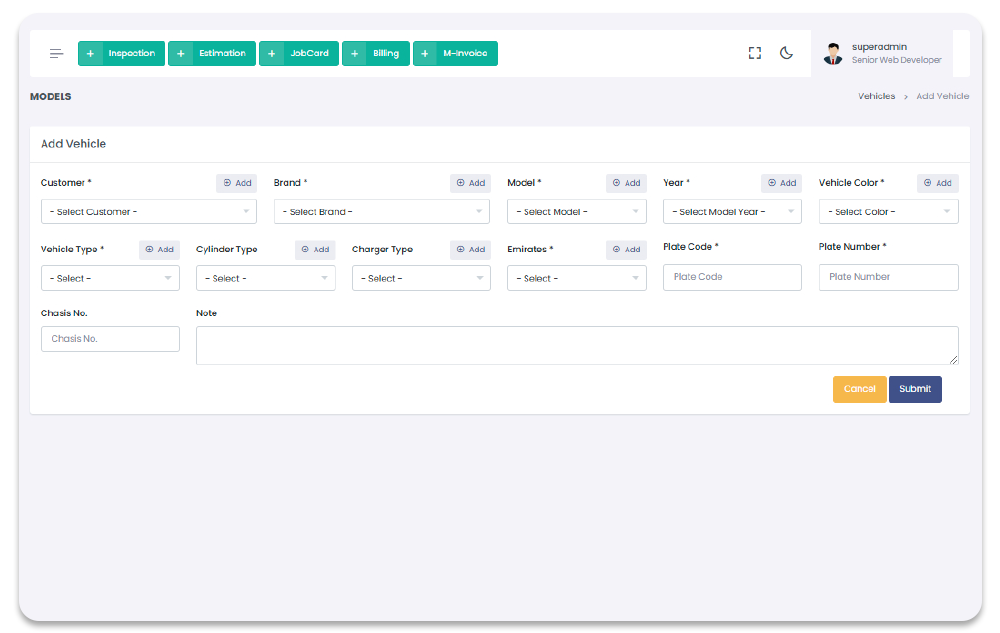
Color Create
You can add vehicle to get started with Vehicles. To Navigate to this page and
Add vehicle follow the given steps:
1- Click on "Vehicle" from Garage Management System sidebar.
2- Then Click on "Vehicle" then it will open (if you have privilege to access the page).
3- Click on "+ Add New Color" button on the top right corner of the "Colors" page.
4- After click "+ Add New Color" button you will redirect to the "Add New Color" Page.
5- Fill the information and click on "Submit" button to add color.
Garage Management System / Vehicles/ Add Vehicle Color
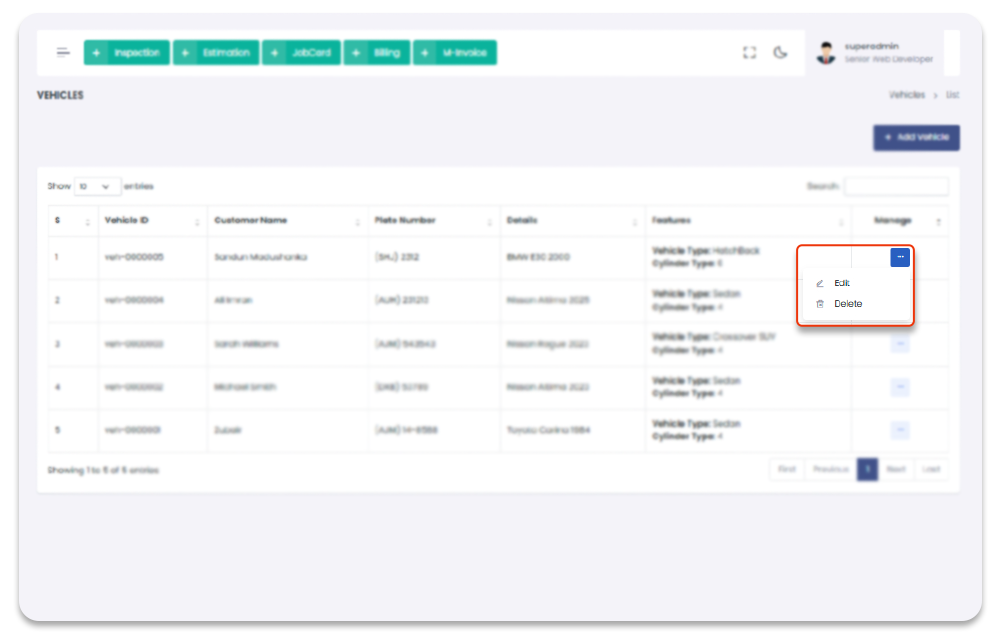
Vehicle Update
You can update brands. To Navigate to this page and
Update color follow the given steps:
1- Click on "Vehicle" from Garage Management System sidebar.
2- Then Click on "Vehicle" then it will open (if you have privilege to access the page).
3- Click on the icon under table column name "Manage" of the desired vehicle.
4- From the dropdown menu select "Edit".
5- After click "Edit" button you will redirect to the "Edit Vehicle Color" Page.
6- Edit the information and click on "Submit" button to add vehicle.
Garage Management System / Vehicles/ Edit Vehicle Color
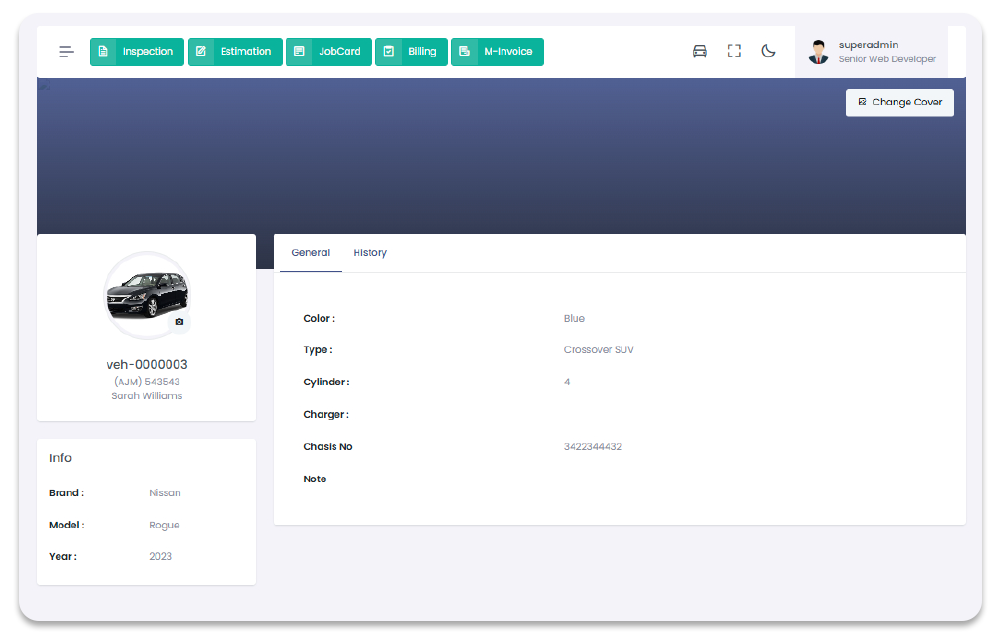
Vehicle Profile
You can see the profile of the vehicle. To Navigate to this page and
see profile follow the given steps:
1- Click on "Vehicle" from Garage Management System sidebar.
2- Then Click on "Vehicle" then it will open (if you have privilege to access the page).
3- Click on the text under table column name "Vehicle ID" or "Plate Number" of the desired vehicle.
4- After click you will redirect to the "Vehicle Profile" Page.
Garage Management System / Vehicles/ Vehicle PRofile
Vehicle Delete
You can delete vehicles. To Navigate to this page and
Delete vehicle follow the given steps:
1- Click on "Vehicle" from Garage Management System sidebar.
2- Then Click on "Vehicle" then it will open (if you have privilege to access the page).
3- Click on the icon under table column name "Manage" of the desired vehicle.
4- From the dropdown menu select "Delete".
5- After click "Delete" button you will be asked for a "Confirmation".
6- When you confirm the vehicle will be deleted.
Garage Management System / Vehicles/ Color
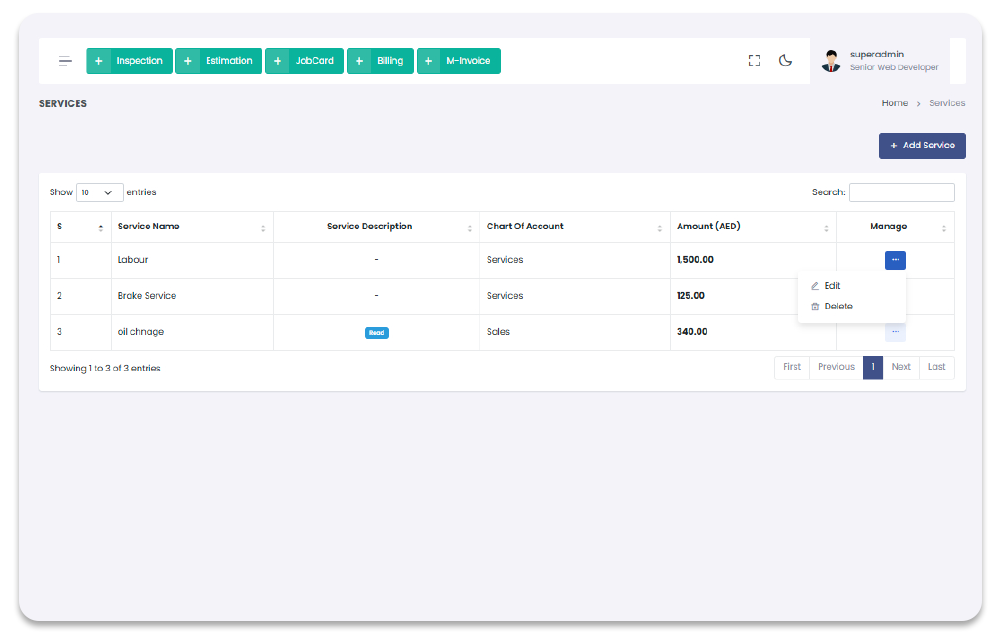
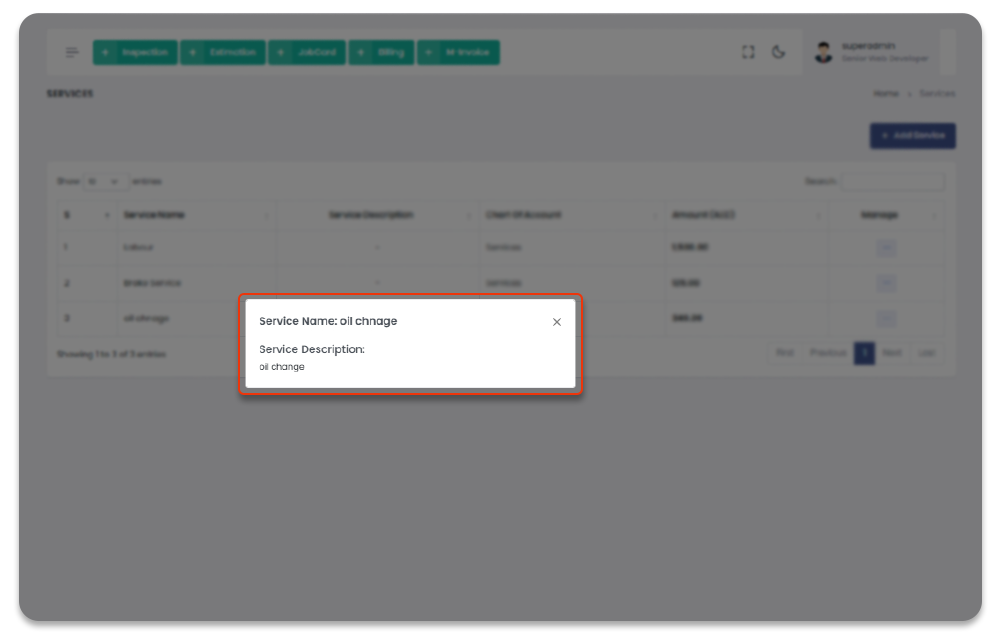
Services
All the services are manageable though Services Section. You can add, update, and delete services. All the added services will show in services page table with detail. To navigate to services, follow the steps below.
1- Click on "Services" from Garage Management System sidebar.
2- You will redirect to the Services Page.
Garage Management System / Services
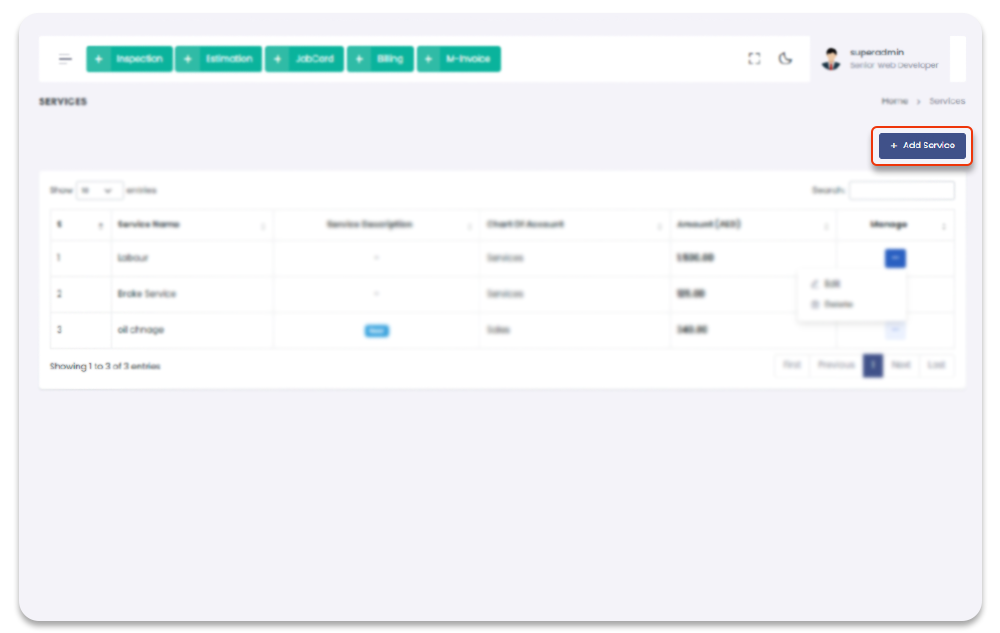
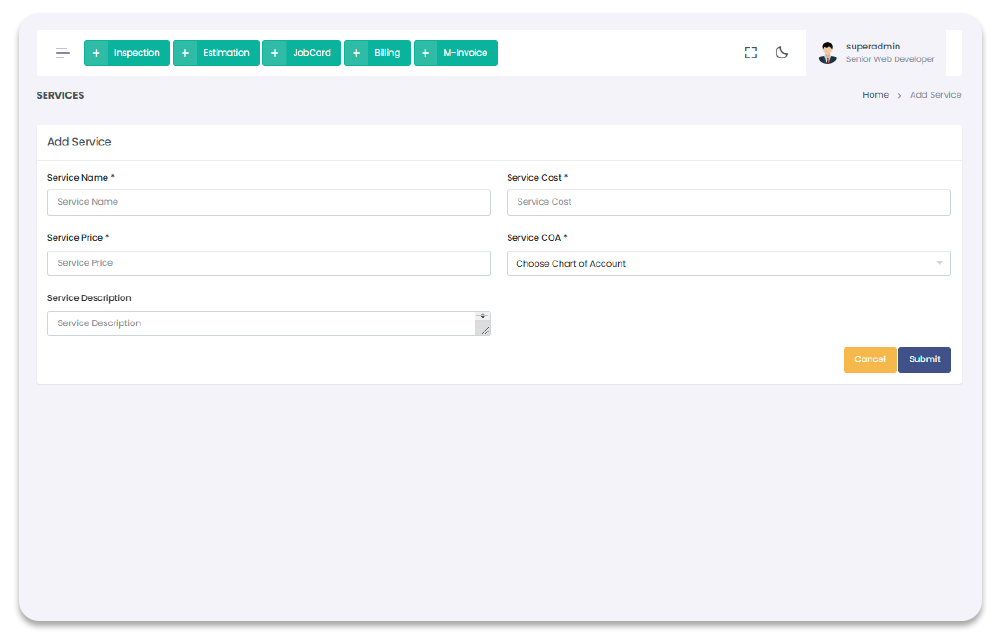
Add Service
You can add Service through Add Service Page. To navigate to Add Service Page, and to Add Services, follow the steps below:
1- Click on "Services" from Garage Management System sidebar.
2- Click on + Add Services option from the top right corner of the screen.
3- After click on + Add Services, you will redirect to the Add Service page.
4- On Add Services page you have to enter services required details.
5- After Adding the service detail in the form and click on "Submit" to save service.
Garage Management System / Services / Add Services
Update Service
You can update service once service is created. To Navigate to Update service Page, and to update follow the steps below:
1- Click on "Service" from Garage Management System sidebar.
2- Click on Edit option from the Services table column name Manage
dropdown.
3- After click on Edit, you will redirect to the Update service page.
4- On Update service page you have to update the service information.
5- After updating the service information in the form and click on "Submit" to save new changes.
Garage Management System / Services / Update service
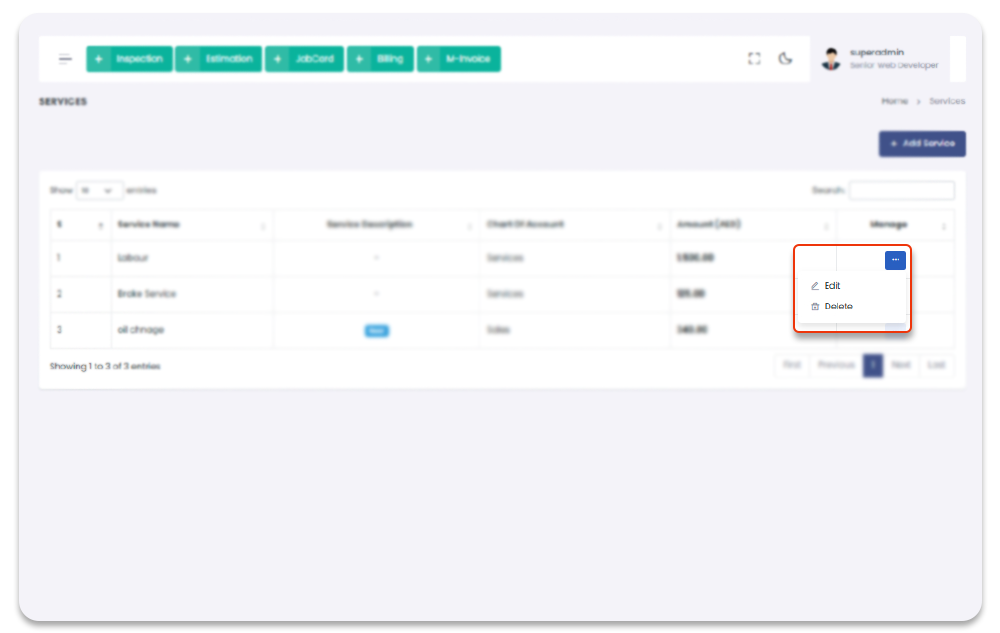
Delete Service
You can Delete service once service is created. To Navigate to Delete service Page, follow the steps below:
1- Click on "Service" from Garage Management System sidebar.2- Click on Delete option from the Services table column name Manage dropdown.
3- After click on Delete, service will be deleted with notification.
Garage Management System / Service
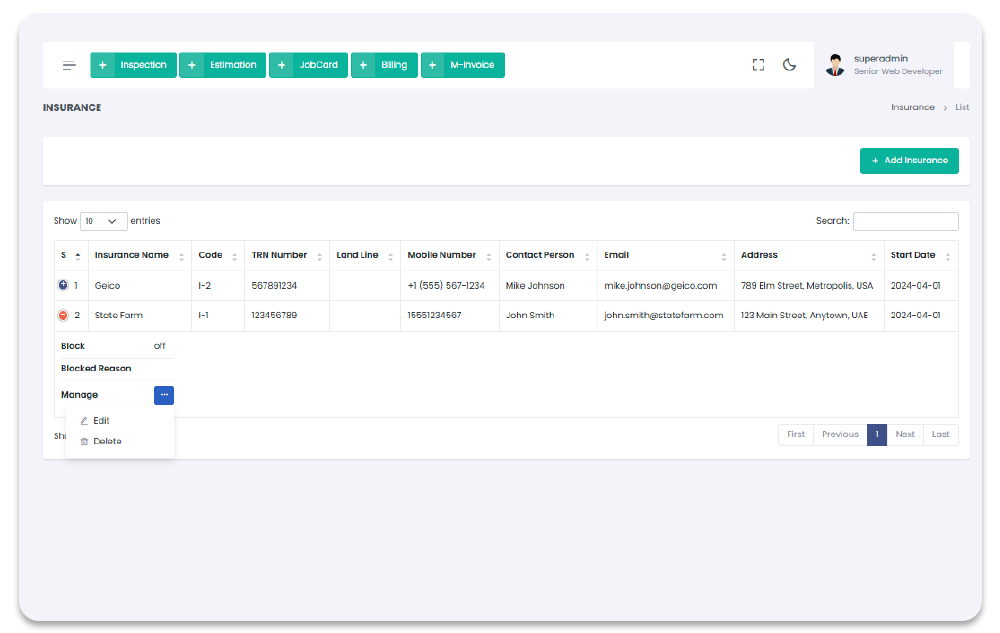
Insurances
All the insurances are manageable though Insurances Section. You can add, update, and delete insurances. All the added insurances will show in insurances page table with detail. To navigate to insurances, follow the steps below.
1- Click on "Insurances" from Garage Management System sidebar.
2- You will redirect to the Insurances Page.
Garage Management System / Insurances
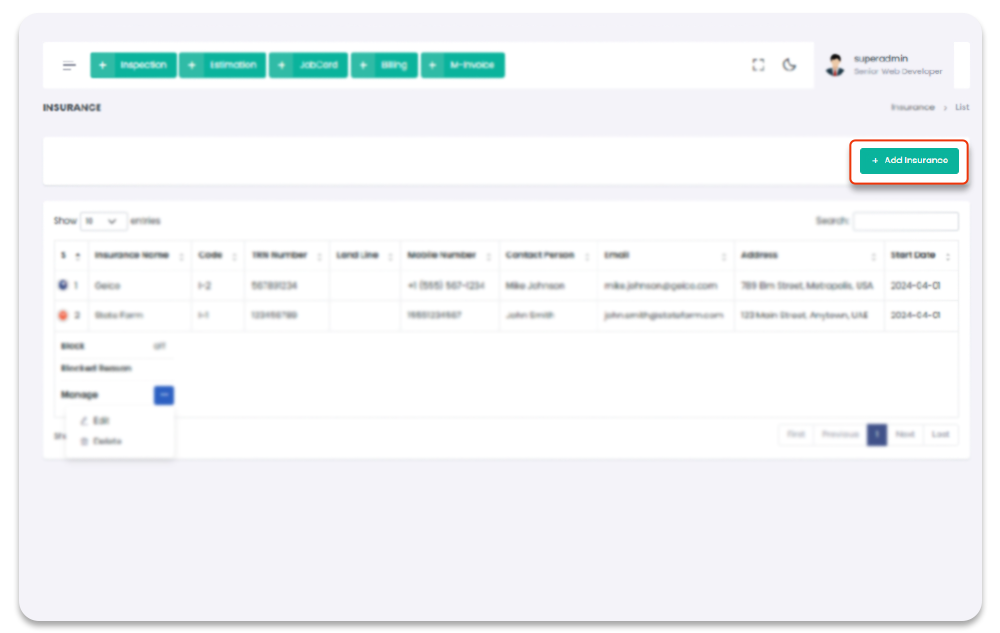
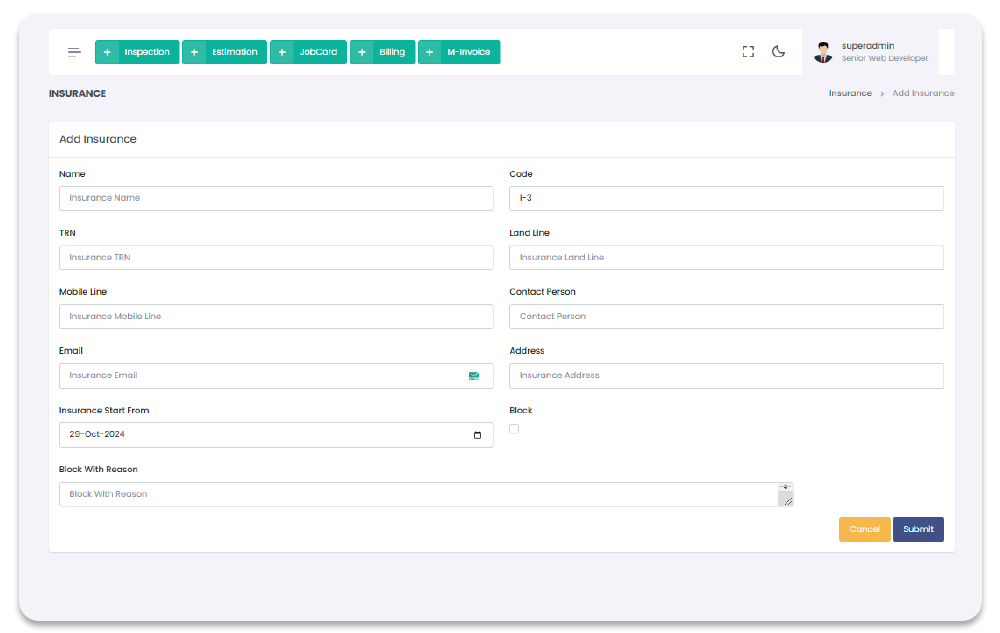
Add Insurance
You can add Insurance through Add Insurance Page. To navigate to Add Insurance Page, and to Add Insurances, follow the steps below:
1- Click on "Insurances" from Garage Management System sidebar.
2- Click on + Add Insurances option from the top right corner of the screen.
3- After click on + Add Insurances, you will redirect to the Add Insurance page.
4- On Add Insurances page you have to enter insurances required details.
5- After Adding the insurance detail in the form and click on "Submit" to save insurance.
Garage Management System / Insurances / Add Insurances
Update Insurance
You can update insurance once insurance is created. To Navigate to Update insurance Page, and to update follow the steps below:
1- Click on "Insurance" from Garage Management System sidebar.
2- Click on Edit option from the Insurances table column name Manage
dropdown.
3- After click on Edit, you will redirect to the Update insurance page.
4- On Update insurance page you have to update the insurance information.
5- After updating the insurance information in the form and click on "Submit" to save new changes.
Garage Management System / Insurances / Update insurance
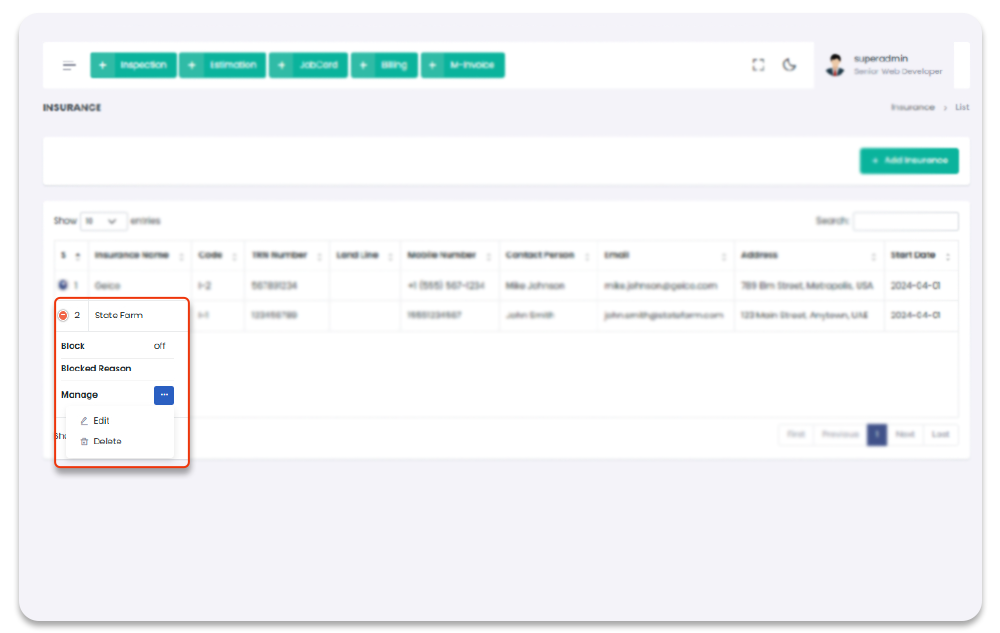
Delete Insurance
You can Delete insurance once insurance is created. To Navigate to Delete insurance Page, follow the steps below:
1- Click on "Insurance" from Garage Management System sidebar.2- Click on Delete option from the Insurances table column name Manage dropdown.
3- After click on Delete, insurance will be deleted with notification.
Garage Management System / Insurance
Inspections
All the function can be done from the Inspections Section. To navigate to the Inspections Pages, follow the steps below:
1- Click on "Inspections" from Garage Management System sidebar.
2- Click on "Desired Functionality" from the Sidebar.
Garage Management System / Inspections
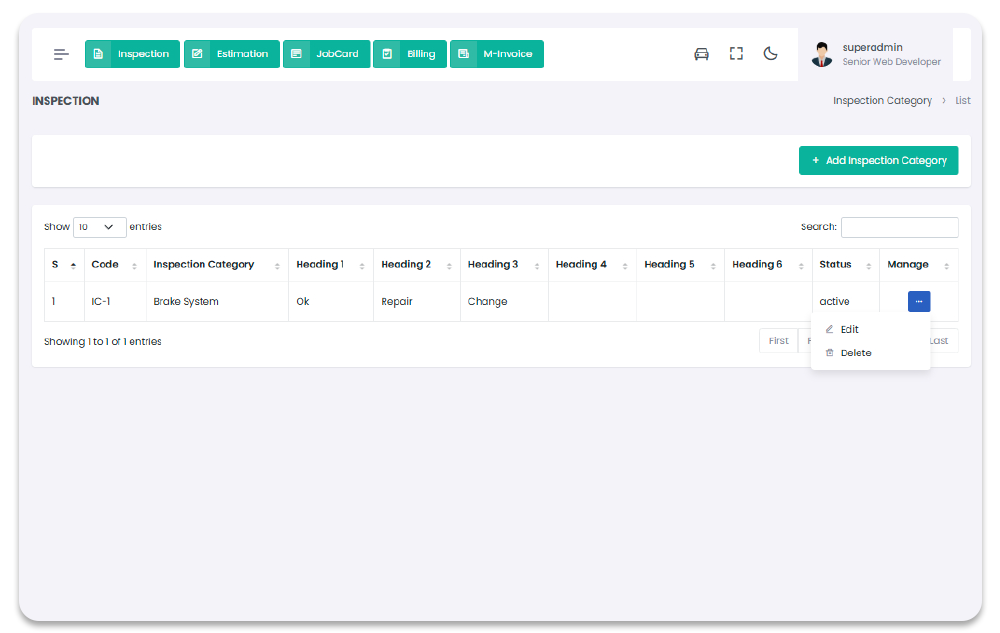
Inspection Category
All the Inspection Category can be done from the Inspection Category Section. When inspection category is created you can be used it in Inspections section, To navigate to the Inspection Category Page, follow the steps below:
1- Click on "Inspections" from Garage Management System sidebar.
2- Click on "Inspection Category" from the Sidebar.
Garage Management System / Inspections/ Inspection Category
Inspection Category Create
You can add inspection category to get started with Inspections. To Navigate to this page and
Add inspection category follow the given steps:
1- Click on "Inspections" from Garage Management System sidebar.
2- Then Click on "Inspection Category" then it will open (if you have privilege to access the page).
3- Click on "+ Add New Inspection Category" button on the top right corner of the "Inspection Category" page.
4- After click "+ Add New Inspection Category" button you will redirect to the "Add New Inspection Category" Page.
5- Fill the information and click on "Submit" button to add inspection category.
Garage Management System / Inspections/ Add Inspection Categorye

Inspection Category Update
You can update Inspection Category. To Navigate to this page and
Update inspection category follow the given steps:
1- Click on "Inspections" from Garage Management System sidebar.
2- Then Click on "Inspection Category" then it will open (if you have privilege to access the page).
3- Click on the icon under table column name "Manage" of the desired inspection category.
4- From the dropdown menu select "Edit".
5- After click "Edit" button you will redirect to the "Edit Inspection Category" Page.
6- Edit the information and click on "Submit" button to add inspection category.
Garage Management System / Inspections/ Edit Inspection Category

Inspection Category Delete
You can delete features. To Navigate to this page and
Delete inspection category follow the given steps:
1- Click on "Inspections" from Garage Management System sidebar.
2- Then Click on "Inspection Category" then it will open (if you have privilege to access the page).
3- Click on the icon under table column name "Manage" of the desired inspection category.
4- From the dropdown menu select "Delete".
5- After click "Delete" button you will be asked for a "Confirmation".
6- When you confirm the inspection category will be deleted.
Garage Management System / Inspections/ Inspection Category
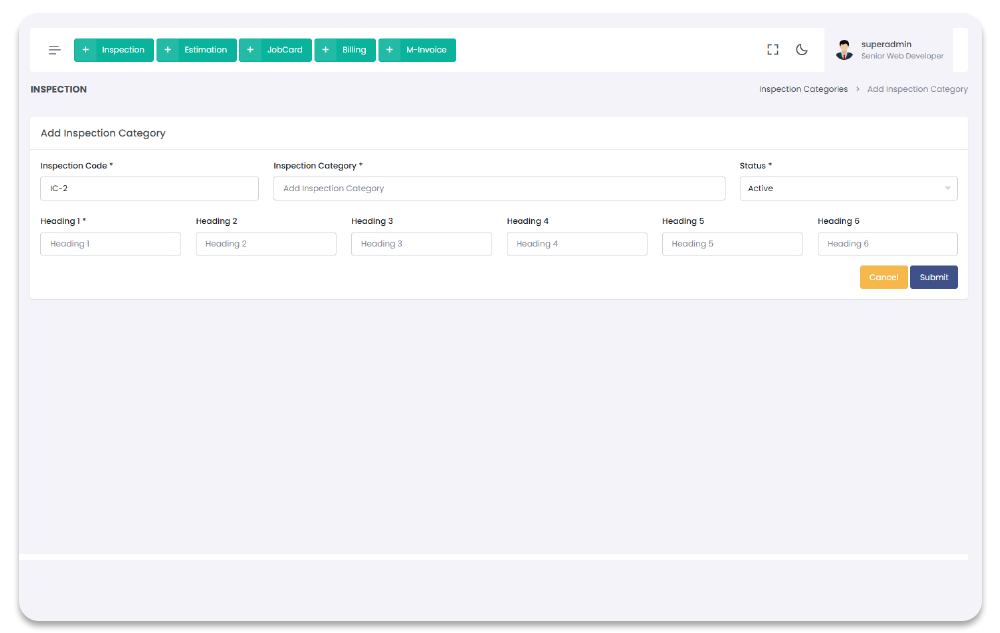
Inspection List
All the inspection list can be done from the inspection list Section. When inspection list is created you can be used it in Inspections section, To navigate to the inspection list Page, follow the steps below:
1- Click on "Inspections" from Garage Management System sidebar.
2- Click on "Inspection List" from the Sidebar.
Garage Management System / Inspections/ Inspection List
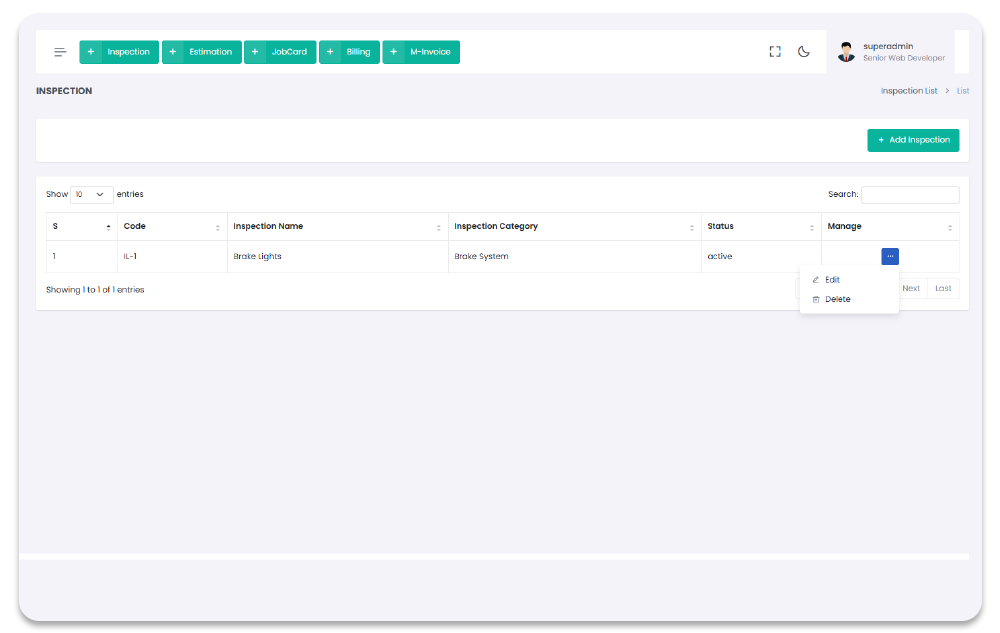
Inspection List Create
You can add inspection list to get started with Inspections. To Navigate to this page and
Add inspection list follow the given steps:
1- Click on "Inspections" from Garage Management System sidebar.
2- Then Click on "Inspection Lists" then it will open (if you have privilege to access the page).
3- Click on "+ Add New Inspection List" button on the top right corner of the "Inspection Lists" page.
4- After click "+ Add New Inspection List" button you will redirect to the "Add New Inspection List" Page.
5- Fill the information and click on "Submit" button to add inspection list.
Garage Management System / Inspections/ Add Inspection List
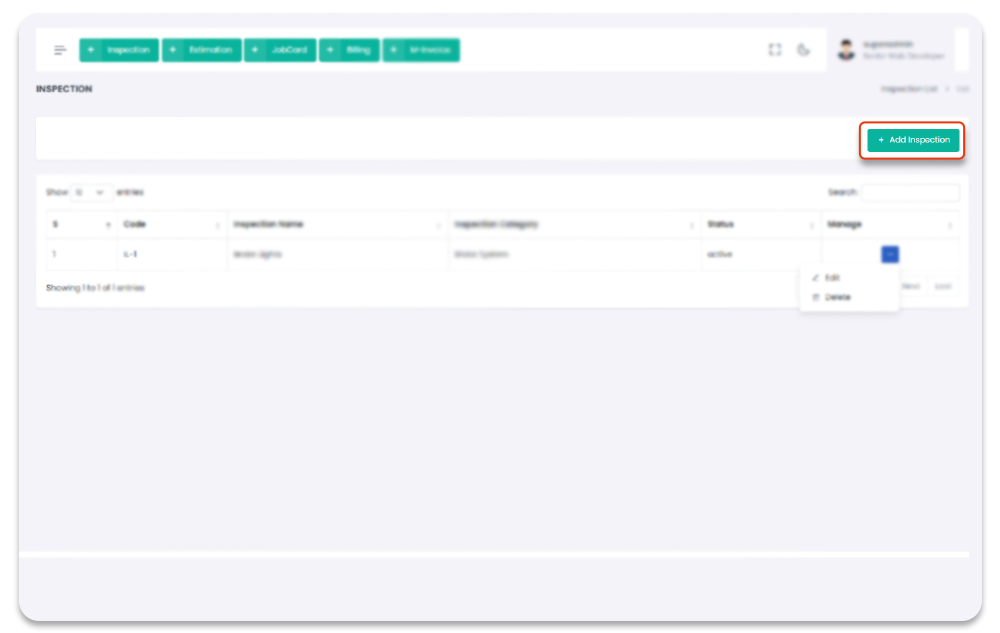
Inspection Lists Update
You can update inspection list. To Navigate to this page and
Update inspection list follow the given steps:
1- Click on "Inspections" from Garage Management System sidebar.
2- Then Click on "Inspection Lists" then it will open (if you have privilege to access the page).
3- Click on the icon under table column name "Manage" of the desired inspection list.
4- From the dropdown menu select "Edit".
5- After click "Edit" button you will redirect to the "Edit Inspection List" Page.
6- Edit the information and click on "Submit" button to add inspection list.
Garage Management System / Inspections/ Edit Inspection List
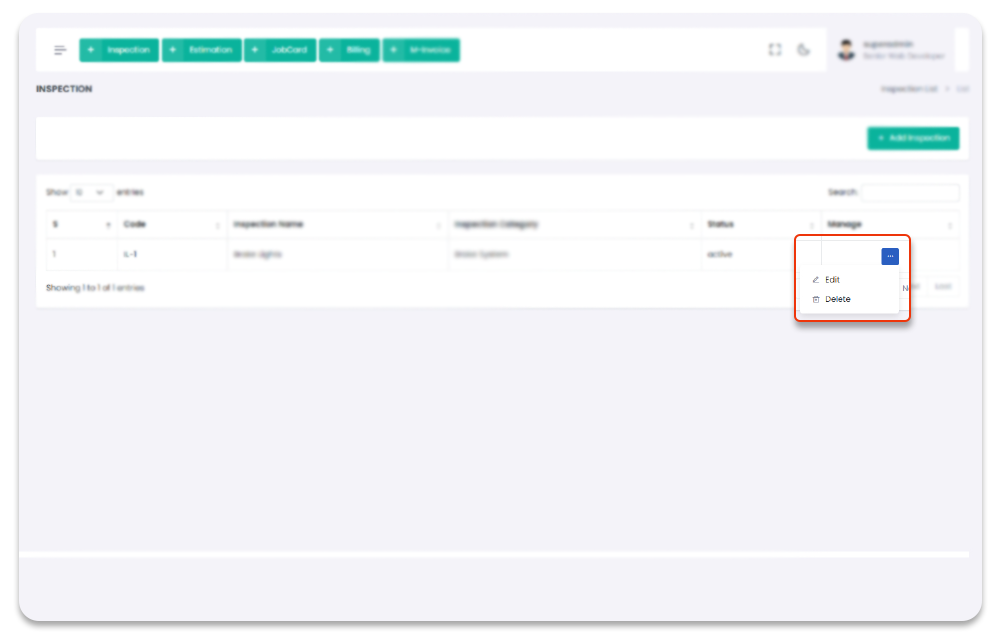
Inspection Lists Delete
You can delete inspection list. To Navigate to this page and
Delete inspection list follow the given steps:
1- Click on "Inspections" from Garage Management System sidebar.
2- Then Click on "Inspection Lists" then it will open (if you have privilege to access the page).
3- Click on the icon under table column name "Manage" of the desired inspection list.
4- From the dropdown menu select "Delete".
5- After click "Delete" button you will be asked for a "Confirmation".
6- When you confirm the inspection list will be deleted.
Garage Management System / Inspections/ Inspection List
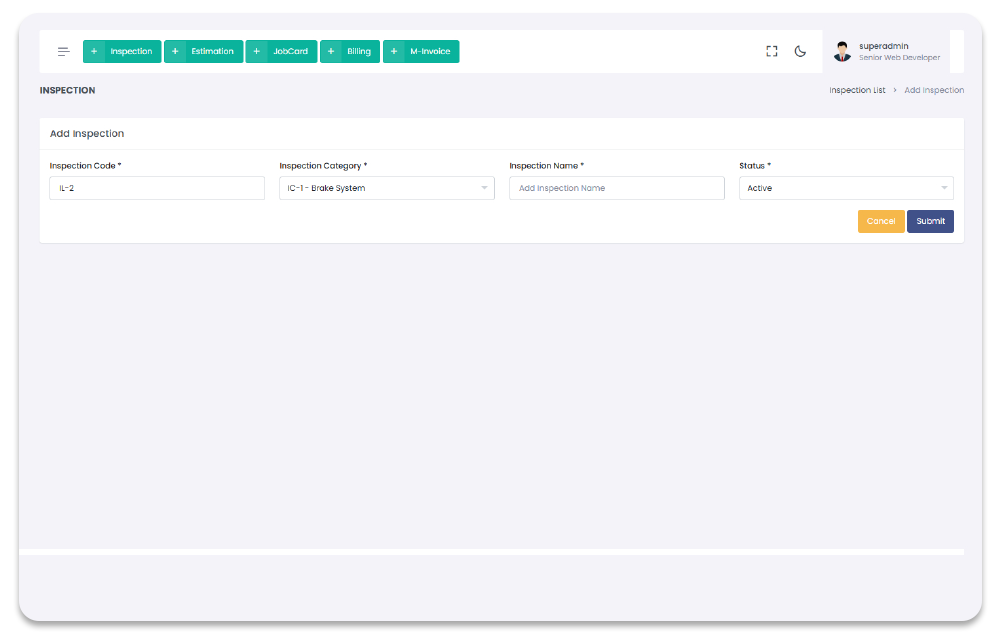
Inspections
All the inspections can be done from the inspections Section. When inspections is created you can be used it in Inspections section, To navigate to the inspections Page, follow the steps below:
1- Click on "Inspections" from Garage Management System sidebar.
2- Click on "inspections" from the Sidebar.
After add a inspection a pop up modal will appear to choose between Share report with customer or add estimation.These will be the wizard steps we have added for user easyiness so that user can navigate the flow
Garage Management System / Inspections/ Inspection
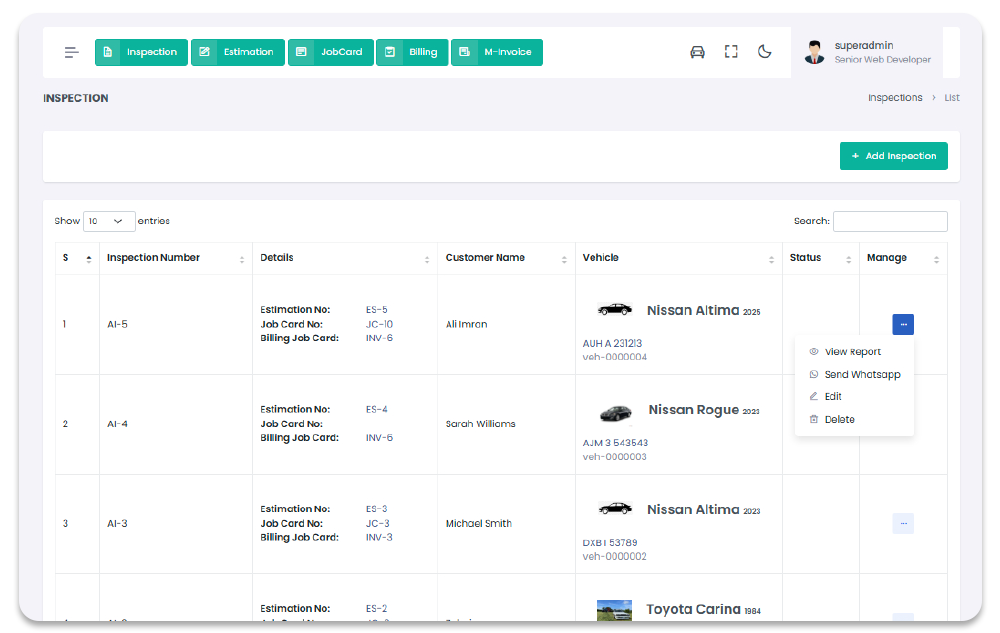
Inspection Create
You can add inspections to get started with Inspections. To Navigate to this page and
Add inspections follow the given steps:
1- Click on "Inspections" from Garage Management System sidebar.
2- Then Click on "Inspections" then it will open (if you have privilege to access the page).
3- Click on "+ Add New Inspection" button on the top right corner of the "Inspections" page.
4- After click "+ Add New Inspection" button you will redirect to the "Add New Inspection" Page.
5- Fill the information and click on "Submit" button to add inspections.
Garage Management System / Inspections/ Add Inspection
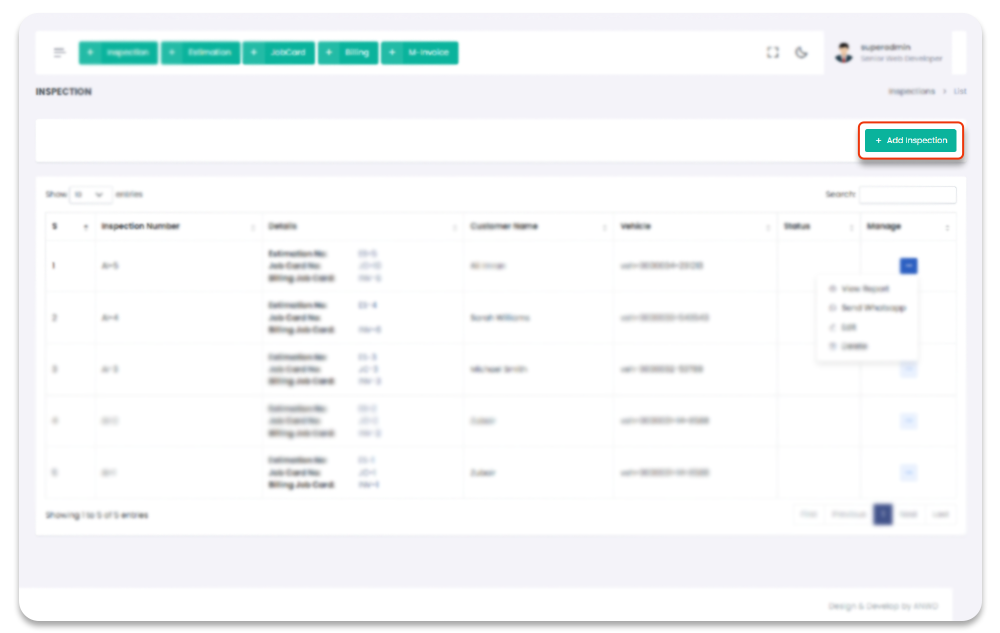
Inspection Lists Update
You can update brands. To Navigate to this page and
Update inspections follow the given steps:
1- Click on "Inspections" from Garage Management System sidebar.
2- Then Click on "Inspections" then it will open (if you have privilege to access the page).
3- Click on the icon under table column name "Manage" of the desired inspections.
4- From the dropdown menu select "Edit".
5- After click "Edit" button you will redirect to the "Edit Inspection" Page.
6- Edit the information and click on "Submit" button to add inspections.
Garage Management System / Inspections/ Edit Inspection
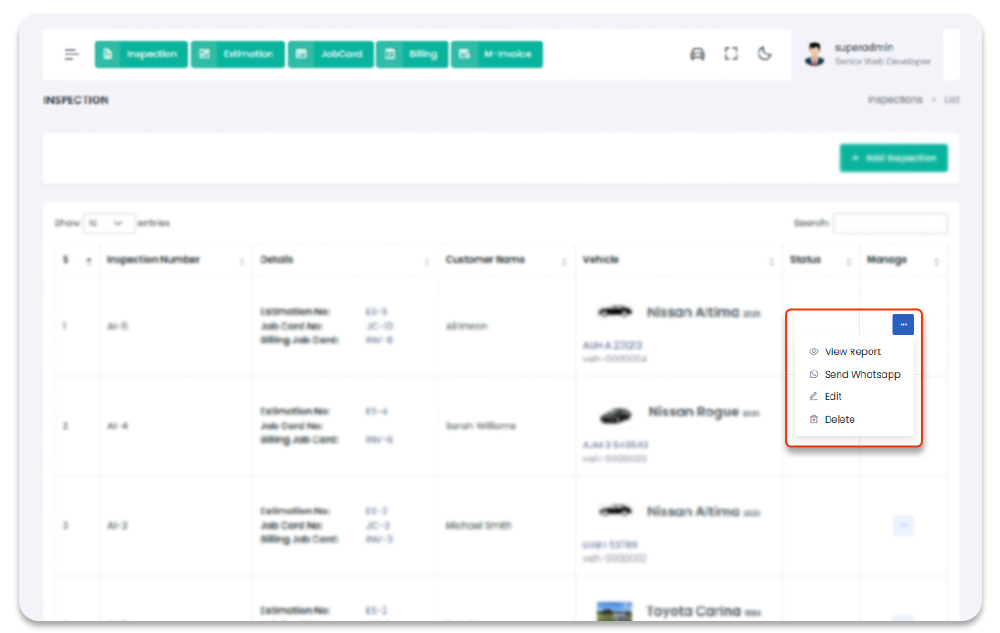
Inspection Lists Delete
You can delete inspections. To Navigate to this page and
Delete inspections follow the given steps:
1- Click on "Inspections" from Garage Management System sidebar.
2- Then Click on "Inspections" then it will open (if you have privilege to access the page).
3- Click on the icon under table column name "Manage" of the desired inspections.
4- From the dropdown menu select "Delete".
5- After click "Delete" button you will be asked for a "Confirmation".
6- When you confirm the inspections will be deleted.
Garage Management System / Inspections/ Inspection
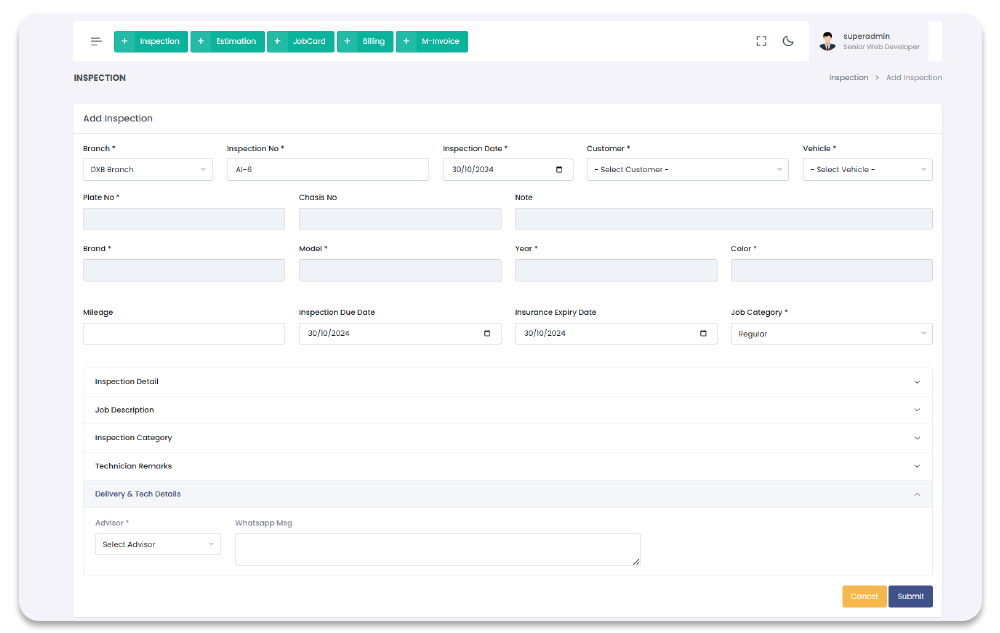
Estimations
All the estimations are manageable though Estimations Section. You can add, update, and delete estimations. All the added estimations will show in estimations page table with detail. To navigate to estimations, follow the steps below.
1- Click on "Estimations" from Garage Management System sidebar.
2- You will redirect to the Estimations Page.
After add a estimation a pop up modal will appear to choose between Share report with customer or add job card.These will be the wizard steps we have added for user easyiness so that user can navigate the flow
Garage Management System / Estimations
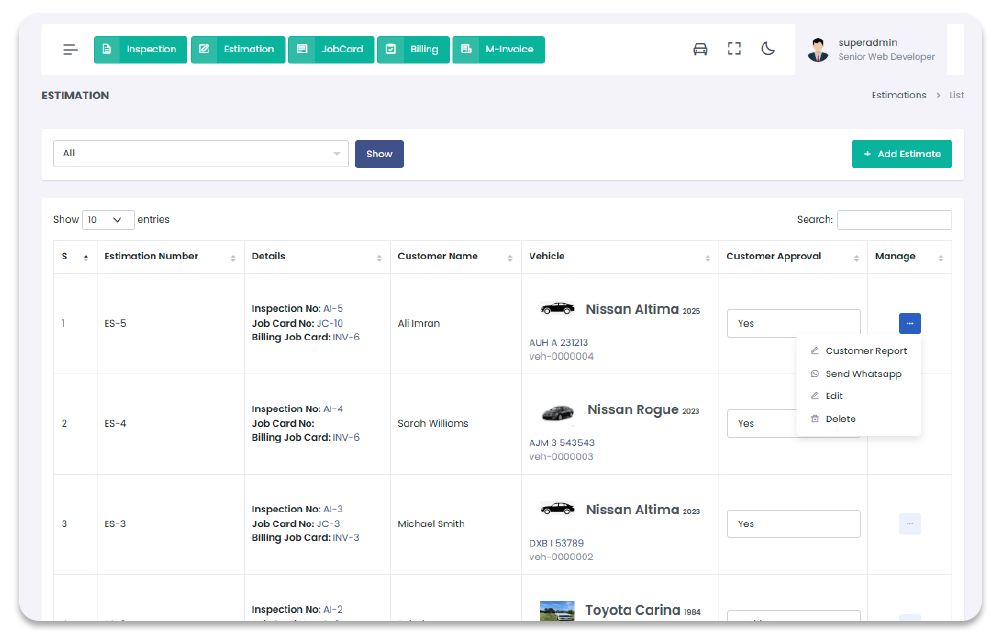
Add Estimation
You can add Estimation through Add Estimation Page. To navigate to Add Estimation Page, and to Add Estimations, follow the steps below:
1- Click on "Estimations" from Garage Management System sidebar.
2- Click on + Add Estimations option from the top right corner of the screen.
3- After click on + Add Estimations, you will redirect to the Add Estimation page.
4- On Add Estimations page you have to enter estimations required details.
5- After Adding the estimation detail in the form and click on "Submit" to save estimation.
Garage Management System / Estimations / Add Estimations
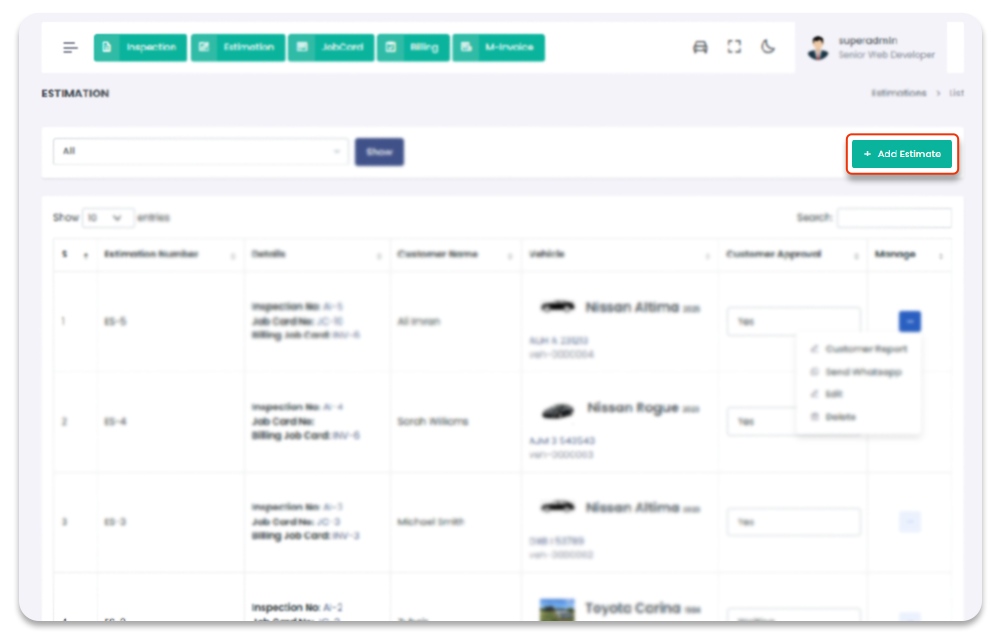
Update Estimation
You can update estimation once estimation is created. To Navigate to Update estimation Page, and to update follow the steps below:
1- Click on "Estimation" from Garage Management System sidebar.
2- Click on Edit option from the Estimations table column name Manage
dropdown.
3- After click on Edit, you will redirect to the Update estimation page.
4- On Update estimation page you have to update the estimation information.
5- After updating the estimation information in the form and click on "Submit" to save new changes.
Garage Management System / Estimations / Update estimation
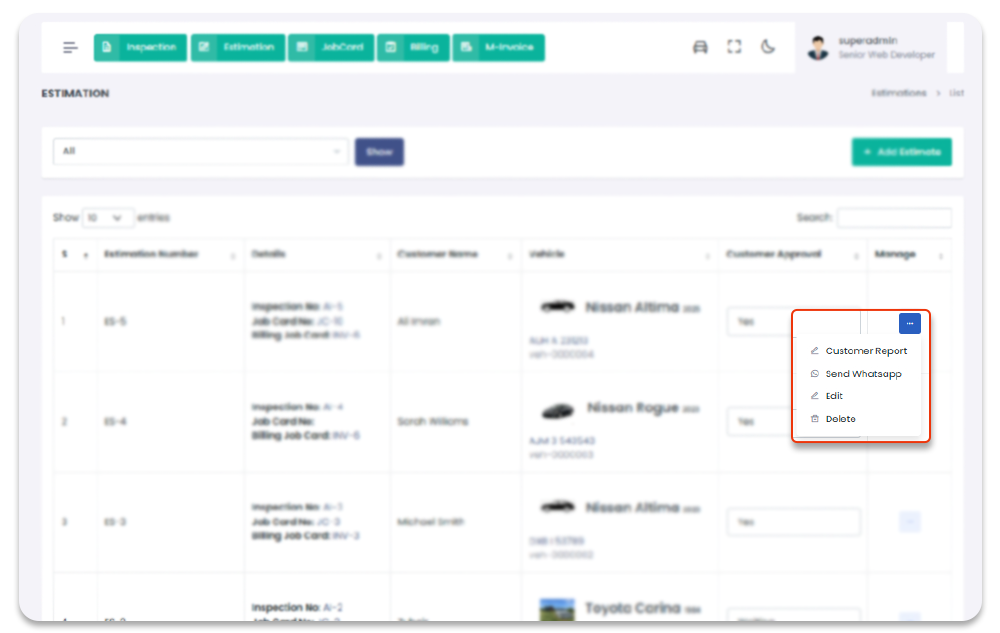
Delete Estimation
You can Delete estimation once estimation is created. To Navigate to Delete estimation Page, follow the steps below:
1- Click on "Estimation" from Garage Management System sidebar.2- Click on Delete option from the Estimations table column name Manage dropdown.
3- After click on Delete, estimation will be deleted with notification.
Garage Management System / Estimation

Job Cards
All the job Cards are manageable though Job Cards Section. You can add, update, and delete job Cards. All the added job Cards will show in job Cards page table with detail. To navigate to job Cards, follow the steps below.
1- Click on "Job Cards" from Garage Management System sidebar.
2- You will redirect to the Job Cards Page.
After add a job card a pop up modal will appear to choose between send report to customer or add billing job card directly.These will be the wizard steps we have added for user easyiness so that user can navigate the flow
Garage Management System / Job Cards
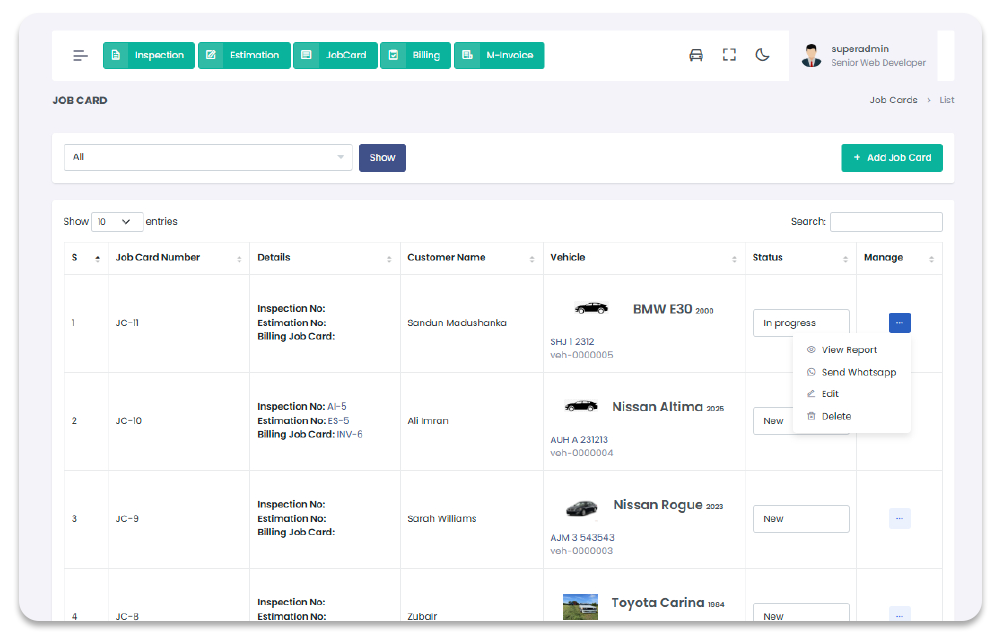
Add Job Card
You can add Job Card through Add Job Card Page. To navigate to Add Job Card Page, and to Add Job Cards, follow the steps below:
1- Click on "Job Cards" from Garage Management System sidebar.
2- Click on + Add Job Cards option from the top right corner of the screen.
3- After click on + Add Job Cards, you will redirect to the Add Job Card page.
4- On Add Job Cards page you have to enter job Cards required details.
5- After Adding the job Card detail in the form and click on "Submit" to save job Card.
Garage Management System / Job Cards / Add Job Cards
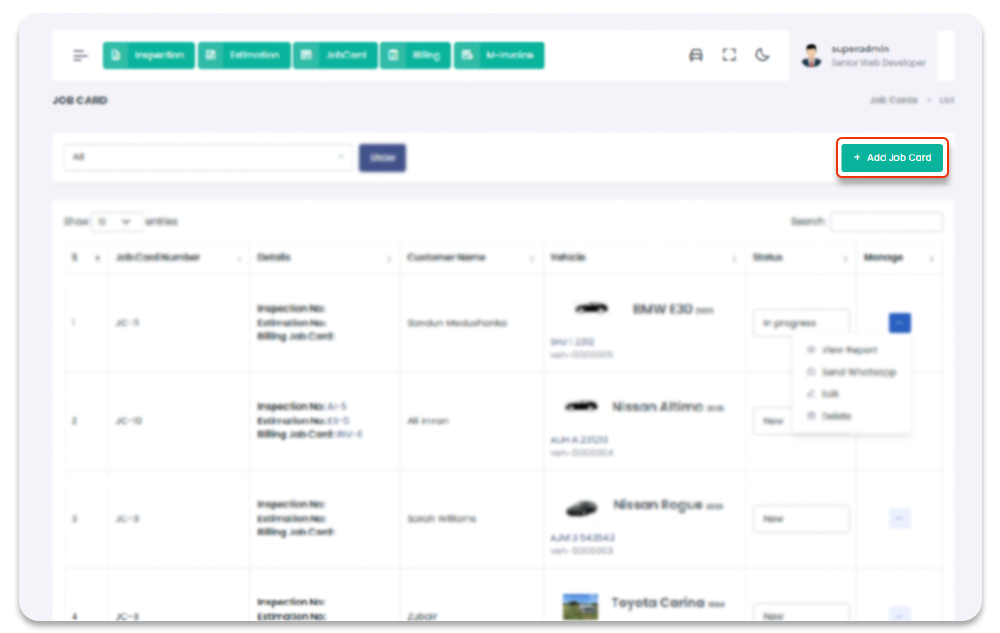
Update Job Card
You can update job Card once job Card is created. To Navigate to Update job Card Page, and to update follow the steps below:
1- Click on "Job Card" from Garage Management System sidebar.
2- Click on Edit option from the Job Cards table column name Manage
dropdown.
3- After click on Edit, you will redirect to the Update job Card page.
4- On Update job Card page you have to update the job Card information.
5- After updating the job Card information in the form and click on "Submit" to save new changes.
Garage Management System / Job Cards / Update job Card
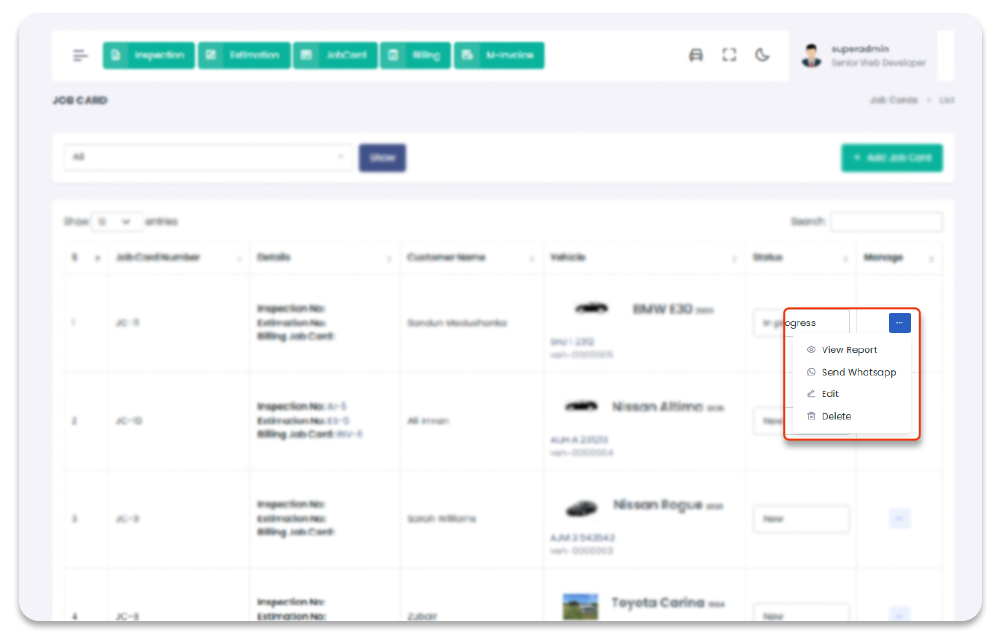
Delete Job Card
You can Delete job Card once job Card is created. To Navigate to Delete job Card Page, follow the steps below:
1- Click on "Job Card" from Garage Management System sidebar.2- Click on Delete option from the Job Cards table column name Manage dropdown.
3- After click on Delete, job Card will be deleted with notification.
Garage Management System / Job Card
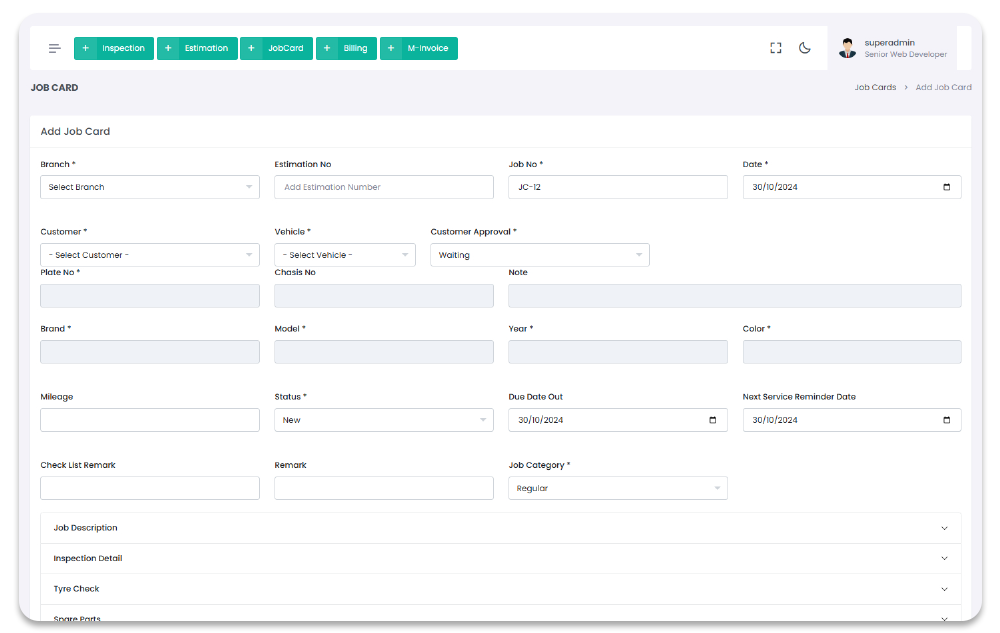
Billing Job Card
All the billings are manageable though Billing Job Card Section. You can add, update, and delete billings. All the added billings will show in billings page table with detail. To navigate to billings, follow the steps below.
1- Click on "Billing Job Card" from Garage Management System sidebar.
2- You will redirect to the Billing Job Card Page.
Garage Management System / Billing Job Card
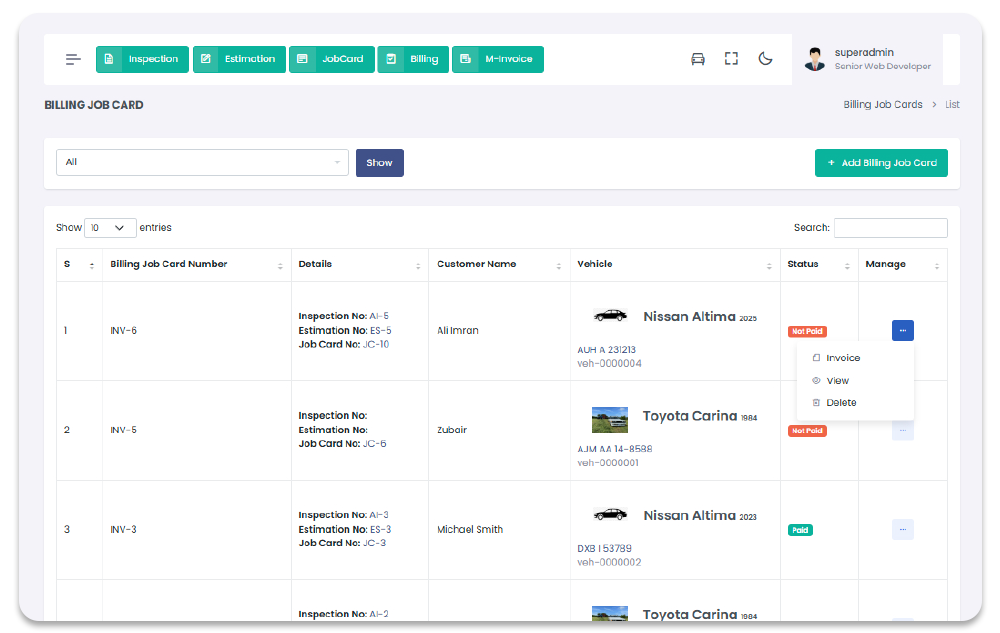
Add Billing Job Card
You can add Billing Job Card through Add Billing Job Card Page. To navigate to Add Billing Job Card Page, and to Add Billing Job Card, follow the steps below:
1- Click on "Billing Job Card" from Garage Management System sidebar.
2- Click on + Add Billing Job Card option from the top right corner of the screen.
3- After click on + Add Billing Job Card, you will redirect to the Add Billing Job Card page.
4- On Add Billing Job Card page you have to enter billings required details.
5- After Adding the billing job card detail in the form and click on "Submit" to save billing job card.
Garage Management System / Billing Job Card / Add Billing Job Card
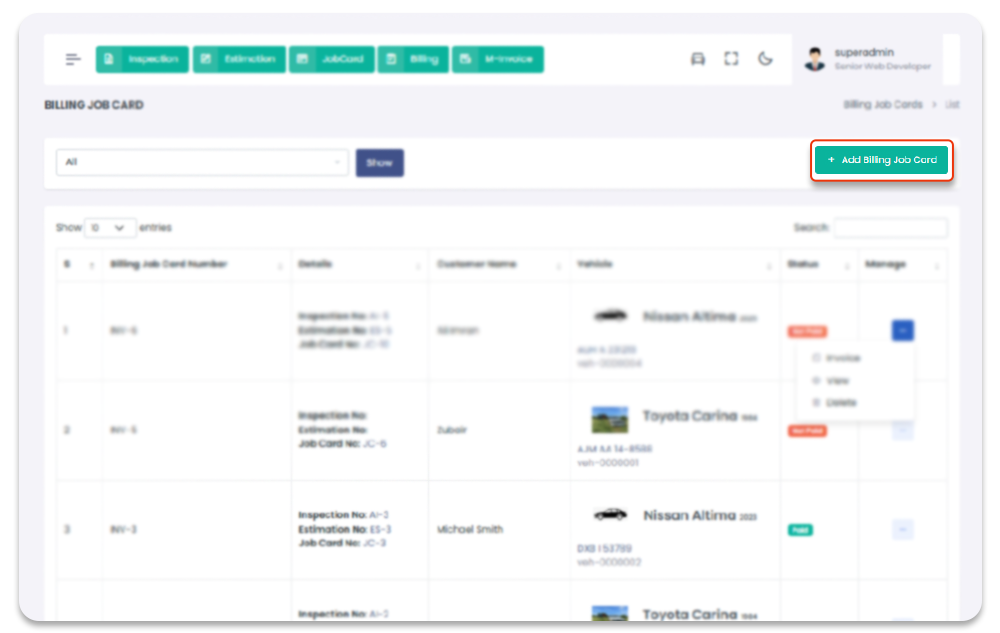
Delete Billing Job Card
You can Delete billing job card once billing job card is created. To Navigate to Delete billing job card Page, follow the steps below:
1- Click on "Billing Job Card" from Garage Management System sidebar.2- Click on Delete option from the Billing Job Card table column name Manage dropdown.
3- After click on Delete, billing job card will be deleted with notification.
Garage Management System / Billing Job Card
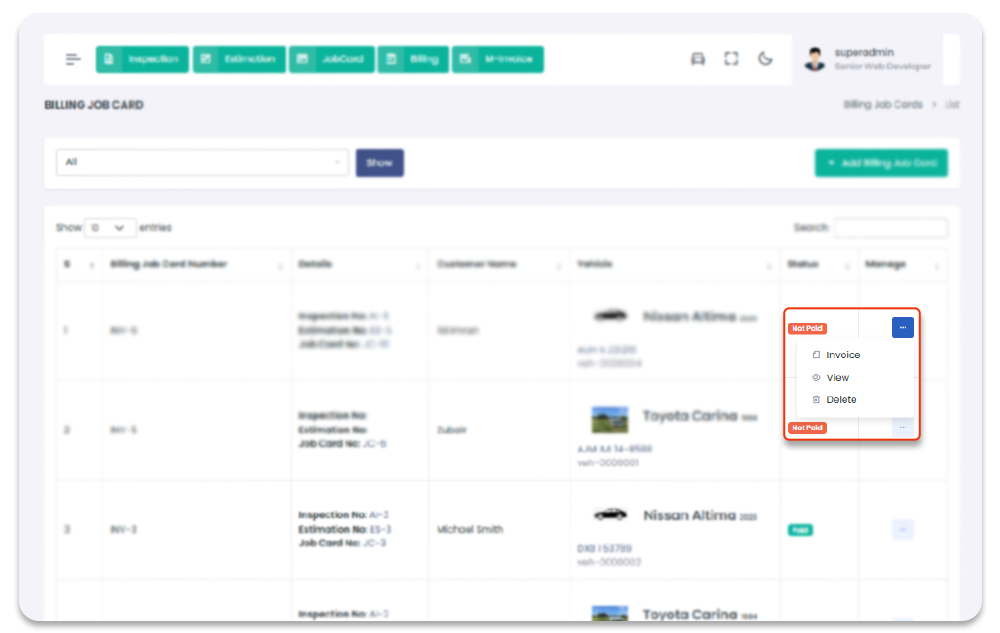
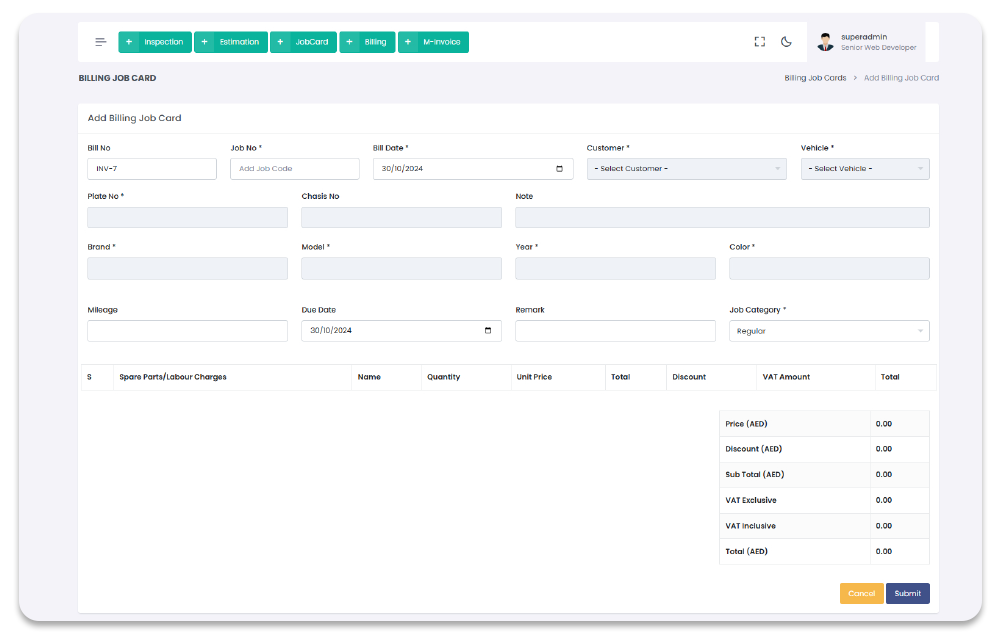
Returns
All the Returns are manageable though Returns Section. You can add, update, and delete Returns. All the added Returns will show in Returns page table with detail. To navigate to Returns, follow the steps below.
1- Click on "Returns" from Garage Management System sidebar.
2- You will redirect to the Returns Page.
Garage Management System / Returns
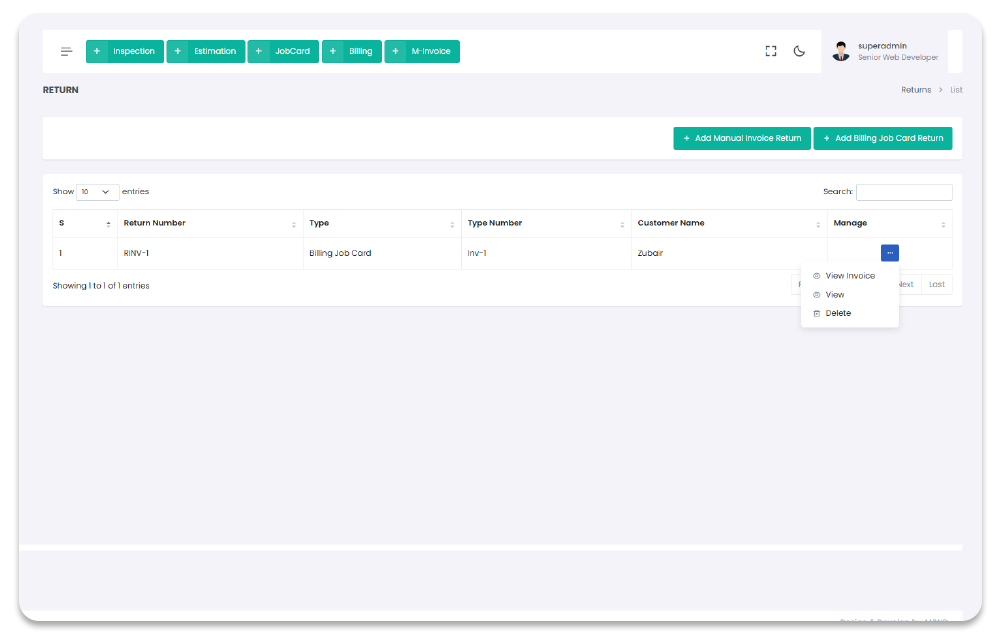
Add Return
You can add Return through Add Return Page. To navigate to Add Return Page, and to Add Returns, follow the steps below:
1- Click on "Returns" from Garage Management System sidebar.
2- Click on + Add Returns option from the top right corner of the screen.
3- After click on + Add Returns, you will redirect to the Add Return page.
4- On Add Returns page you have to enter Returns required details.
5- After Adding the Return detail in the form and click on "Submit" to save Return.
Garage Management System / Returns / Add Returns
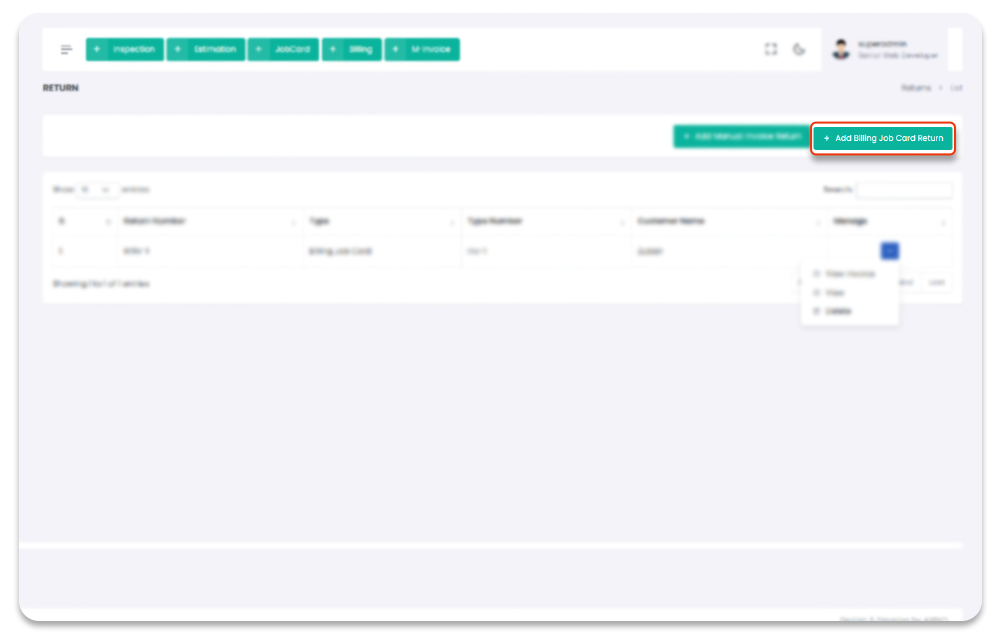
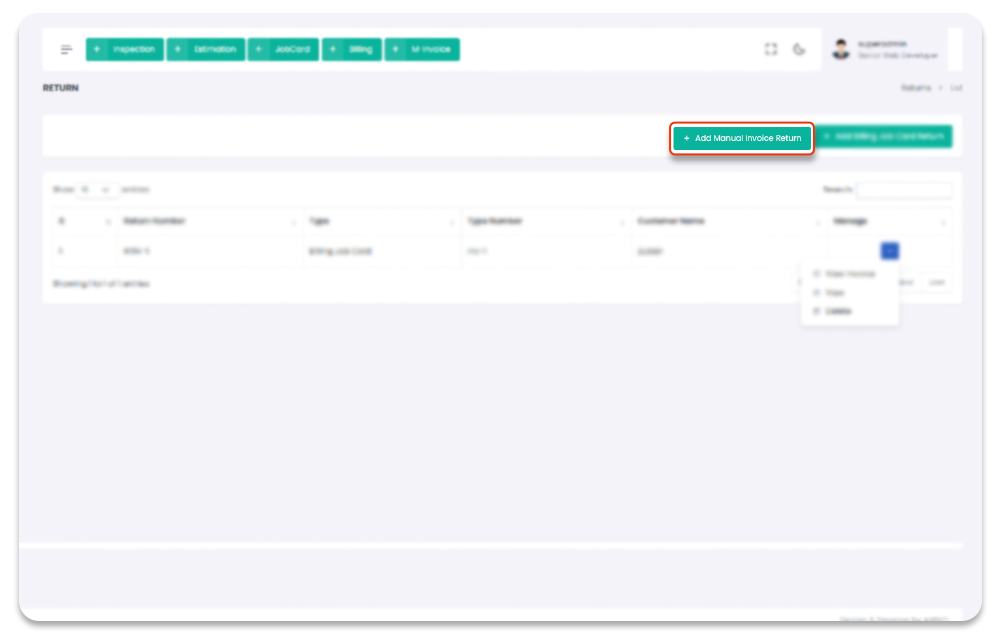
Delete Return
You can Delete Return once Return is created. To Navigate to Delete Return Page, follow the steps below:
1- Click on "Return" from Garage Management System sidebar.2- Click on Delete option from the Returns table column name Manage dropdown.
3- After click on Delete, Return will be deleted with notification.
Garage Management System / Return
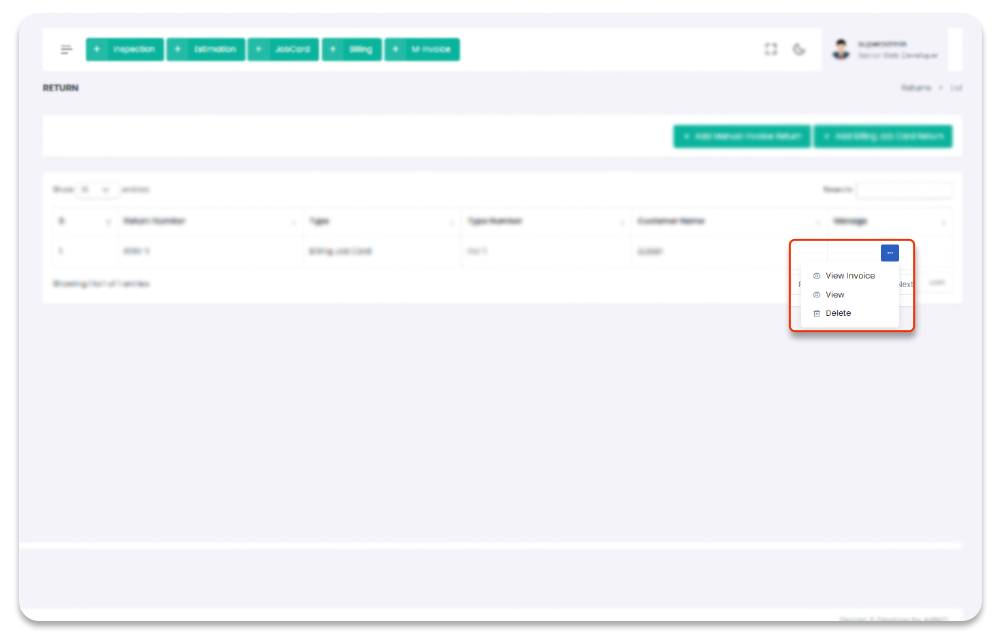
Users
All the users are manageable though Users Section. Before get start with users you have to create, Departments from Departments section, and user types from User types section. You can add, update, and delete users. All the added users will show in users page table with detail. To navigate and to users, follow the steps below.
1- Click on "Users" from Garage Management System sidebar.
2- You will redirect to the Users Page.
Garage Management System / Journal Entries
Add User
You can add User through Add User Page. To navigate to Add User Page, and to Add Users, follow the steps below:
1- Click on "Users" from Garage Management System sidebar.
2- Click on + Add Users option from the top right corner of the screen.
3- After click on + Add Users, you will redirect to the Add User page.
4- On Add Users page you have to enter users required details.
5- After Adding the user detail in the form and click on "Submit" to save user.
Garage Management System / Users / Add Users
Update User
You can update user once user is created. To Navigate to Update user Page, and to update follow the steps below:
1- Click on "User" from Garage Management System sidebar.
2- Click on Edit option from the Users table column name Manage
dropdown.
3- After click on Edit, you will redirect to the Update user page.
4- On Update user page you have to update the user information.
5- After updating the user information in the form and click on "Submit" to save new changes.
Garage Management System / Users / Update user
Delete User
You can Delete user once user is created. To Navigate to Delete user Page, follow the steps below:
1- Click on "User" from Garage Management System sidebar.2- Click on Delete option from the Users table column name Manage dropdown.
3- After click on Delete, user will be deleted with notification.
Garage Management System / User
User Types
All the user types are manageable though User Type Section. All the user types created will use in user section, and to give privilege You can add, update, and delete user Types. All the added user types will show in user types page table with detail. To navigate and to user types, follow the steps below.
1- Click on "Users" from Garage Management System sidebar.
2- Click on "User Types" from top menubar.
3- After click on "User Types" from top menubar, you will redirect to the User Type
page.
Garage Management System / User Types
Add User Type
You can add User type through Add User Type Page. To navigate to Add User Type Page, and to Add Users Type, follow the steps below:
1- Click on "Users" from Garage Management System sidebar.
2- Click on "Users Types" from top menubar.
3- Click on + Add Users Type button from the top right corner of the screen.
4- After click on + Add User Type, you will redirect to the Add User Type
page.
5- On Add Users Type page you have to enter the User Type (e.g: Admin, Super Admin,
Accountant, Cashier) in user type field.
6- After filling the User Type field you have to toggle on the buttons under the various
sections to give the permission to above added user type to access the sections in the
system.
7- Above added user type will only able to access the sections in the system you gave access.
These Added User Types will be used while you will create any user in Add Users
section.
Garage Management System / User Types / Add User Type
Update User Types
You can update user type once user type is created. To Navigate to Update user type Page, and to update follow the steps below:
1- Click on "User" from Garage Management System sidebar.
2- Click on "User Types" from top menubar.
3- Click on Edit option from the Users Type table column name Manage
dropdown.
4- After click on Edit, you will redirect to the Update user Type page.
5- On Update user Type page you have to update the user Type information.
6- After updating the user information and click on "Submit" to save new changes.
Garage Management System / User Types / Update user Types
Delete User Type
You can Delete user type once user type is created. To Delete user type, follow the steps below:
1- Click on "User" from Garage Management System sidebar.2- Click on "User Types" from top menubar.
3- Click on Delete option from the Users Type table column name Manage dropdown.
4- After click on Delete, user type will be deleted with notification.
Garage Management System / User Type
Settings
System's settings can be access and modify from Settings page. To Navigate to Settings Page, follow the steps below:
1- Click on "Settings" from Garage Management System sidebar.
Garage Management System / Settings
User ID Setting
You can access user ID format from User ID settings. You can Add user ID format according to your need, new created User will start from the entered format. Below are the options available in User ID Settings:
To Navigate to User ID Setting page, follow the steps below: 1- Click on "Settings" from Garage Management System sidebar.
2- Select "User ID Settings" from tabs options.
Garage Management System / Settings
Invoice Numbers
You can add invoice number according to your need. There are several modules are available where you can use custom invoice number functionality.
To Navigate to Invoice Numbers page, follow the steps below: 1- Click on "Settings" from Garage Management System sidebar.
2- Select "Invoice Numbers" from tabs options.
Garage Management System / Settings
Sales Credentials
You can add sales credentials according to your need. There are several Options available for modification in sales, that options are expained below:
To Navigate to Sales Credentials page, follow the steps below: 1- Click on "Settings" from Garage Management System sidebar.
2- Select "Sales Credentials" from tabs options.
Garage Management System / Settings
Default Accounts
You can Select Default Accounts according to your need in settings. There are several category modules available for where you can select default COA, these modules are mentioned below:
To Navigate to Default Accounts page, follow the steps below: 1- Click on "Settings" from Garage Management System sidebar.
2- Select "Default Accounts" from tabs options.
Garage Management System / Settings
Style Setting
You can modify system's colors through Style Setting according to your need in settings. There are several options available that allows you to modify system's colors, these options are mentioned below:
To Navigate to Style Setting page, follow the steps below: 1- Click on "Settings" from Garage Management System sidebar.
2- Select "Style Setting" from tabs options.
Garage Management System / Settings
Logos
You can modify system's logos through Logos according to your need in settings. There are several options available that allows you to modify system's logo, these options are mentioned below:
To Navigate to Logos page, follow the steps below: 1- Click on "Settings" from Garage Management System sidebar.
2- Select "Logos" from tabs options.
Garage Management System / Settings
Website Details
You can modify system's details through Webite details according to your need in settings. There are several options available that allows you to modify system's details, these options are mentioned below:
To Navigate to Website Details page, follow the steps below: 1- Click on "Settings" from Garage Management System sidebar.
2- Select "Website Details" from tabs options.
Garage Management System / Settings
Profile
You can modify system's profile through Profile according to your need in accounting settings. There are several options available that allows you to modify system's Profile, these options are mentioned below:
To Navigate to Profile page, follow the steps below: 1- Click on "Settings" from Garage Management System sidebar.
2- Select "Profile" from tabs options.
Garage Management System / Settings
FAQ
A FAQ is a list of frequently asked questions (FAQs) and answers on a particular topic.
Support
If this documentation doesn't answer your questions, So, Please send us Email via Item Support Page